This Minolta MC Lens Repair guide can also be used for many other short focal length MC series lenses such as the 55mm f1.7. Most short focal length Rokkors share a very similar construction and while there may be minor differences the essentials will be almost identical. For our guide on Minolta MD 50mm f1.7 / f2.0- Lens Repair Guide click here
This is NOT true of long focal length and zoom Rokkor lenses which will be very different in design and construction.
This Minolta MC Lens Repair guide covers the MCII series but MCI series will be identical.
This guide will NOT be appropriate for MC-X Series, MD Series or the earlier Auto Rokkor models which all employ very different construction.
Copyright 2021 High5Cameras,
Free to use, copy and distribute so long as no charge is made for use,
distribution or access and authorship and web address is freely acknowledged.
NOTES BEFORE YOU START
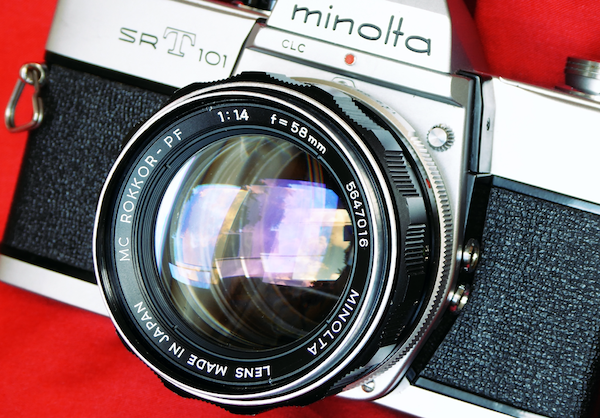
The Minolta Rokkor 58mm f1.4 is a relatively easy lens to work on. Please bear in mind that tis is a guide, you may well face challenges inside the lens that you will need to work out. These can include stripped screws, deformed parts etc.
Read through the entire guide before you start to make sure you understand the basics and are aware of hat you may need in the way of tools and are prepared for any possible problems that may arise.
When working on one side of the lens (eg the front) always be mindful about what’s happening at the other side (eg the back). I always keep caps on as much as possible to prevent any accidents. The classic mistake is for people to press on the lens while it is on a workbench and break things on the downside of the lens like the aperture lever.
There is no such thing as luck in repairing optical equipment, if you do it right, using skill and patience you will be rewarded with a perfectly operating lens. A rushed or bodged job will result in the lens being devalued, unpleasant to use and possibly unusable so…..take your time, get the right tools and materials, don’t take shortcuts or advise from people who know less than you.
There are no prizes for fastest or almost working in the world of lens repair so read the Minolta MC Lens Repair guide from end to end before starting to familiarise yourself with the process.

Start by putting a rear lens cap on while you work on the front part of the lens.
The quality of any repair is down to your skills, your tools, patience and most of all mindfulness.
Good servicing is taking your time, there are no prizes for the fastest lens strip down and rebuild.
| Phase 1 Minolta MC Lens Repair |

Remove the lens beauty ring. This can be done with a lens spanner but a rubber cup is a better solution. A lens spanner can easily mar the finish on the beauty ring.

With the beauty ring removed all of the essential screws and fittings for the front part of the lens are exposed.
| Phase 2 Minolta MC Lens Repair |

Start by removing the front optical element group. You will see there are two sets of lens spanner cut outs. You need only the outer pair.
Apply the lens spanner and gently but firmly turn the lens while keeping downward pressure on the spanner.

The front optical group after being unscrewed can be simply lifted out of the lens body.
Store this somewhere safely. I usually store lens groups in a Tupperware box lined with lint free cloth pending cleaning and reassembly.
You are advised not to disassemble this group but cleaning will be discussed later.

With the front optical group removed the aperture mechanism is now exposed…….

It’s safest at this point to open the aperture to its widest. This will minimise risk of damage to the very fragile aperture blades as you move forward in the disassembly.
| Phase 3 Minolta MC Lens Repair |

Using a JIS screwdriver remove the three screws that retain the filter ring…..

…and simply lift the filter ring away. Make sure the screws are stored safely and not mixed up with other screws. I normally allocate small dishes for the various screws and fastenings to avoid confusion later.
| Phase 4 Minolta MC Lens Repair |

You now need to remove the diaphragm assembly. This is retained by 4 screws around its edge.
One of them is highlighted in the picture….

Using a JIS screwdriver remove the four screws around the aperture mechanism…..

….and remove the diaphragm assembly carefully. The rear optical group is still attached to this so extract this with great care so that the rear optics are not damaged.

Here is the diaphragm assembly rear view after removal. You can see that the rear optical group is still attached. It is far easier usually to remove this group with the diaphragm removed.
Take great care of the diaphragm assembly, it is fragile and easily damaged by rough handling.
Take note of the fact that the assembly has a flat edge on one side. You will see why later.
| Phase 5 Minolta MC Lens Repair |

With care unscrew the rear optical group. Be careful here as the diaphragm assembly has a number of small parts at the rear and the pins and springs can be easily damaged. Remember to stay mindful, keep focused, and THINK before you act.

Store the optical groups somewhere safe while you move forward with disassembly.
Here are the two optical groups from this lens being stored in a small Tupperware box line with lint free cloth.
| Phase 6 Minolta MC Lens Repair |

Check the diaphragm assembly for correct function and see whether there is oil contamination. If the oil contamination is light I usually spray the diaphragm out with a Freon free cleaning solvent and then let it bath in Isoprop Alcohol for around an hour before leaving it to dry thoroughly at room temperature.

If the unit is heavily contaminated it will require stripping down completely.
Diaphragm strip down and rebuild is not usually required and this guide will not cover this aspect.
| Phase 7 Minolta MC Lens Repair |

Now it’s time strip the focus mechanism for cleaning and lubrication.
Set the lens focus to infinity.
It’s assumed that the lens focused correctly prior to stripping down but if not don’t worry it will be corrected later.

Start by removing the three screws around the edge of the focus barrel with a JIS screwdriver. These are on top of the brass coloured ring. Take care to extract each screw after removal and be careful – each of these screws has a tiny washer – DO NOT LOSE THEM.
Once removed, store them safely.

With all three screws removed the focus barrel will simply slip off from the lens body….this reveals the two focusing helicoils.
These go by different names but to keep life simple the guide will refer to the brass colored one as the outer helicoil and the silver colored (inside the brass one) one as the inner helicoil.

Measure the distances between the inner helicoil to the brass helicoil – normally on an MC lens the inner helicoil will be almost flush with the brass outer helicoil.
Measure also the gap between the brass helicoil and the lens base. Normally I use a collection of fine screwdrivers to assess distance. In this case a 1mm driver is being used and it is an exact fit. Make a note of these measurements.
| Phase 8 Minolta MC Lens Repair |

Now remove the lens mount assembly from the rear of the lens body. Start by removing just a single screw. If the screw is short then replace it. If it is long remove it.
DO NOT REMOVE THE SHORT SCREWS

Here is a picture to give you an idea of scale of the short and long screws.
These alternate around the lens mount plate. You only need to remove the 4 long screws for servicing of the lens. Removing the short screws will release parts of the lens that are difficult to reassemble and generally there is no need to remove these parts.

With the four screws removed, as before store them safely and then simply pull the lens mount assembly from the body of the lens.
Take care also at this point NOT to remove the aperture ring. I usually tape the aperture ring to the body prior to this step to make sure it does not come away with the lens mount due to stuck grease.
| Phase 9 Minolta MC Lens Repair |

Cup the rear of the lens in your hand, preferably inside a Tupperware box or clear bag and gently pull the aperture ring free. Inside the ring there is a tiny spring and ball bearing and these can easily fly out and be lost.

Sometimes the bearing will stay with the lens, sometimes it will fall into your hand. Sometimes it will simply vanish – take this step easy. If you don’t see the ball bearing examine your hands carefully. Its so small it may be stuck to your hand.
This is why I generally do this inside a large clean bucket or Tupperware box. It minimises the risk of a loss.

The previous picture and this one give an idea of size – the bearing is most normally around 1.2mm.
In the previous picture the bearing is sitting on top of a small spring. This bearing and spring provide the click stops.

Store the bearing somewhere safe.
Place some low tack tape over the hole with the small spring to prevent loss or remove the spring entirely.
A small needle, needle nosed tweezers or a cocktail stick can be used to extract it. Store this safely with the bearing. The spring is very tiny barely larger than the index numbers on the lens, take care when handling it as it is prone to flying off and getting lost.
| Phase 10 Minolta MC Lens Repair |

Remove the three screws from the helicoil key/lock tab.
Be careful here as these are sometimes lacquered in place. If they don’t turn out easily apply some heat or isoprop alcohol.
It’s very easy to strip the heads on these so take care.

Remove the helicoil key/lock tab.

Unscrew the helicoils from the lens body.
Its good practice to count the turns before the parts separate and mark the separation point on the two parts.
Its not necessary for the 58mm f1.4 MC but it is good practice – not all lenses are kind to technicians.
L-R in picture – lens body, outer helicoil, inner helicoil.
Note: The inner helicoil has screw holes in its top part – this faces the front of the lens when assembled.
This completes the strip down of the lens.
We now have to consider cleaning the components and reassembly.
MECHANICAL AND BARREL PARTS – NOT INCLUDING DIAPHRAGM MECHANISM
For cleaning you will need a soft toothbrush, cotton wool balls and Isopropyl Alcohol (IPA) and a lot of patience. I generally clean down with hot soapy water first and then soak the helicoils in IPA for a few hours before wiping down with cotton wool. The threads on the helicoils are extremely fine and the smallest piece of grit or dried grease will cause problems later on. Usually these are chased out with a fine needle before cleaning again.
My own view on cleaning is to get the parts absolutely spotless prior to reassembly to give the lens the longest life before any further servicing is needed.
Normally when I rebuild a lens I will strip and clean EVERYTHING. The lens mount assembly can be flushed with IPA, all of the barrel components such as the aperture control ring, filter ring and focus barrel will be thoroughly cleaned. Index marks with their numbers can be scrubbed with a soft toothbrush to remove dirt and grime.
OPTICS CLEANING
The Minolta MC series can show haze caused by oil vapour on the lens group inner surfaces. These are the optical surfaces that face inside the lens in each of the two optical groups. These can be cleaned with a mild IPA solution and a micro fibre or lint free soft cloth. You need to exercise extreme care here and do not apply pressure to the glass. Apply a dilute IPA solution to the cloth just so the cloth is damp and then apply lightly. Use a puffer brush to blow off any moisture and then use a clean cloth to polish out any evaporation marks.
CAUTION
You are advised NOT to remove the lenses from within each group. Minolta used a very soft coating formula in almost all of the MC series lenses and this can be damaged by even very mild cleaning and careful handling.
I normally clean the optics just prior to their reassembly into the lens and make sure the lens interior is blown clean with a puffer bulb. You will always find some dust is present on reassembly – do not worry – they were no different when they came from the factory.

After cleaning the helicoils should be lightly greased using a suitable lubricant. I prefer Helimax XP for most Minolta lenses. This is applied thinly using a fine sable brush. On a Minolta MC series the lens is semi self lubricating thanks to the material used in construction of brass to aluminium so the lubricant needs to be quite thin and very evenly spread.
Notes on lubrication – The first time you so this you will need to work by trial and error to get the right feel.
Too much lubricant will result in the focus being stiff, too little and it will grind or be too light. You can test the ‘feel’ while the helicoils are assembled but it will be hard to assess without practice as to what the lens will feel like with its focus barrel mounted.
| Phase 11 Minolta MC Lens Repair |

On reassembly the object is to get the helicoils spacing for focus the same as you measured at the end of PHASE 7 and with the lock tab recess aligned to the threaded holes for the lock tab. You don’t have to be super precise but its best to get it as close as possible. You may need to unscrew the helicoils a few times and try at different entry points to the threads to achieve this.

Replace the focus lock tab. Take care not to overtighten the screws.
After replacing check that the helicoils will rotate correctly. The lock tab, if not centred can cause the focus to jam or be stiff. I normally apply a very thin smear of Helimax XP to the sides of the recess.
| Phase 12 Minolta MC Lens Repair |

Do a trial run of fitting the aperture ring to the rear of the lens. Some MCs will be fussy about what position the ring needs to go back on (eg will only easily fit at the f5.6 position) Do a dry run if needs be BEFORE replacing the small ball bearing.
The trick to get the bearing back into position is to replace the spring and then apply a small dab of lubricant/grease to the top of the spring. Apply the bearing to the grease to hold it in place.
I normally position the bearing by using a cocktail stick with a small dab of grease on its end to retain the bearing….

…keep the lens body in position while you keep an eye on the bearing and the apply the aperture ring at a slight angle to trap the bearing in place and then ease the aperture ring down over the rest of the lens body.
This is why you do a dry run earlier at the start of Phase 12 to make sure the ring will fit easily as some MC lenses will be awkward to fit the aperture ring at some positions.

While making sure the aperture ring does not slip off apply the lens mount to the rear of the lens body making sure the aperture actuation lever is at the base of the lens and on the opposite side of the lens to the aperture index mark.
You can see in the picture the aperture index mark is on the opposite side to the aperture actuation lever.

Replace the four long screws into the lens mount ring. Do not overtighten these for now.
This is in case anything is wrong and requires a quick strip later. Just tight enough is good enough for now.
| Phase 13 Minolta MC Lens Repair |

In order to replace the diaphragm mechanism you need to be aware of some elements of assembly.
Th diaphragm barrel has a flat side as shown in the picture. This has to locate against the lens body where the focus lock tab sits…..

….here is the focus lock tab and the flat part of the diaphragm barrel needs to be aligned with this PLUS…..

The diaphragm actuating lever shown needs to locate into the aperture control ring slot on the lens body……

….The aperture control locating slot is shown here. This is where the Diaphragm body lever needs to mate to.
It seems tricky but in fact its quite easy. Here’s how to do it…

First set the aperture control ring to f2…..and by using the diaphragm barrel lever at its rear open the diaphragm to its widest aperture.
Place the diaphragm barrel into the lens making sure the flat side is aligned with the focus lock tab.
Look through the rear of the lens body – this is why you leave the rear lens element out during reassembly until this step…..

..and maneuverer the diaphragm and the aperture ring until the diaphragm lever is located into the aperture control ring slot.
This seems hard at first but you will see it is actually quite easy in practice.
Once diaphragm is installed hold it gently in place and rotate it slightly so that the screw holes align.

Cap the rear of the lens to protect the aperture lever and replace the screws that retain the diaphragm barrel to the lens body. Do not overtighten as these can shear off under too much torque.
Once secured check that the diaphragm is behaving normally by selecting f16 and operating the aperture actuating lever. The aperture should stop down and reopen quite normally. Check also operation at f1.4
| Phase 14 Minolta MC Lens Repair |

Replace the rear optical group…..
I would normally clean the group before reinsertion and blow the inner surface clean.

….and secure the group with a lens spanner.

Replace the front optical group…..
These would be cleaned at this point and the inner surface blown clean with a Rocket Blower.
Prior to securing the front lens it’s a good idea to run a quick torch test before the lens is fully secured down. This may catch any pieces of dust or lint prior to final assembly.

| …and secure with a lens spanner. |
| Phase 15 Minolta MC Lens Repair |

Attach the lens to a known good camera look through the viewfinder and use the brass inner helicoil to bring the lens to infinity focus.
I normally aim at a pair of radio towers around 8 miles away and use a camera with a split field focus.

Once you are happy that the lens is focusing correctly set the lens at infinity and then very carefully replace the focus barrel making sure the barrel indicates infinity against its index mark. Replace the focus barrel retainer screws with their washers and lightly tighten. Recheck focus and once happy tighten down – do not over-tighten as these screws will shear easily.

Replace the filter ring.

Replace the beauty ring. Take care to ensure this is correctly threaded before tightening down with a rubber cup or lens spanner.

Check lens for all functions and do a final tighten on the mount ring if you left this loosely dogged down at the end of Phase 12
Fully check lens focuses correctly and that all f stops are working correctly.


Mel is one of the driving forces behind High 5 Cameras and writes all our articles.
Starting serious photography back in 1972. Over the years she got to shoot film with most of the major brands in 35mm and large format as both a studio photographer and content provider for websites in the early life of the web. These days she is rediscovering photography and has become the GOTO person for knowledge on camera repair advice.
Thanks I bought the pdf and used it to repair a lens with stiff focus.After a couple of scares (I lost the spring and found it on the floor!) I managed to get it back in working order.
What do you recommend for a “Freon Free Cleaning Solvent?”
I assume you are talking about oiled up aperture mechanisms. Usually these days I use Ambersil contact cleaner FG. Its pressurised so will generally get all of the muck out. After use soak the diaphragm mechanism in Isoprop and allow to air dry – it can take a fair few hours to air dry but I find thats best. For myself I’d I’d only do the contact cleaner route if the contamination is light. For a very bad one I’d do a diaphragm strip down. With that said I try to balance best practice (stripping the diaphragm down) against practical advice for beginners. Many beginners to repair would struggle with a diaphragm rebuild so although a rebuild is the ‘pro’ way to do it I feel its safer for a beginner and non-pro to use a pressurised degreaser so long as it has fast evaporation and leaves no residue (definitely NOT WD-40). Doing it that way may leave the cleaning at sub optimal but thats better than someone having a lens destroyed because they found a diaphragm rebuild was beyond their ability.
Practical experience of actually doing the spray and Isoprop and THEN doing a strip down showed me there was very little difference in effectiveness.
Obviously for either approach the diaphragm has to be removed from the lens housing and away from the optical elements.