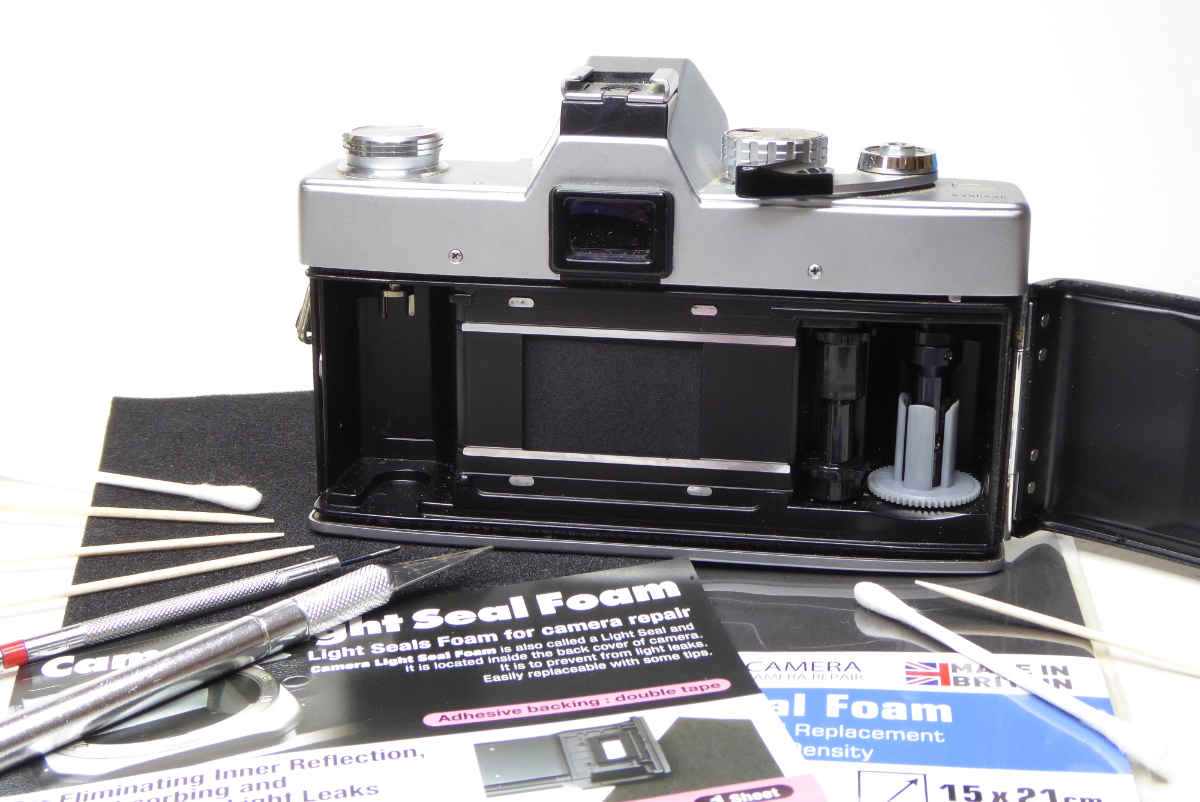
Light seal overview
Really? You’re going to do light seals as a subject? Sheesh! This gets asked every week on camera forums. Yep! It does and rather than repeat myself, I wrote this guide to replacing light seals to help beginners out. This saves my fingers and the resulting RSI after typing the same answer out a few times a week.
Like most things on camera forums, there’s a lot of bad advice. So let’s deal with some of that right at the start…
“Why do I need to replace the seals anyway?”
Well the door seals and mirror bumpers in many cameras made from the 1960s onwards were made of foam. Over time the foam decays into dust or sometimes a tar like substance. As the foam degrades it basically turns back into its basic original chemistry which is usually some form of oil. The glue/tar like substance is the foam decaying back to dead dinosaur guts. These cameras are now usually at least 40 years old so way beyond their expected operating life. It’s really not surprising some stuff like foam materials and lubricants are starting to show issues.
“I didn’t bother replacing the light seals and the camera works ok”
Well pardon me but I prefer to believe that the manufacturer had their reasons for putting it in there. No manufacturer fits things that aren’t needed. If they thought they could save a few pennies on manufacturing with no downside they’d do it. If they are there they are there for a reason. In some cases the seals act to cut down dust and dirt.
Second answer to that one – if the old seals are decaying (and most are) then they will slowly scatter dust as well as nasty acidic tar like droplets all over the cameras insides including your film. The focus screen, mirror and shutter curtains all need to be clean. Precision parts don’t generally like being coated in fragments of foam or tar so your camera may be working. But for how long? Some nasty bits of semi congealed tar in the shutter curtains will cause problems soon enough.
“Don’t bother buying light seals, I just use a yarn and glue / a cut up mouse mat / some junk I found in the shed”
You are Scrooge McDuck and I claim my £5 prize! Seriously – you are going to invest in spending £10 a roll on film? Get it processed? Are too tight to spend time and money to make sure the camera works and gets good shots. If you love film you should be loving the equipment that allows you to shoot it. With no more film cameras being made, you might just want to rethink this. Start to see yourself as a conservator of the past rather than a consumer. It’s not like Nikon or Pentax are going to bring out a new one next week!
Some cameras did indeed use yarn/glue as a seal. If thats what your camera has thats what you should replace it with the same. Most Japanese cameras used foam.
So use the right materials. Bodges have consequences, meaning excess strain being placed on the door hinge, latches or channels which will CAUSE light leaks or cause other problems.
“Just buy a pre-cut set on eBay – they are easy to fit – no need to research a guide to replacing light seals”
No they aren’t, very often these pre-cut sets are very poor quality foam that will decay very quickly.
I had a Pentax KX set off eBay when I should have known better. Paradoxically pre-cut door seals turn out to be harder to fit. Plus the foam decayed into goop inside a few months. On top of that some of these sets are simply not right with the wrong density of foam. The correct foam is open cell type foam.
However, some of these kits use semi-open or closed-cell foam probably because it’s easier to cut. They often miss expensive felt or take an easy route for cutting rather than doing it right missing small details. Many of these people have no love in them for classic cameras. They just want to bang stuff out quick for your cash. If you are serious buy the right materials and do it right. With the right materials, you will be doing the job once in your lifetime. It’s worth spending a bit more and doing the job properly……
So what’s the right way? Read on for a general guide to replacing light seals. PLUS some specific guides for commonly found cameras. Some of them have their own special needs for light seal and mirror bumper fitting.
Guide to Replacing Light Seals
You will need the following tools and parts to replace light seals
Checking your seals
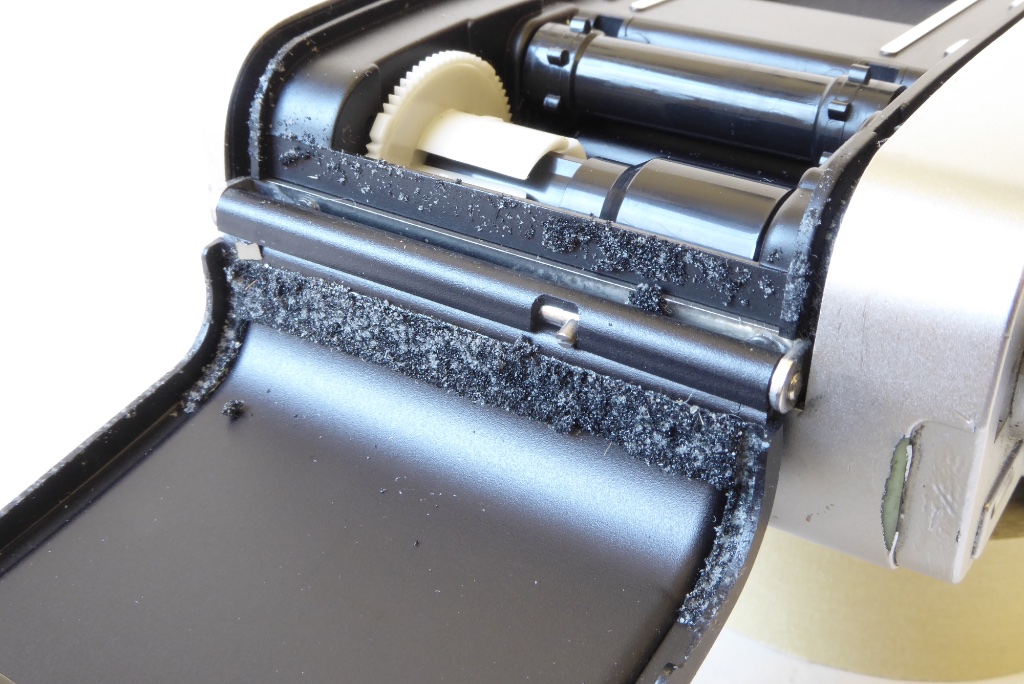
How do you know if the light seals need changing at all ? Well you can generally tell by look and feel. The foam should be dark and dry to the touch. If it feels sticky or shows signs of crumbling when you touch it then it needs to be changed. Run your fingers around the door edges where it fits into the slots – they should be smooth. If they feel rough that’s decaying light seal glue – we’ll be dealing with that later.
Here’s a pic of a Minolta. You can see the seal on the hinge side of the door is crumbling. It’s sticking to the camera body side of the hinge – these need to be gone now and replaced. It may look harmless but crumbled up bits of light seal can cause major headaches. As well as shutter rails can be clogged. If any gets trapped into the shutter curtains you could be facing a repair bill.
Getting started
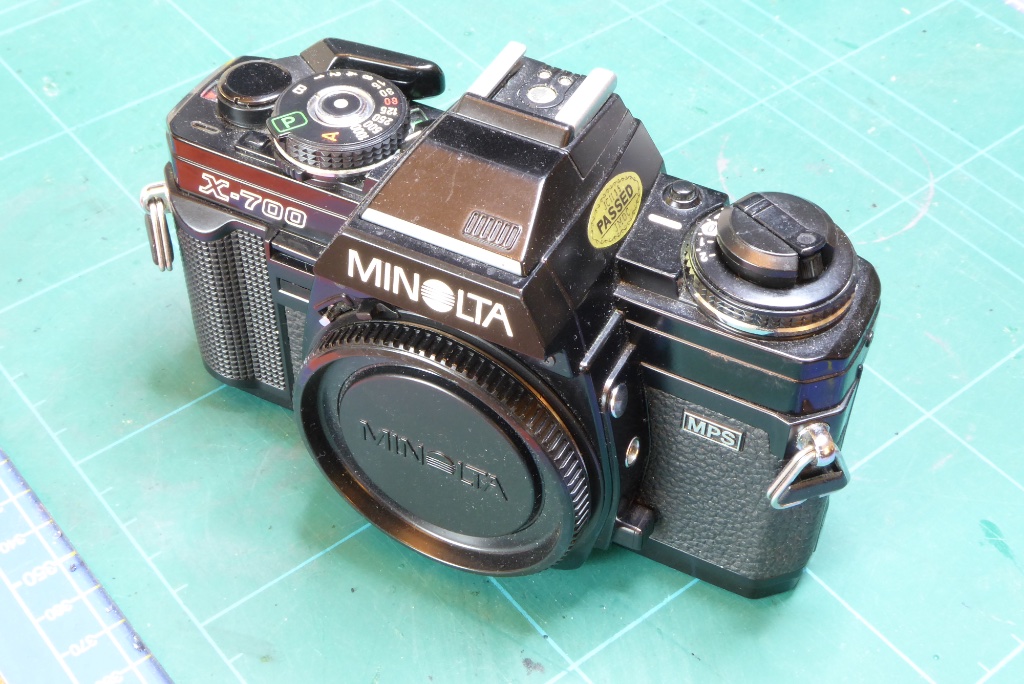
For this guide to replacing light seals, I will be using a Minolta X-700 with rotten seals. Almost all 35mm SLRs use a similar approach. At the end of the guide I will show some specific models. If in doubt replace like with like, you won’t go far wrong.
As with any camera repair patience and practice is always a good thing. Don’t rush this as a job and allow plenty of time.
This X-700 had badly degraded seals throughout.
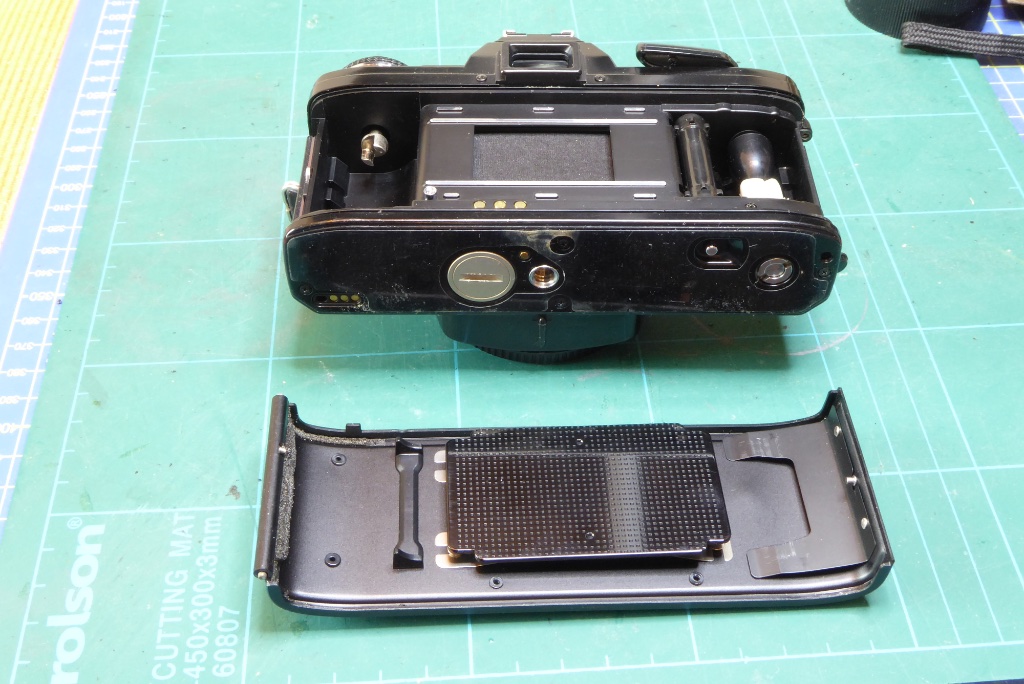
For the Minolta X-700 and many cameras you can easily detach the door. If that’s possible it makes the job a tiny bit easier. If not it can be a bit more awkward. With the door detached exercise EXTREME CARE. Mind where you put your fingers and think about what you are doing at all times. You don’t want your fingers on the mirror or shutter curtains.
Here the lens is off and the camera has its body cap applied. This will keep it safe while it gets worked on.
Here I am feeling the edge of the door where the door fits into the body slots of the camera. You may see it but if this feels rough then that’s a sure sign the slot seals are gone. That roughness is decaying foam, as it decays it turns into a tar like substance that often hardens over time. We’ll deal with that later.
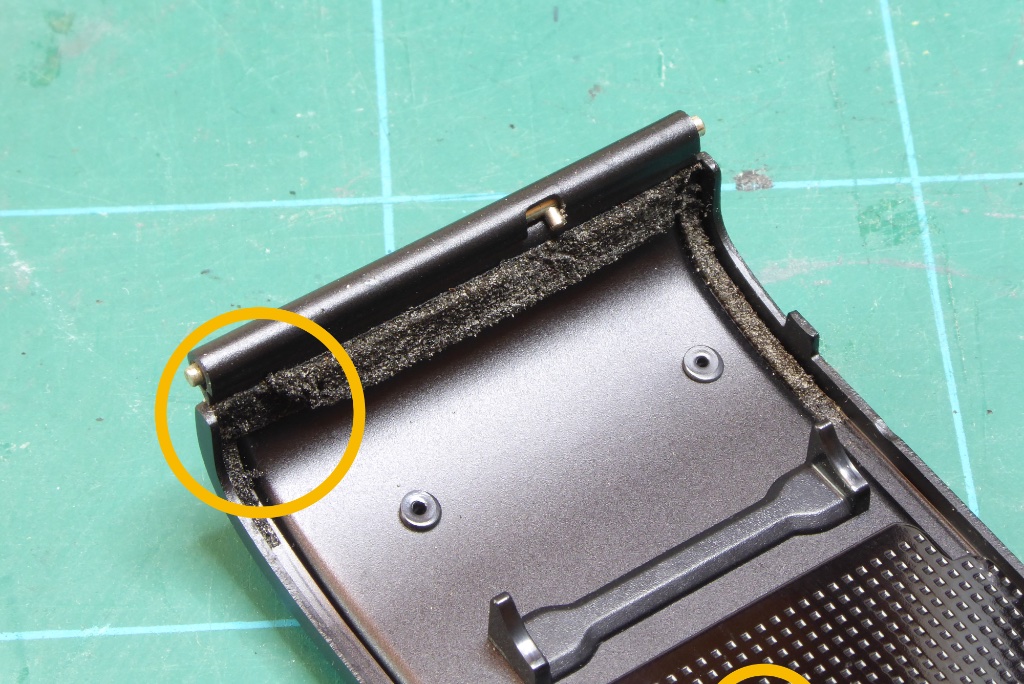
And here’s a visual giveaway – a chunk of the foam is missing on the door side of the hinge. Note also the foam has grey dust on it. That’s the foam getting sticky and attracting dust particles as a result. This stuff can easily get on your film and result in spots and other defects in the processed negatives.
Masking Up
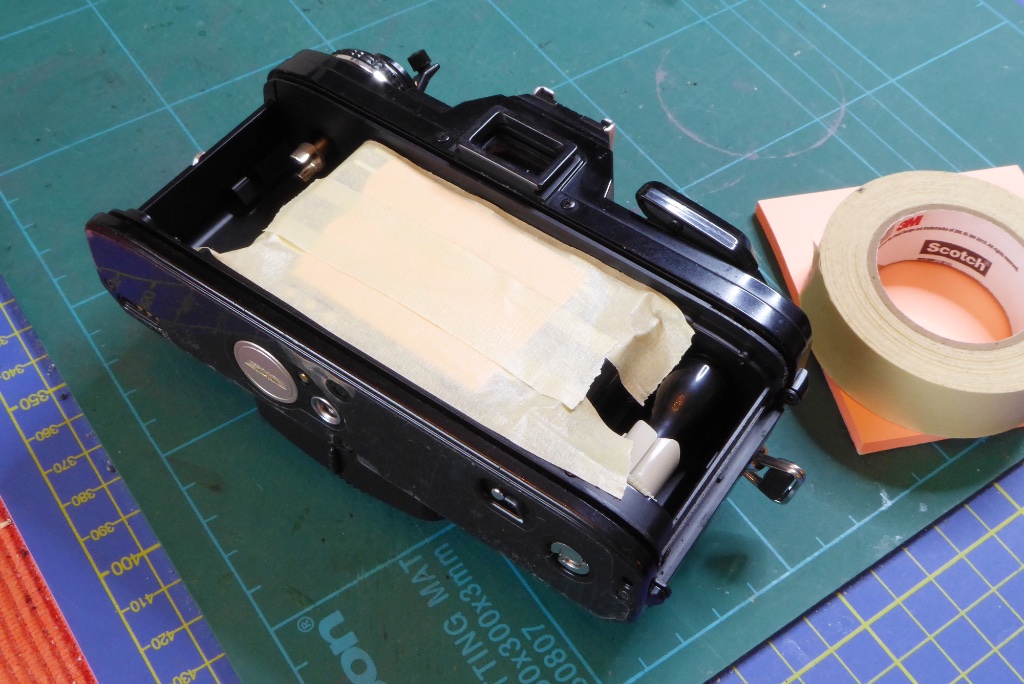
First job to do when replacing light seals is to protect the camera’s working parts. I normally apply a piece of card over the shutter opening and seal it down with some low tack tape. Masking tape is good as it’s waterproof and not too sticky. Don’t allow the sticky tape to get onto the shutter – that’s what the card is for.
Some camera body work can be adversely affected by Isopropyl Alcohol. Do a small test on that and if it is unlikely to have bad effects. If it does mask the camera body work off as well. I have only ever seen a single camera finish react badly (Chinon CE-5) but care is always good.
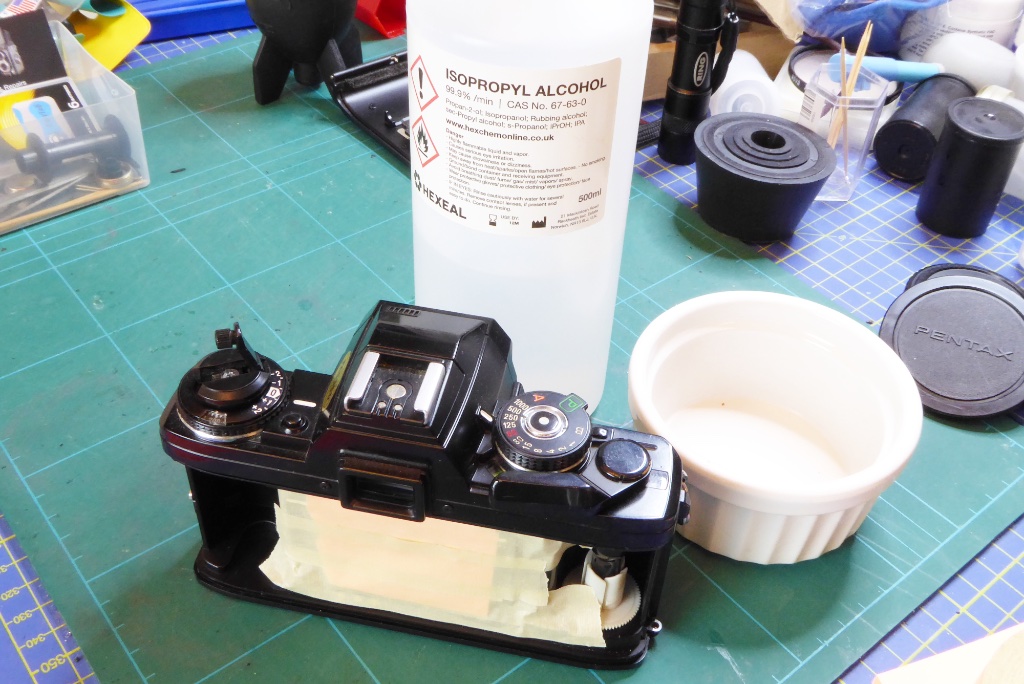
No guide to replacing light seals would be complete without cleaning products so here we go. I use a small dish to put some Isopropyl Alcohol (IPA) into.
You don’t need a lot.
When working with IPA make sure the area is well ventilated and avoid any ignition sources as its flammable.
Removing Old Light seals
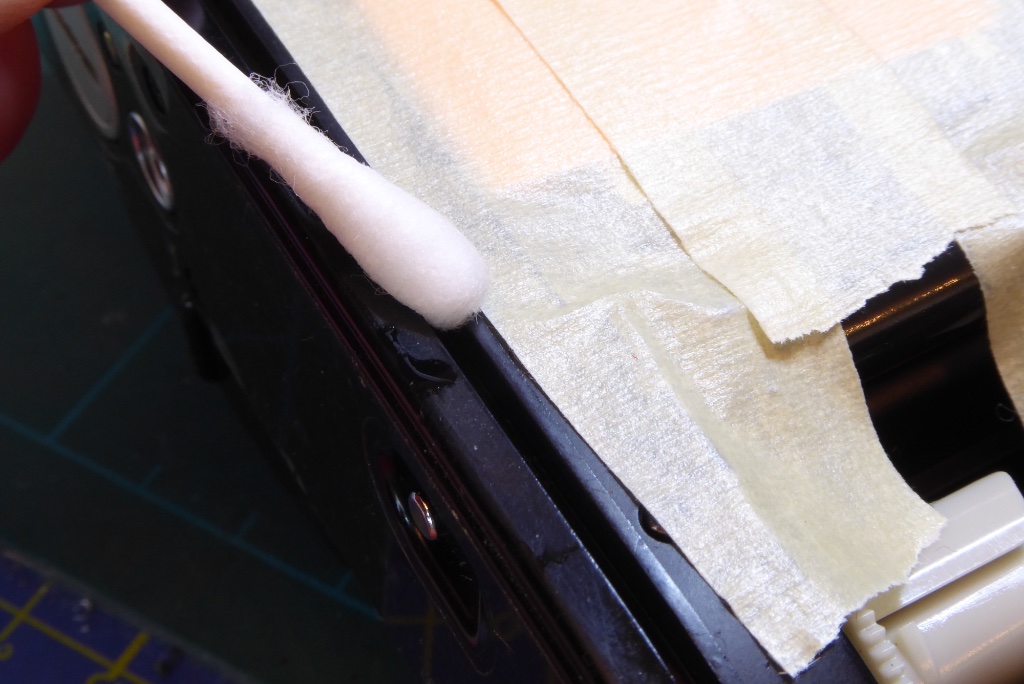
Using a cotton bud or a small ball of cotton wool apply some IPA to the slots. DON’T flood the camera you just want to dampen the foam with IPA. Be very careful around the top slot (nearest the top of the camera) as the seals there can lead directly inside the camera. You don’t want excess liquid washing around near the viewfinder or the frame counter reset lever.
Once seals are damped down with IPA leave alone for 15 minutes – let the IPA get to work.
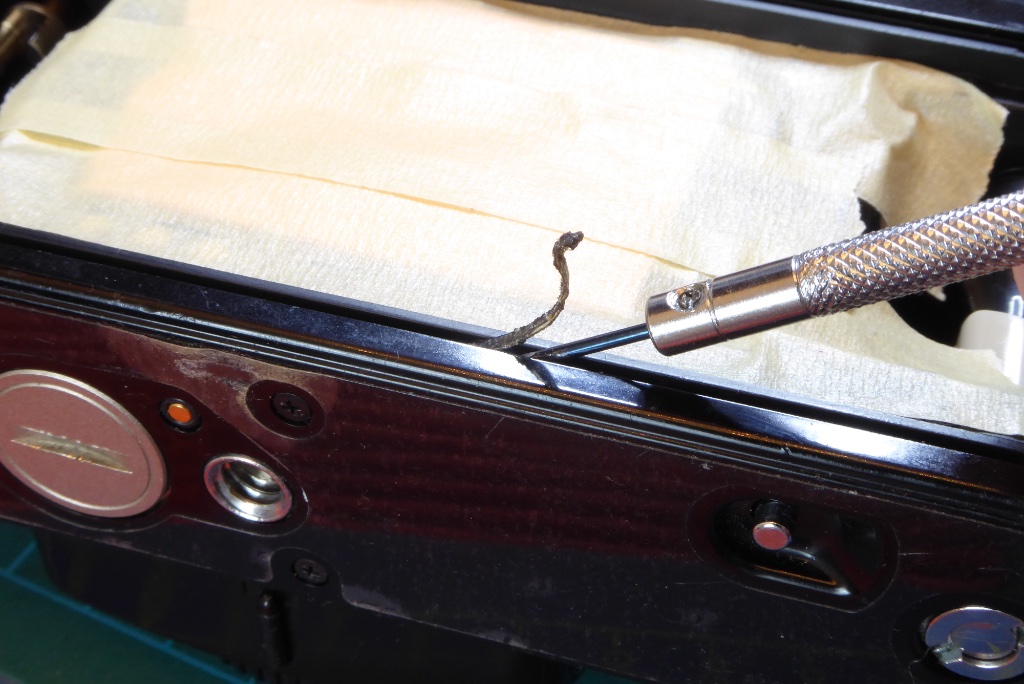
After around 15 minutes the IPA will have dissolved the glue holding the seals in. On many Minoltas the seals will stay with their backing tape. Using a small thin screwdriver its possible to get under the backing tape and bring the seal out in one piece. Other cameras wont be so kind and the seals will turn into a kind of sludge or worse dust.
The best tool to use is a bamboo skewer or cocktail stick especially if the camera body is metal and paint can be damaged easily. On the Minolta X-700 being plastic a thin jewellers metal screwdriver, if used very carefully – will work well and the Minolta seals can usually be relied on to stay in one piece.
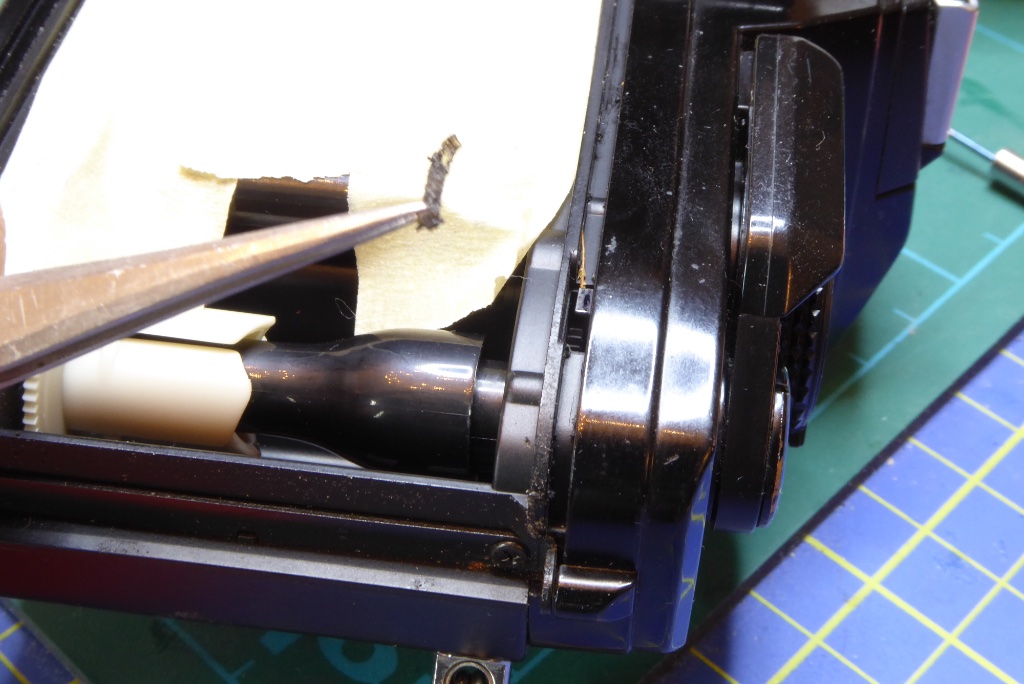
Here you can see the small piece of light seal from the hinge to the frame counter reset button being pulled out pretty much in one piece.
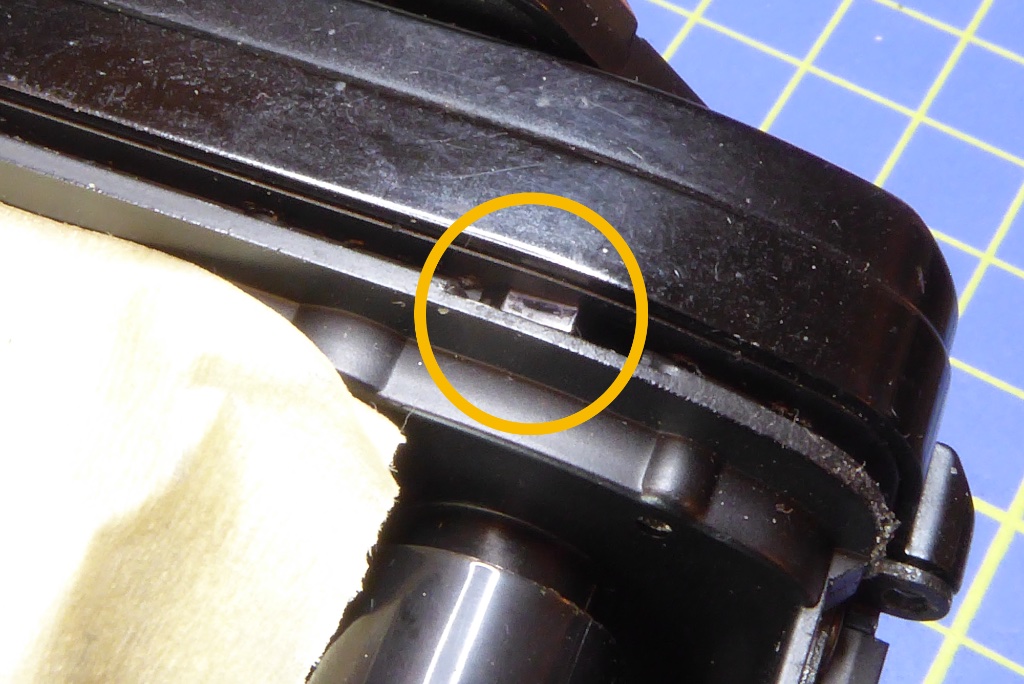
Heres the frame counter reset lever. The light light seal goes either side of this.
You need to be careful extracting old foam here as otherwise it can drop inside the camera and gum stuff up. Be careful using IPA round this as well as you don’t want liquid inside the camera.
Getting ready to clean
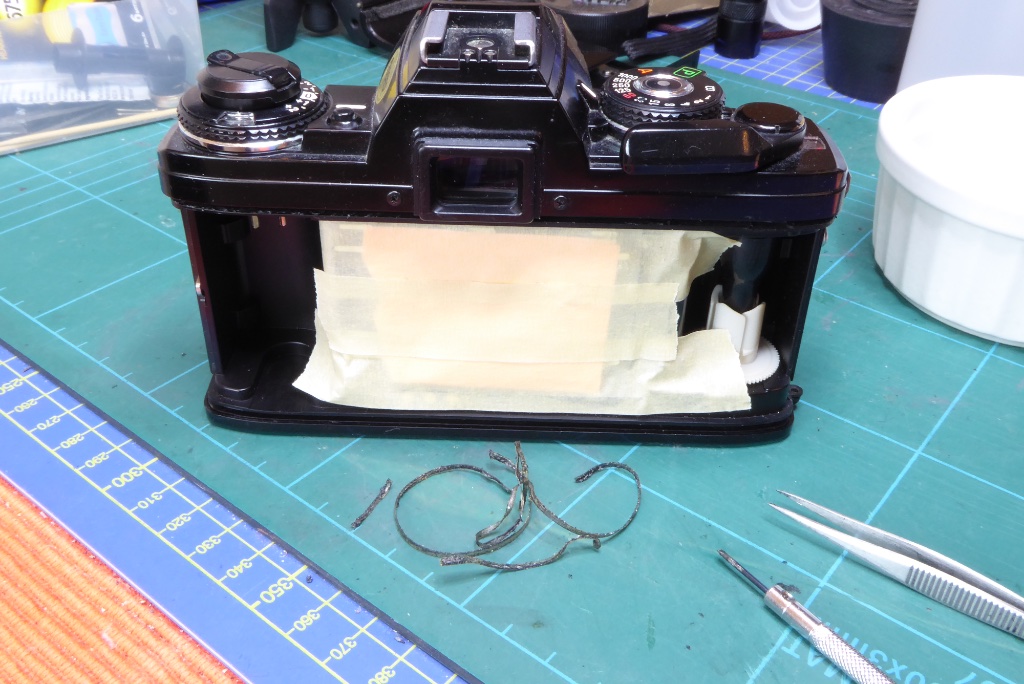
After an initial scrape the light seals on this one have come out almost in one piece though they have scattered crumbly stuff all over the camera rear. This is the reason the shutter is protected.
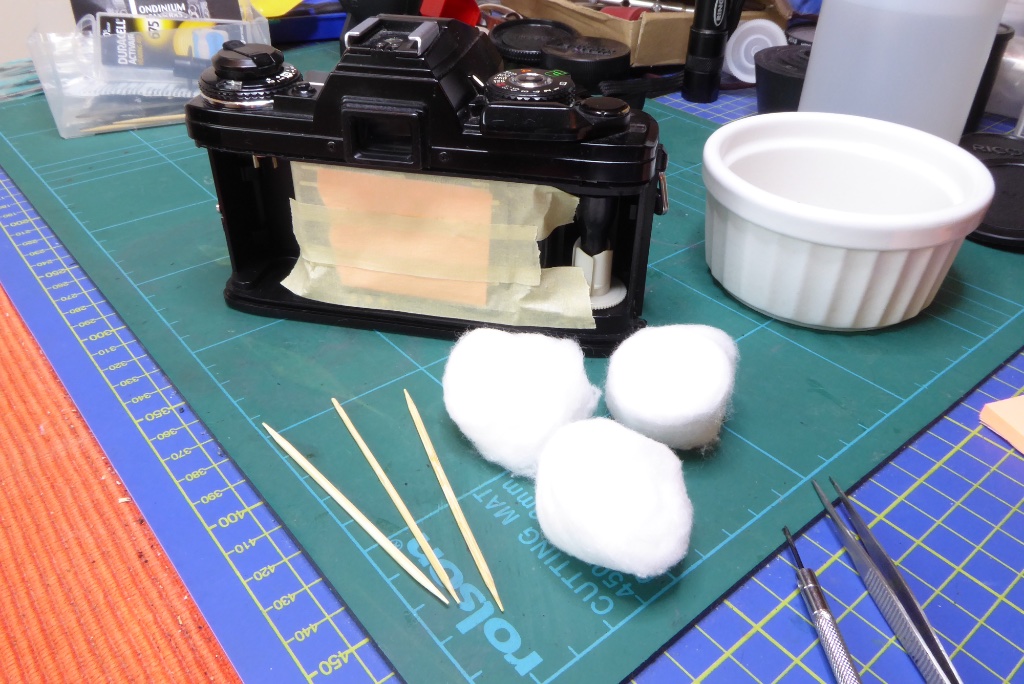
Now it’s time to do some cleaning of the slots and hinge areas. The seals, as they decay, will have left some drek and gunge behind in the slots. For this part of the task I will be using some cotton wool balls and cocktail sticks with some more IPA.
Cleaning body seal residue
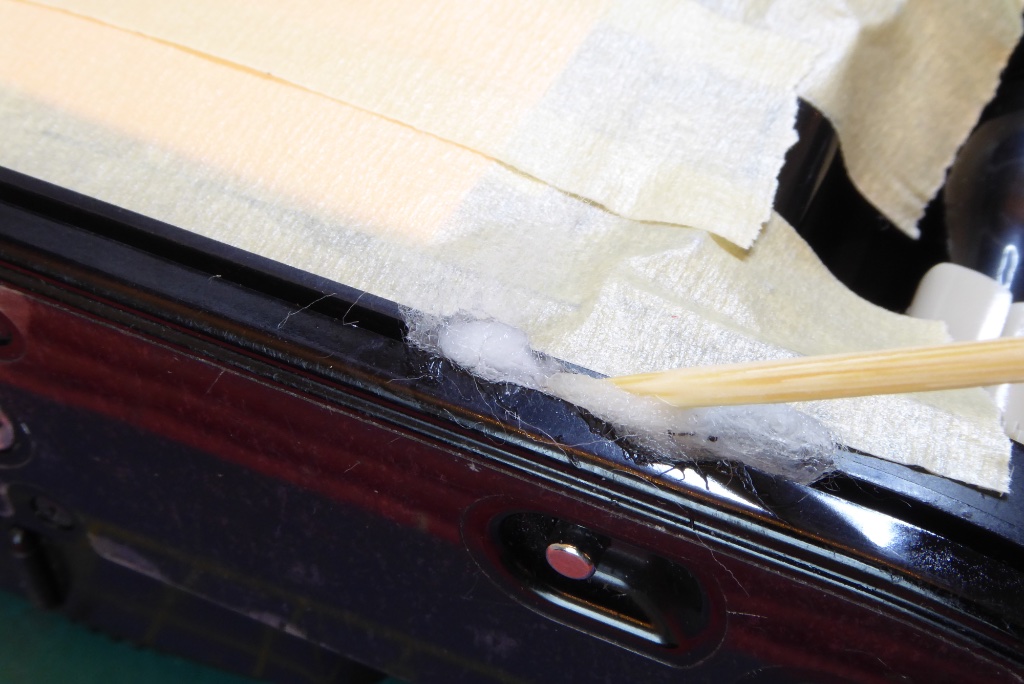
My approach is to take a small piece of cotton wool, soak it in IPA and then run it along the slots using a cocktail stick. It will require a few goes to do this. While you don’t have to be obsessive it’s best to get as much of the gunk and sludge out as is possible. You don’t want the new seals being contaminated with the old decaying stuff. This can take quite a bit of time depending on the camera and the light seal condition. Minoltas are generally kind while Pentax light seals can often be horrific. Either way patience and some IPA WILL get the slots clean.
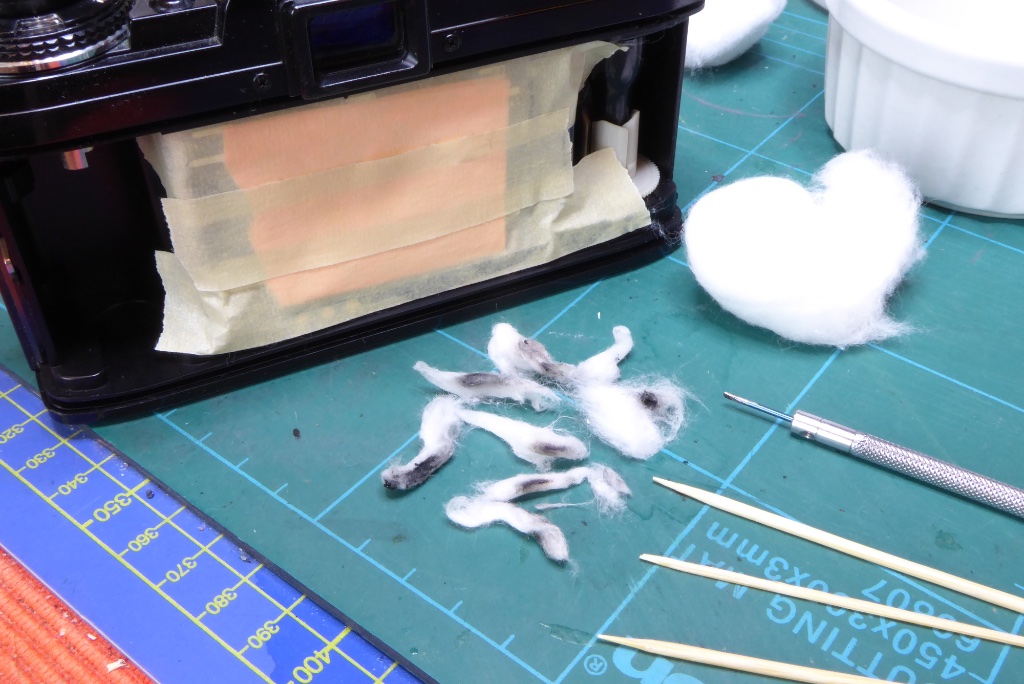
Here you can see to get the bottom slot clean it needed about 7-10 applications of a soaked cotton wool ball being pushed through the slot. When doing this on the top slot be careful around the viewfinder – some cameras have an open area here were liquid can leak inside to the prism/viewfinder and also take care around the film counter reset lever.
Once the camera slots are clean, clean up the hinge area on the camera body. Some cameras will have foam attached to the body or in some cases decaying foam on the door will have created contamination on the camera body and left a sticky residue.
Cleaning door seal residue
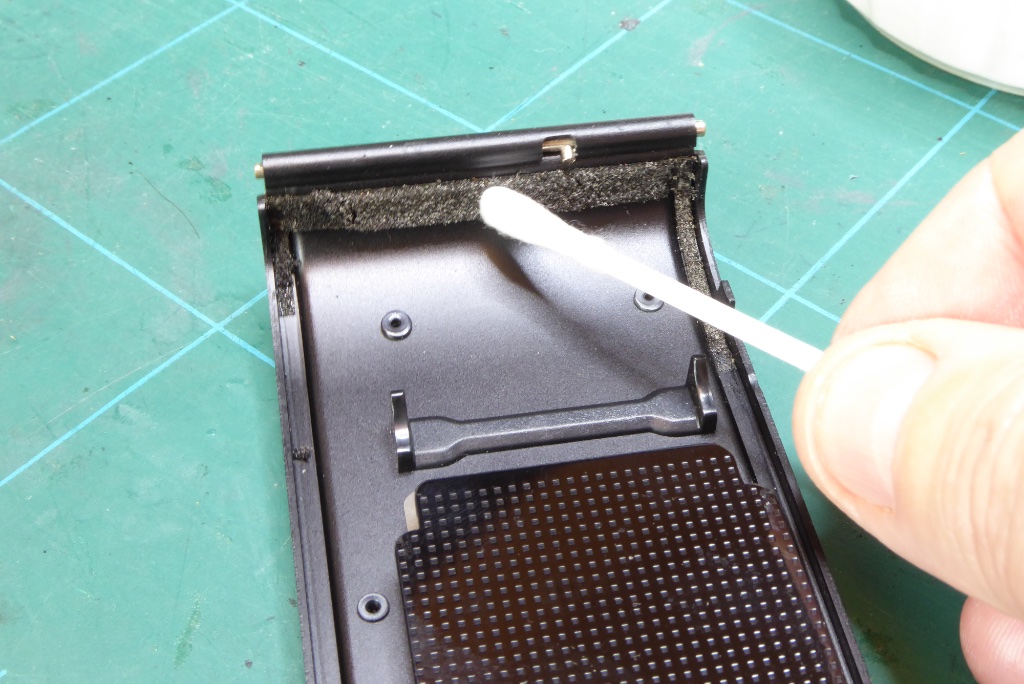
With the camera body clean it’s time to work on the door. As with the camera body slots apply some IPA using a cotton bud and then give it 15 minutes to get working on the adhesive.
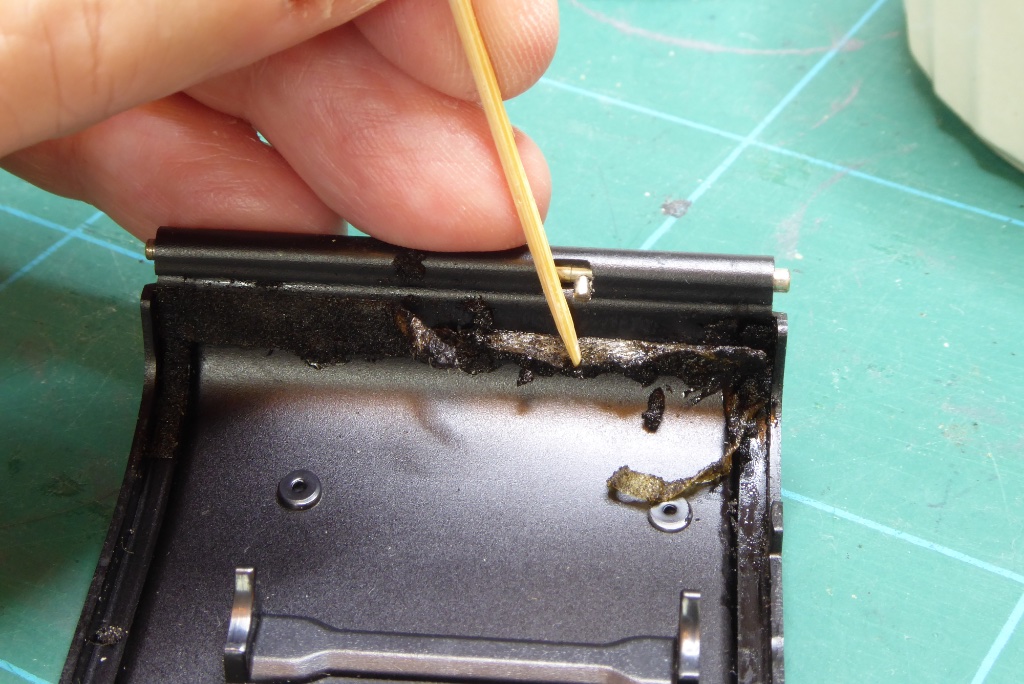
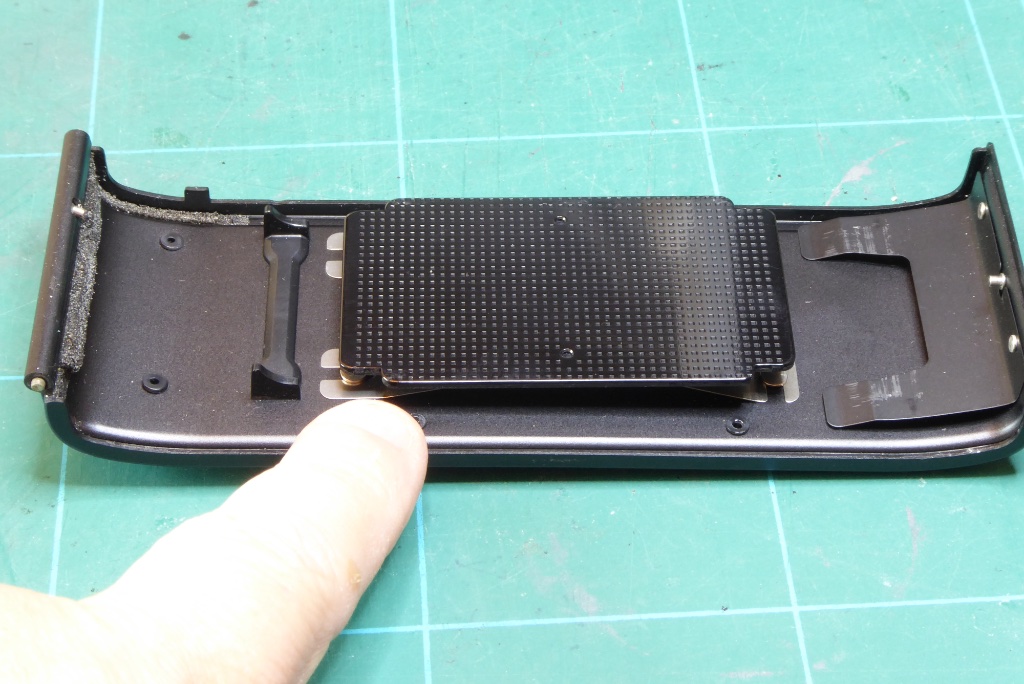
After around 15 minutes it should be easy to remove any decaying foam seals on the door. Here you can see one of the door slot seals has simply detached while the hinge seal can be picked at with a cocktail stick to remove it. While a small screwdriver will work well on a plastic bodies camera like the X-700 its best on painted metal surfaces like doors to use only wood or plastic tools.
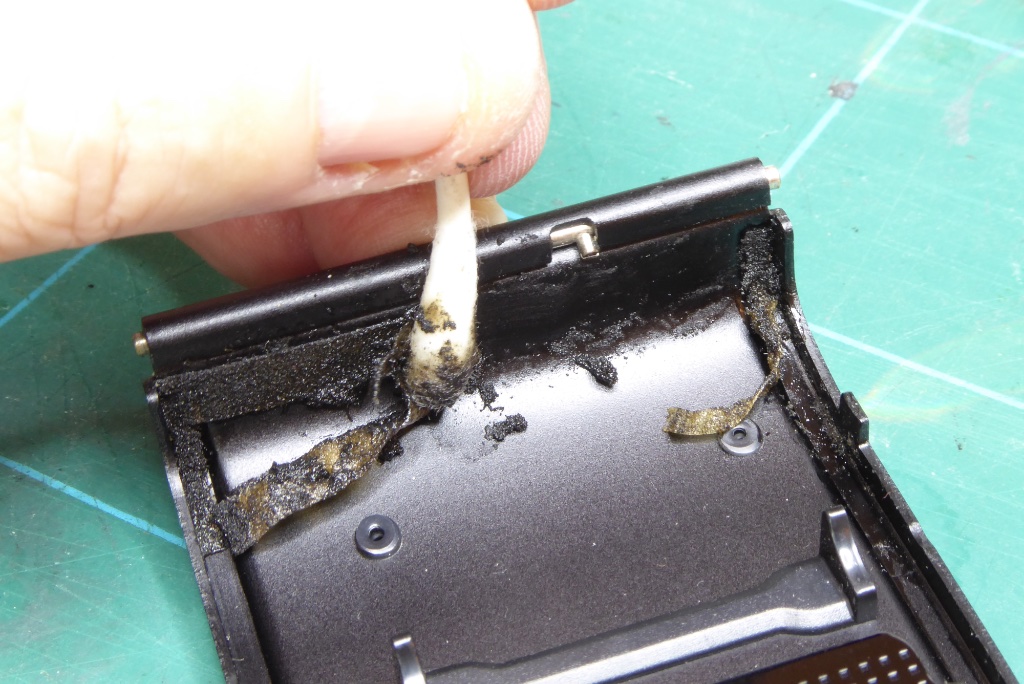
Here’s the main hinge seal being cleaned away by using a cotton bud soaked in IPA.
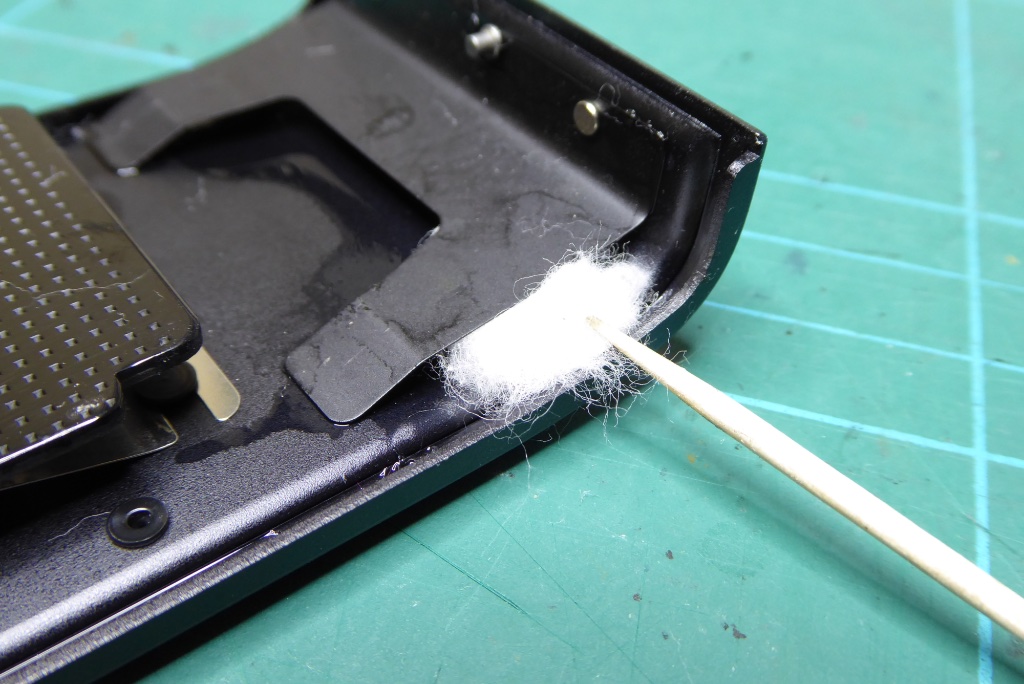
Here’s the seal on the X Series Minolta everyone forgets. The latch end of the door has a sprung metal plate, beneath the plate is yet another light seal and these ones crumble badly. To clean these out use a cocktail stick to scrape away under the spring and then use some cotton wool soaked in Isoprop and pushed underneath the spring with a cocktail stick to clean out the residue.
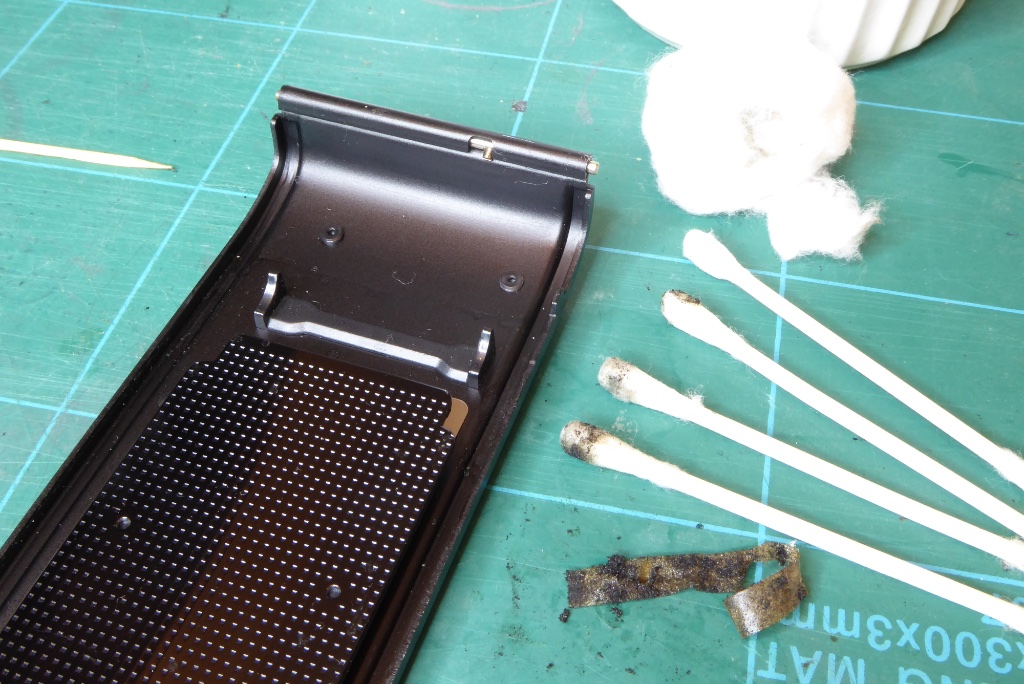
Use some cotton wool soaked in IPA to clean up any remaining residue along the hinge area of the door and don’t forget to clean the matching face on the camera of any residue or tackiness.
Cleaning down
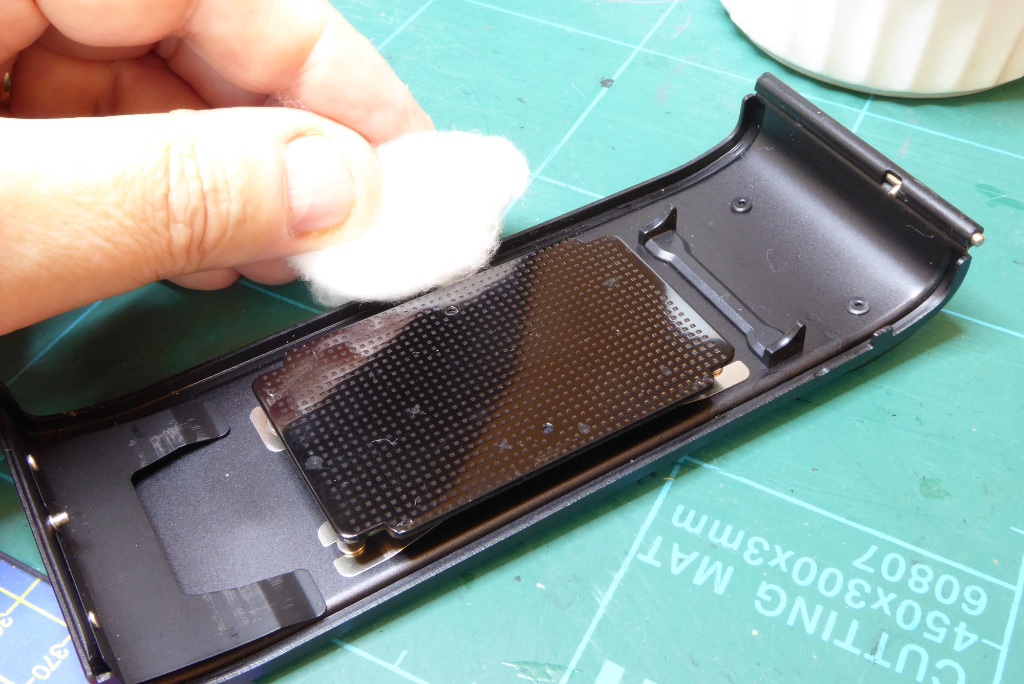
Finally run a cotton wool ball soaked in IPA along the edges of the door, be careful not to let this get onto the leatherette on the rear of the door as IPA can damage the leatherette on some cameras and also cause the glue holding the leatherette in place to dissolve. Be mindful of any bits of cotton getting torn off on any projecting parts like the film pressure plate. Like other parts let the IPA have 15 minutes to work…
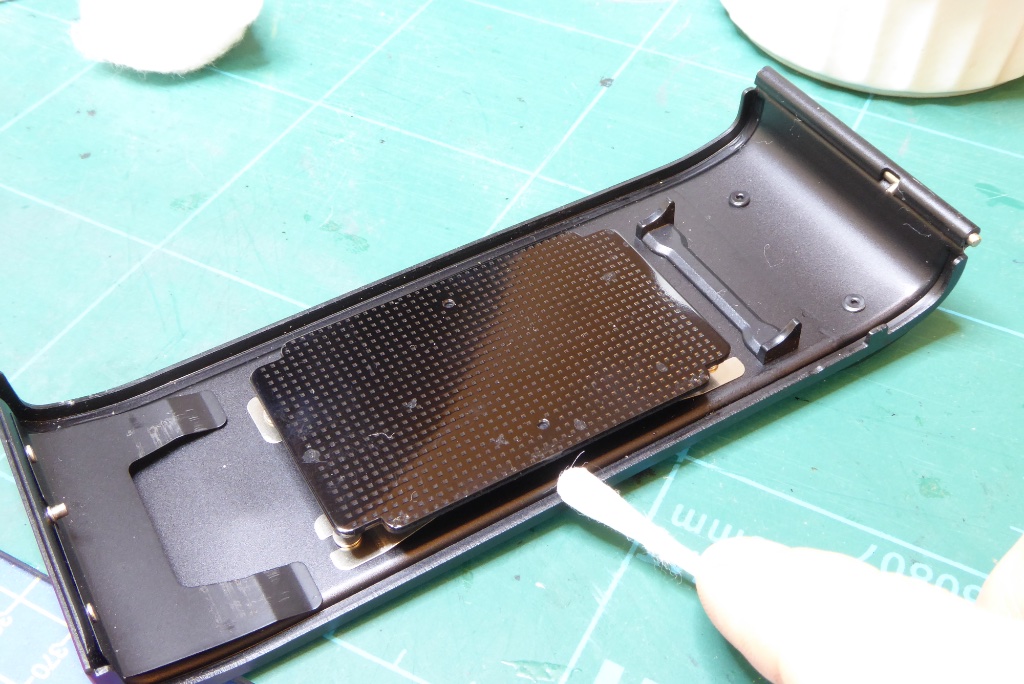
…before cleaning down with a cotton bud. Keep working this until any roughness has gone and the door edge feels smooth. You may need to consider whether any paint has been stripped by the decaying light seal (it can be acidic and dissolve paint as it decays) and make a judgement if it has as to how far to go here.
Cutting new seals
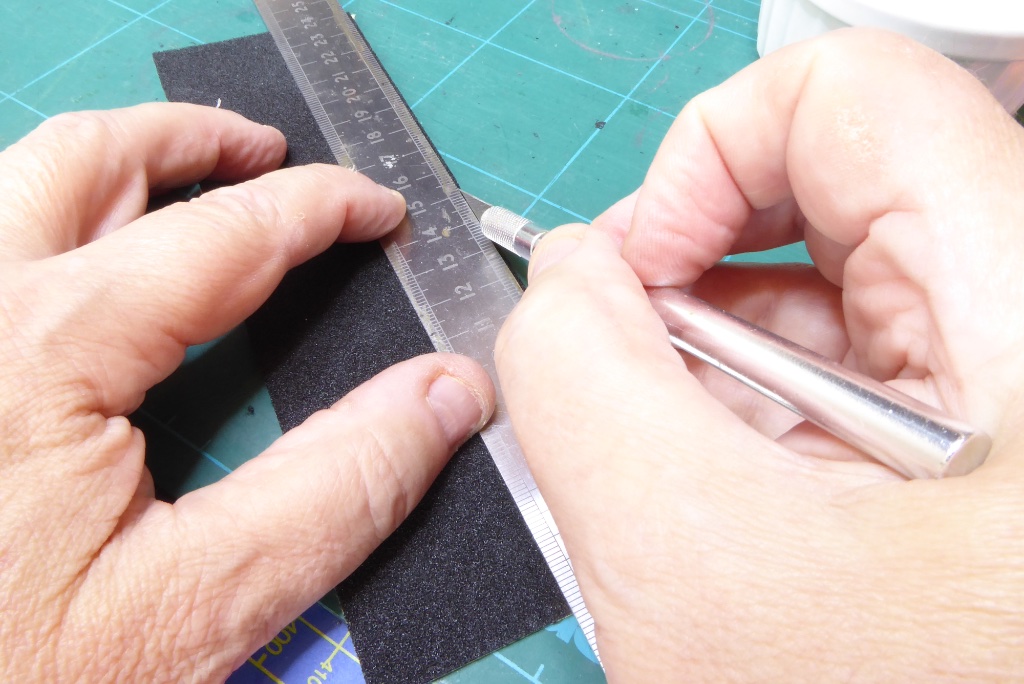
With camera body and door now clear it’s time to create some light seals. I always use Japan Hobby Tools foam. It’s what the cameras were mostly built with in the first place or at least a near perfect equivalent. The slots seals are normally 1.5mm deep foam but 1mm will suffice for most cameras, width of the slot is normally around 1.2mm but can vary. The first time you do this you will almost certainly cut these too thick so do a single cut and see what the fit is like. For this X-700 I am using 1.5mm thick open cell foam.
To cut these I use a cutting mat, an Exacto knife with a fresh blade and a metal ruler. Now you’re ready to start replacing light seals.
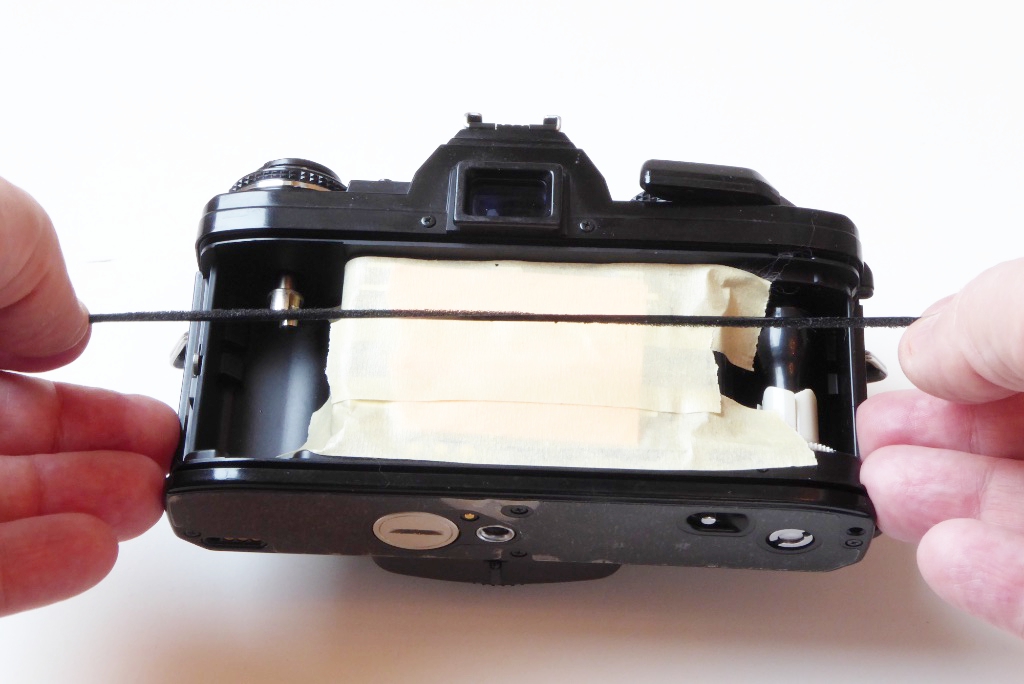
Here’s a top slot light seal cut and ready for fitting. Cut it longer than you need, it will make it easier to place it (this is one of the headaches with precut seals – there’s nothing much to hold onto). Once cut remove the backing paper and lick the seal and make it quite wet, this will stop the glue gripping and allow you a chance to position it. Don’t worry about the wetness, it will dry and set just fine.
Now hold the seal out as shown, make sure it’s not twisted, you want the shiny side with the glue facing in to the slot so its sits facing into the camera (eg the glue side goes against the base of the slot). By very gently stretching the seal you should be easily able to get it glue side down along the slot.
You need sharp eyes and a good light to see the shiny side as you position it – just aim for getting the whole seal into the length of the slot – don’t worry about replacing light seals in the corners yet.
Fitting new seals
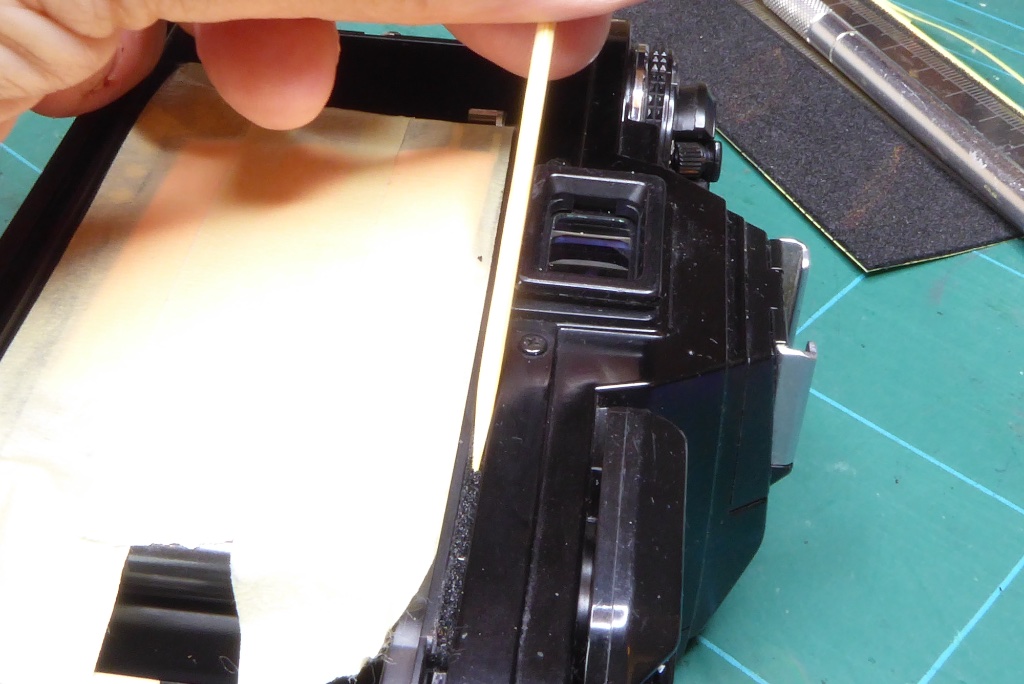
Once in position gently press it down using a cocktail stick. If its slips and you realise there’s a twist in it, DON’T PANIC, if it was nice and damp with saliva the glue will take a good 5-10 minutes to get a hold, so if you get it wrong just extract it and try again, wet it down and start again from the top.
As you GENTLY tamp it down keep a close eye that it doesn’t twist or shift around – you need to very gently press on it to make sure it goes in flat and smooth and the run the cocktail stick along the slot to make sure its smooth.
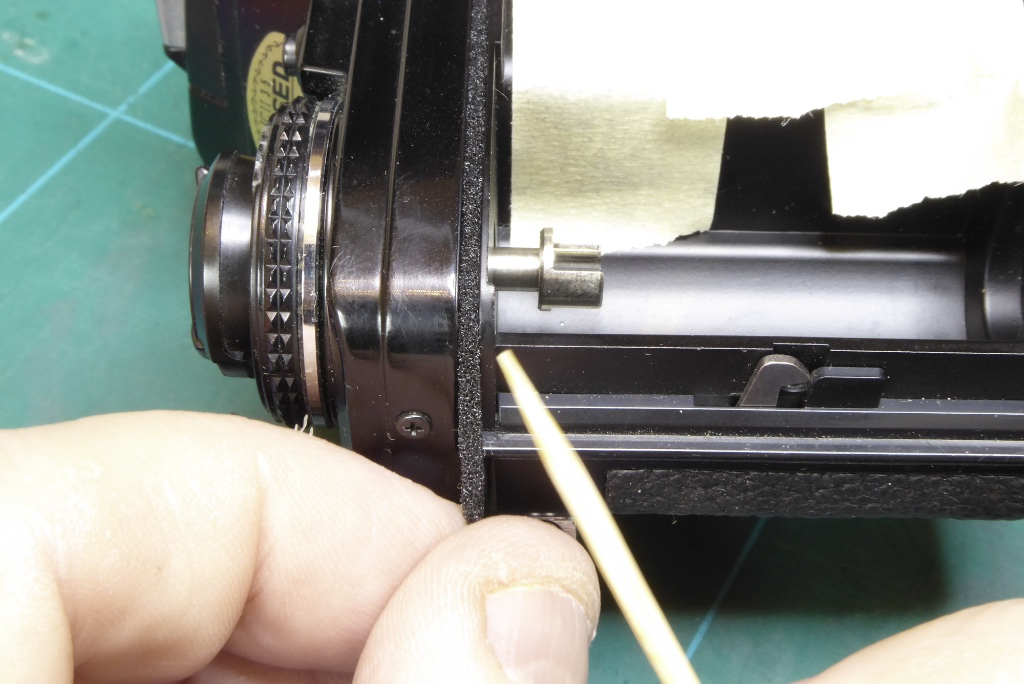
Take extra care as the light seal goes round corners, if it’s going to twist this will be where it happens. Gently pull on the seal to make sure it stays straight and correctly orientated. Use the cocktail stick as a guide to gently press it down around the corner.
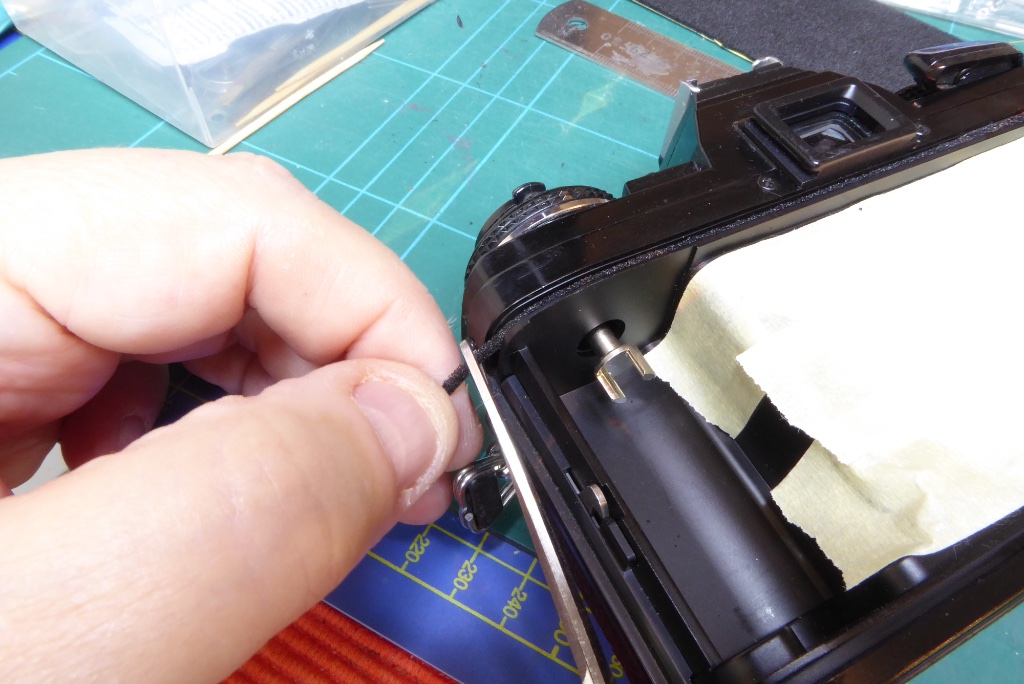
And now trim the latch ends before pressing down. On most cameras the ends of the light seal are NOT at the end of the slot on the latch side. The seal will normally stop just after exiting the corner. Going right to the very end of the slot may make the door a tight fit when closing.
The hinge side will almost always have the slot seal going to the very end of the slot.
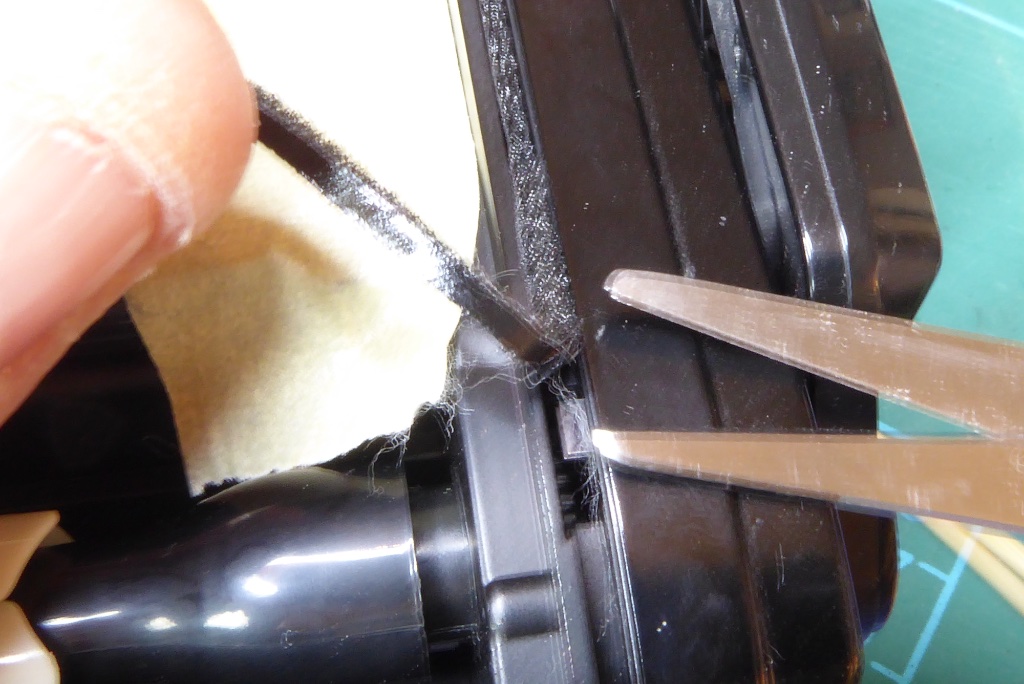
For the top slot seal you will need to trim the seal to stop at the frame counter reset lever…
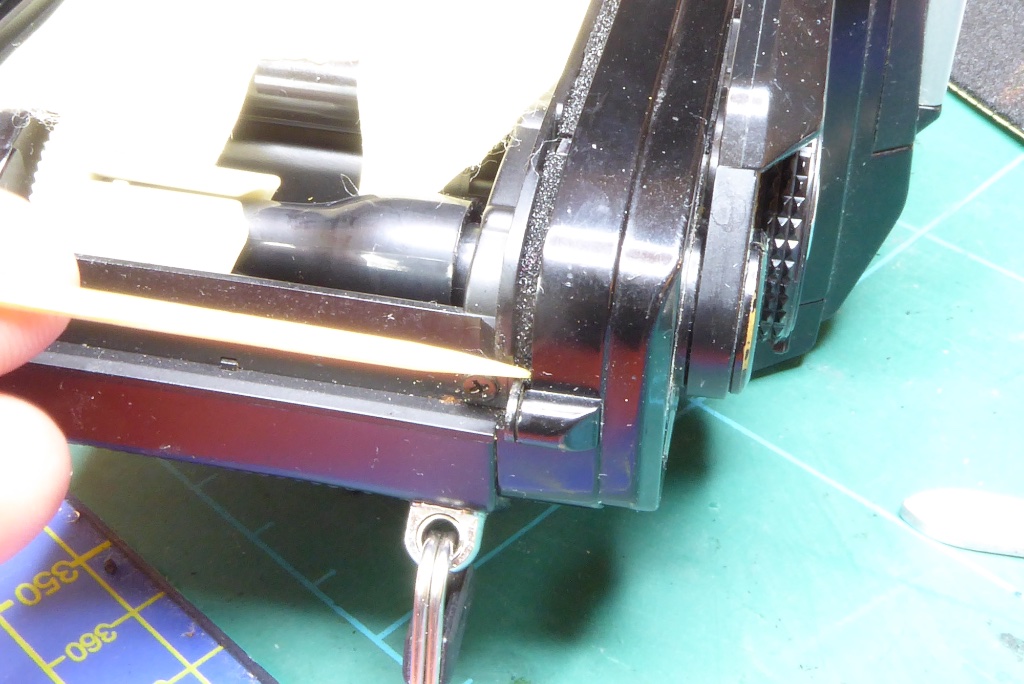
…and apply a short piece of seal between the other end of the frame counter lever and the end of the slot. Most cameras will have the slot seal on the hinge side running all the way to the end of the slot (not stopping short as per the latch side).
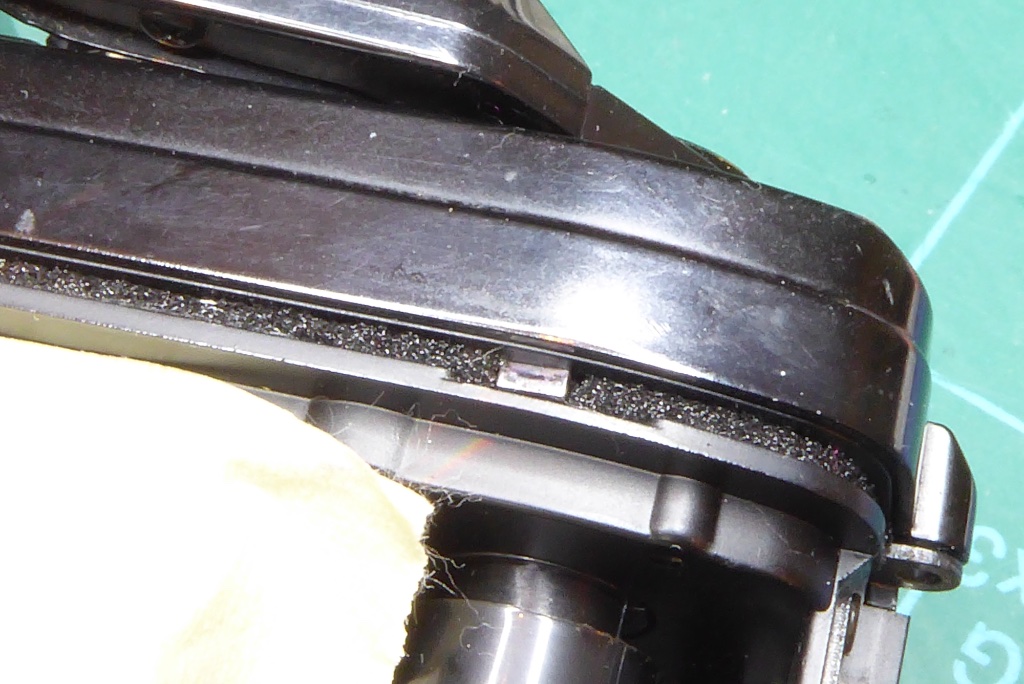
Here is a finished seal on this X-700. You can see how the light seal stops either side of the frame counter reset lever and the foam stops just short of the full depth of the body slots.
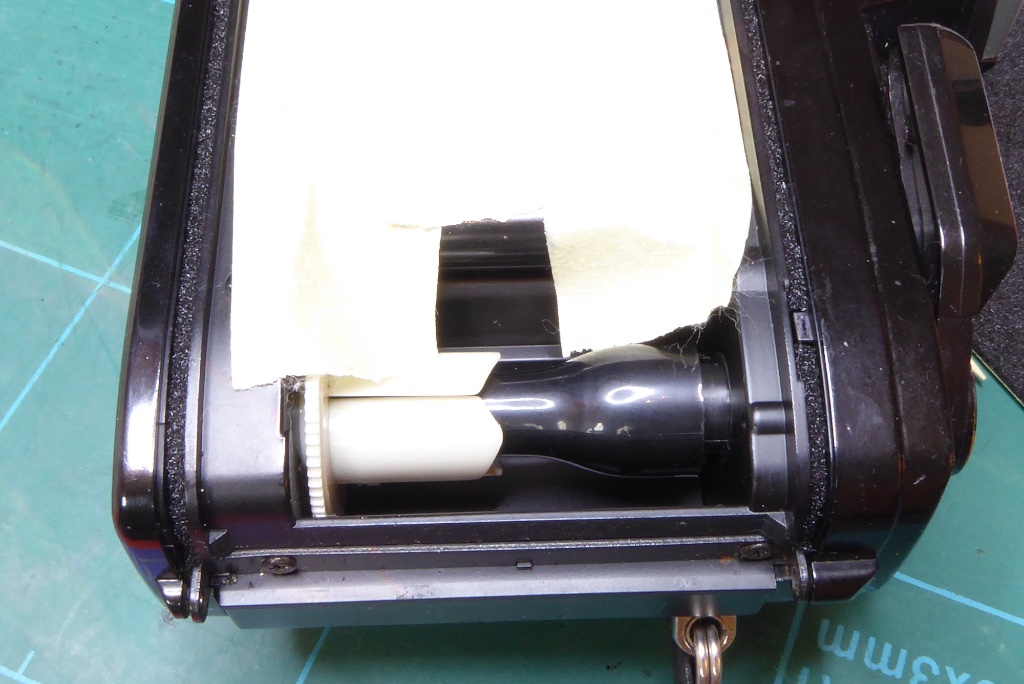
The bottom slot is the same process but easier to manage as there is no frame reset lever to worry about. This X-700 now has two new slot seals. Now set it aside and resist the temptation to mess about with for around 15 minutes to give the glue a chance to dry out and get stuck down.
Fitting door seals
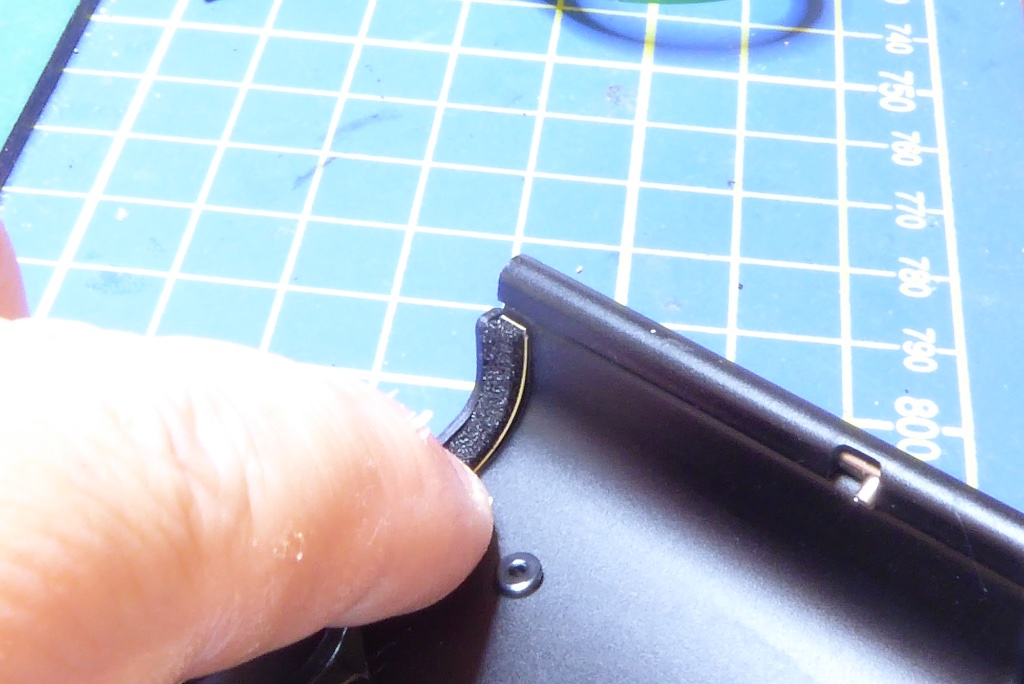
When it comes to replacing light seals the door seals can be a problem. Many cameras have different patterns of seals ranging from the simple to the very awkward. Minolta X series cameras have a variety of different seal layouts on the doors and its best to replace like with like.
The short article on each camera type at the end of this guide to replacing light seals discusses options and varieties. This particular X-700 had seals in the door channels at the hinge. These are normally 1.5mm foam and typically around 3mm wide. Length varies by X series so read the specific fitting information at the end of the article. Heres the lower seal on the door being measured for fitting…
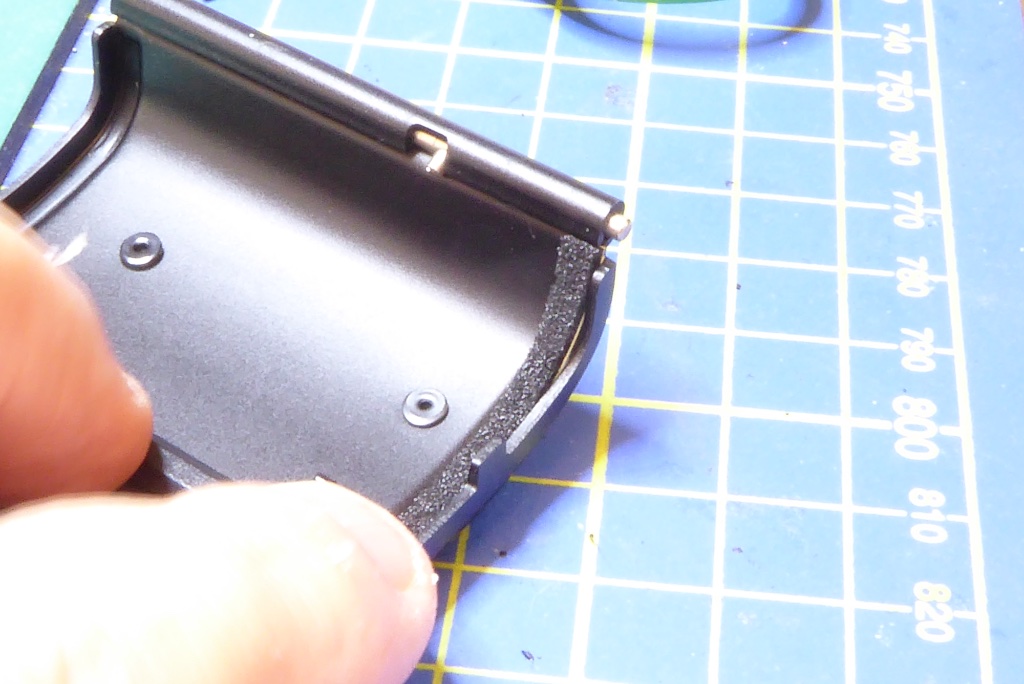
…and heres the upper seal being measured for fitting.
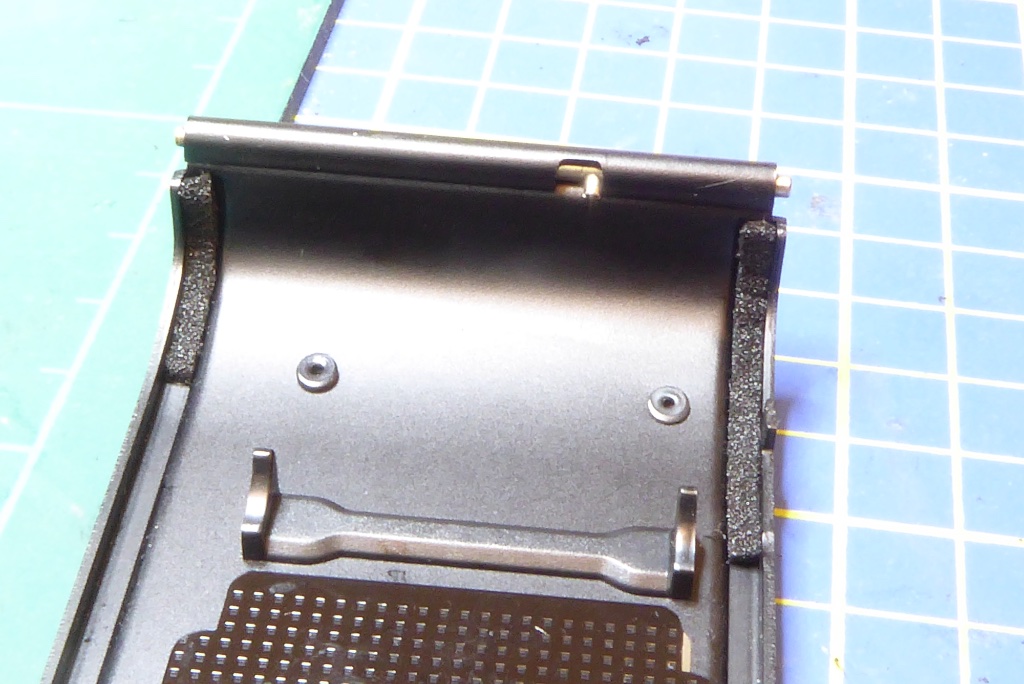
As with the camera body slot seals once cut to size, peel away from the backing paper and lick well. Then apply and position. You see the lower door channel seal runs from edge of door hinge to around the curve of the door. The upper seal runs from the edge of the hinge to just past an indent in top of the door. It’s almost level with the metal structure before the film pressure plate.
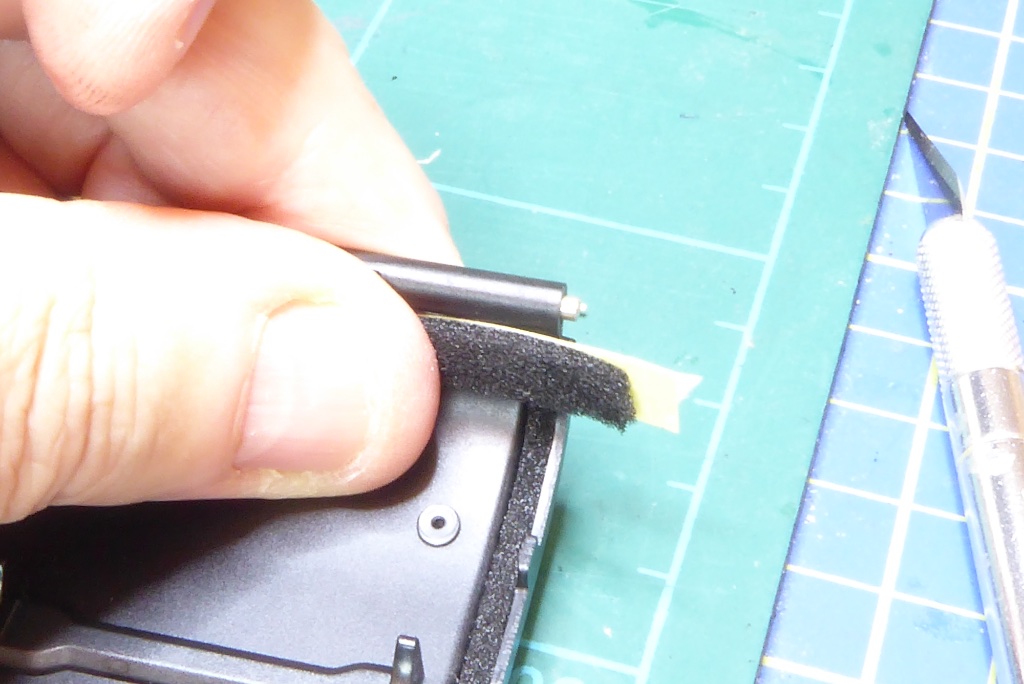
On an X-700 there is a vertical hinge seal made from 1.5mm foam. This is cut to run from top to bottom, OVER the door channel seals and run down alongside the hinge. Its typically around 5mm wide. As with the other seals once cut to size and shape, remove the backing paper, give it a lick and then apply and position it.
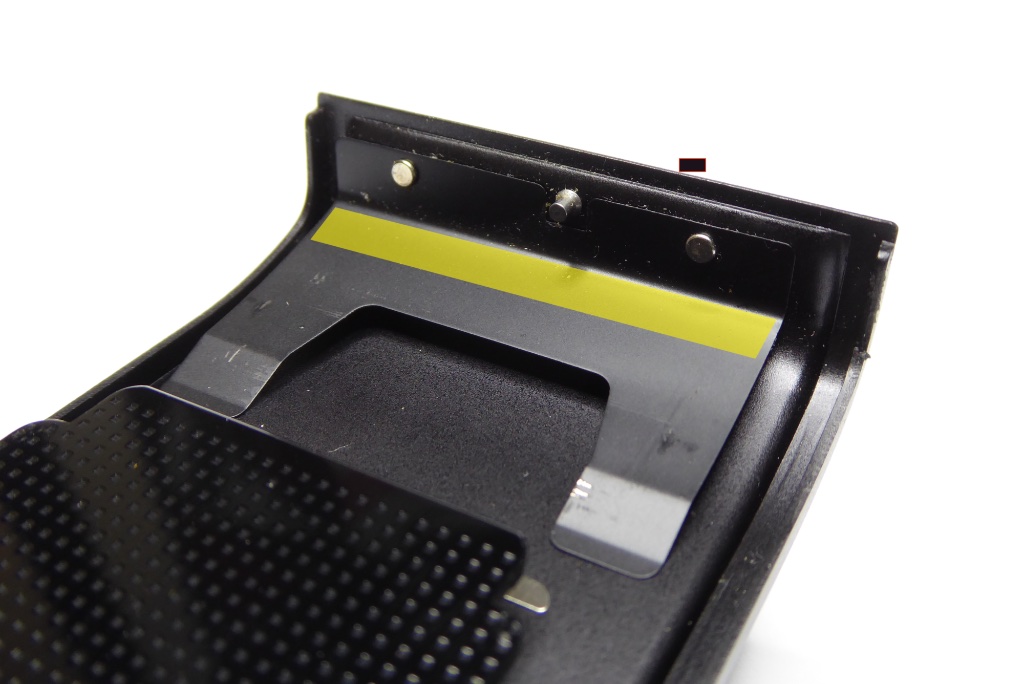
Finally on an X-700 and most of the XG and X-x00 series there is a light seal strip under sprung plate at the latch end of the door. This is 2mm foam and occupies a space under the sprung plate as shown. You will need to make this quite moist to get it under the sprung plate and in position. It butts up to the curve of the door. This is the seal few people know about or replace.
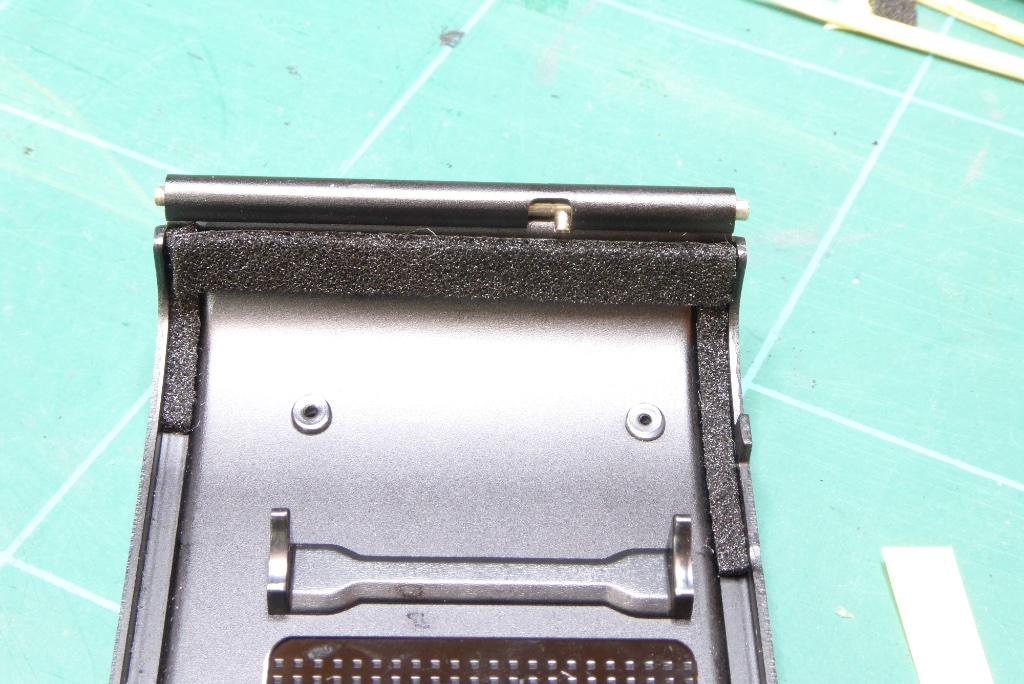
Here’s the door hinge seals now completed. Once applied set the door aside and give it a good 15 minutes to dry off.
Once it’s dry , test the seals by gently poking them with your finger to make sure they are stuck down.
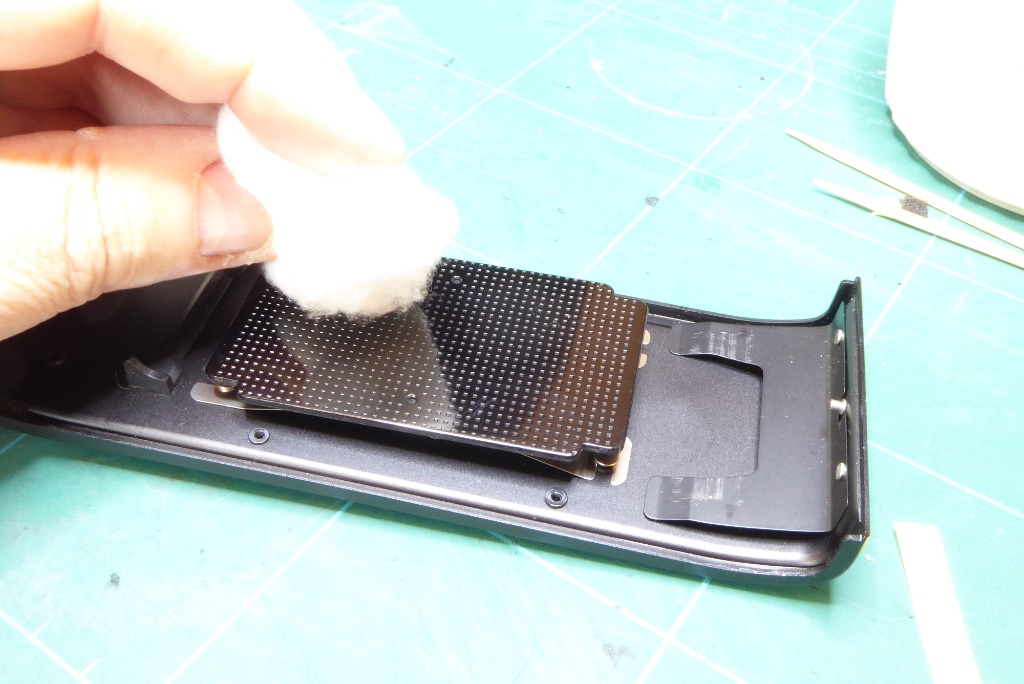
Finally use a little IPA on a cotton ball to clean off the film pressure plate and use a puffer brush to blow both the door clean of any stray material
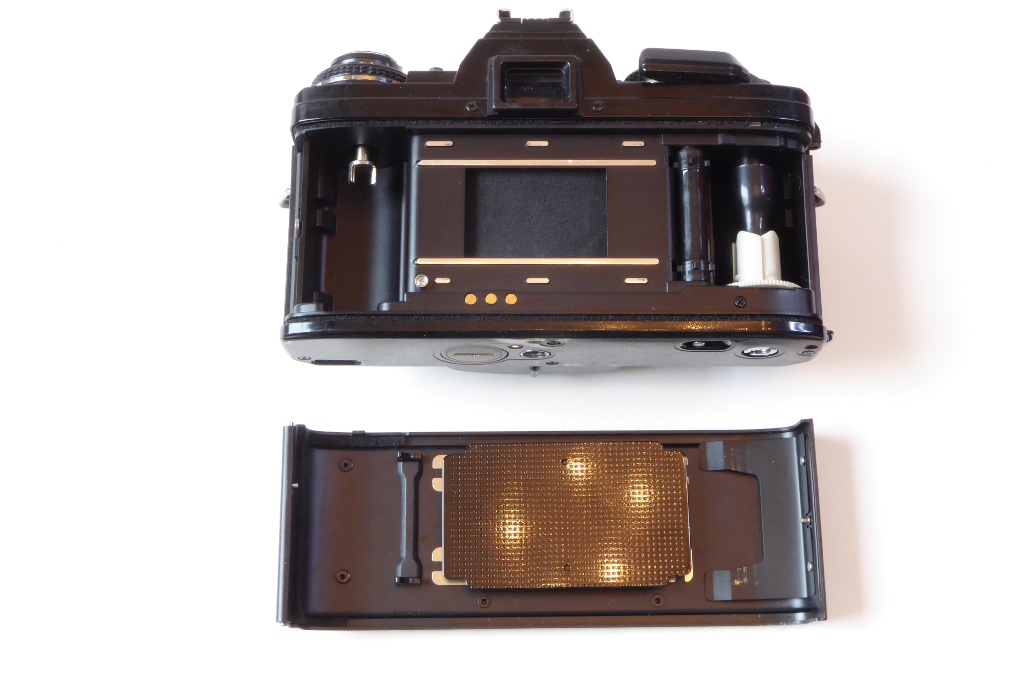
Give the camera interior a blow out with a puffer brush and clean any stray particles out. Remove the masking tape and card protection from the shutter and replace the door. Once the seals are dry fully you can shut the door. Check it opens again easily. If you messed up and a light seal got twisted you may find the door gets stuck by the glue.
Get ready for the next job which is replacing the mirror bumper.
Replacing mirror bumper seals
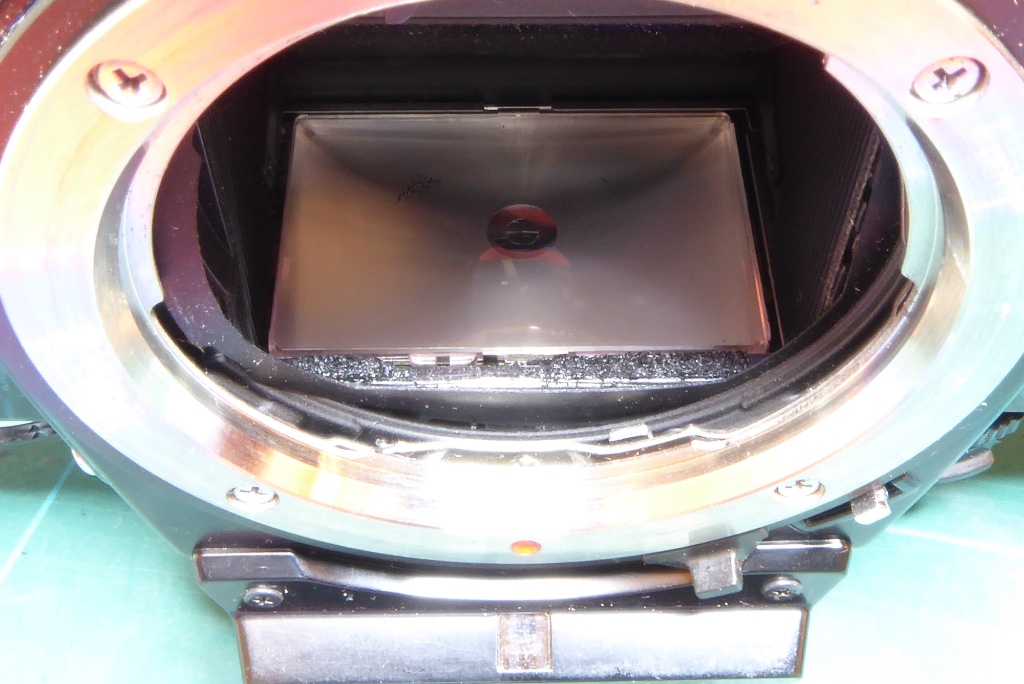
A guide to replacing light seals is not complete without discussing bumper seals. If light seals are shot it’s a certainty that the mirror bumper will be on its way out as well. While lights seals are simple mirror bumpers are quite daunting for the the beginner.
Its not so much getting the new ones in – it’s the headache in getting the old ones out! The focusing screen, prism and mirror are all very fragile. They mostly cannot take being splashed with chemicals without risking damage. This is true of the focus screen which will more than likely melt if it comes into contact with IPA. The focus screen can also be easily damaged by tools and even your fingers so extreme caution is needed here.
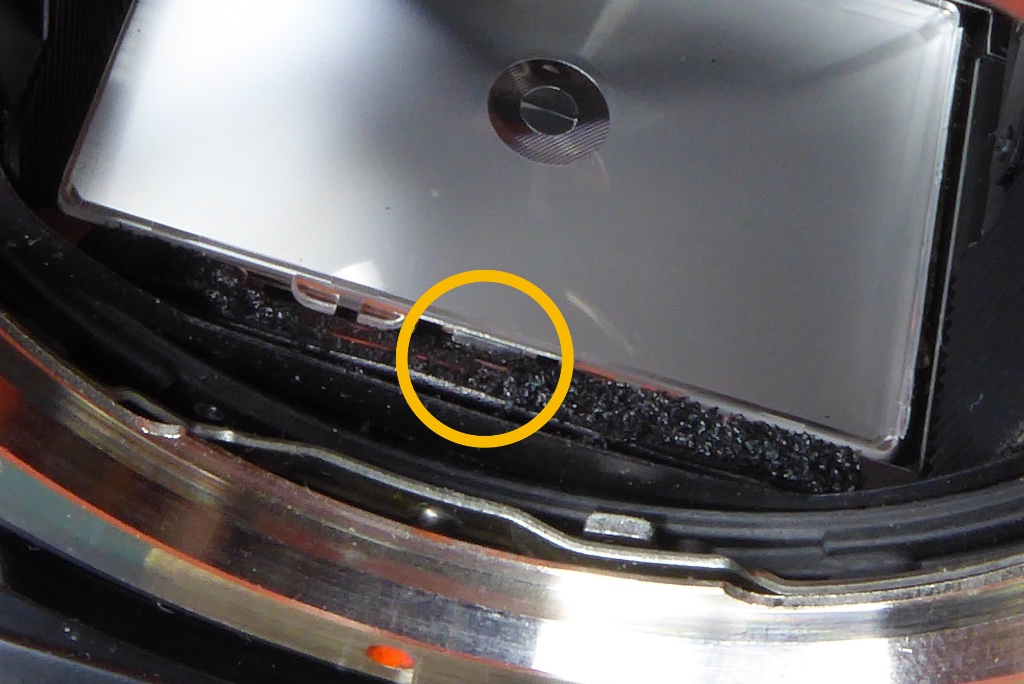
On any camera with a removable focus screen I normally remove the screen. The prism may be fragile but it’s generally tougher than the focus screen at least. Removing the focus screen for a beginner is itself a hazard.
Getting them out of an X series is tough. Getting them back in is even tougher with a big risk of damage. In order to get an X series screen out there is a small clip as indicated in the picture. It’s almost invisible under the foam. Pull towards the front of camera while using a small pick to lift screen away using small slot in screen. You can see to the left of the circle. Very often decayed gummy mirror bumper foam may cause the screen to be stuck downs. This makes it hard and the slightest slip onto the screen even with a soft tool will mark the screen. If this is spooking you out then leave the focus screen in and just be careful.
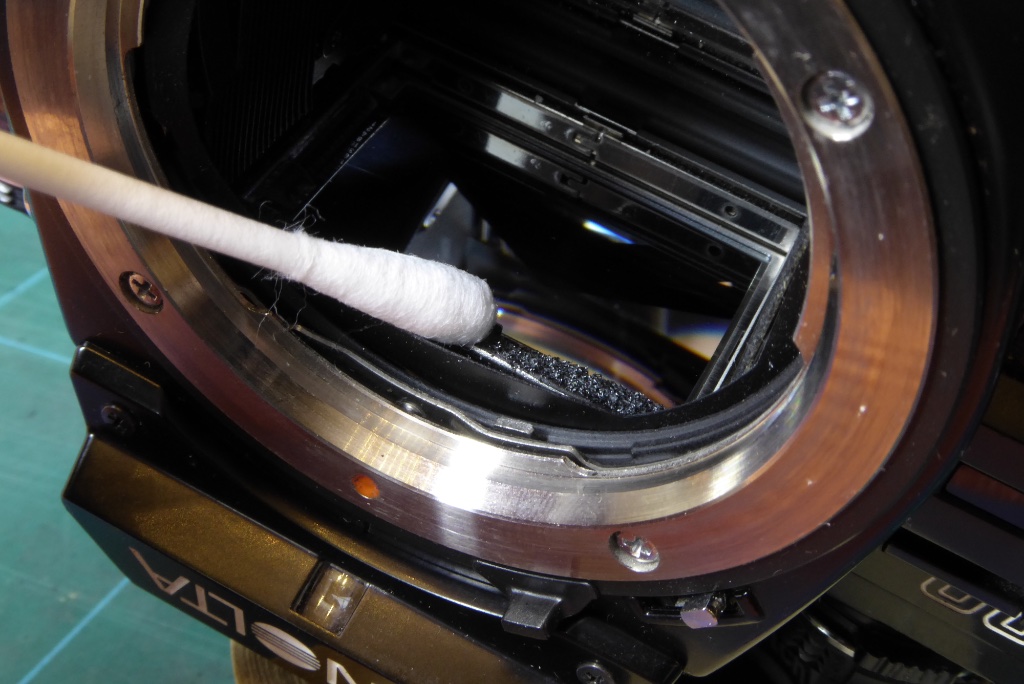
With the focus screen out of the way (or not if left in the way) use a cotton bud. Slightly dampen with IPA to gently apply to the mirror bumper. Leave camera facing up and with cap off to reduce any risks of IPA fumes damaging the focus screen. Give this a good 15-30 minutes. Thanks to the internal light shield Minoltas are harder than most. Access is quite limited especially at the edges of the mirror bumper so maximum patience here.
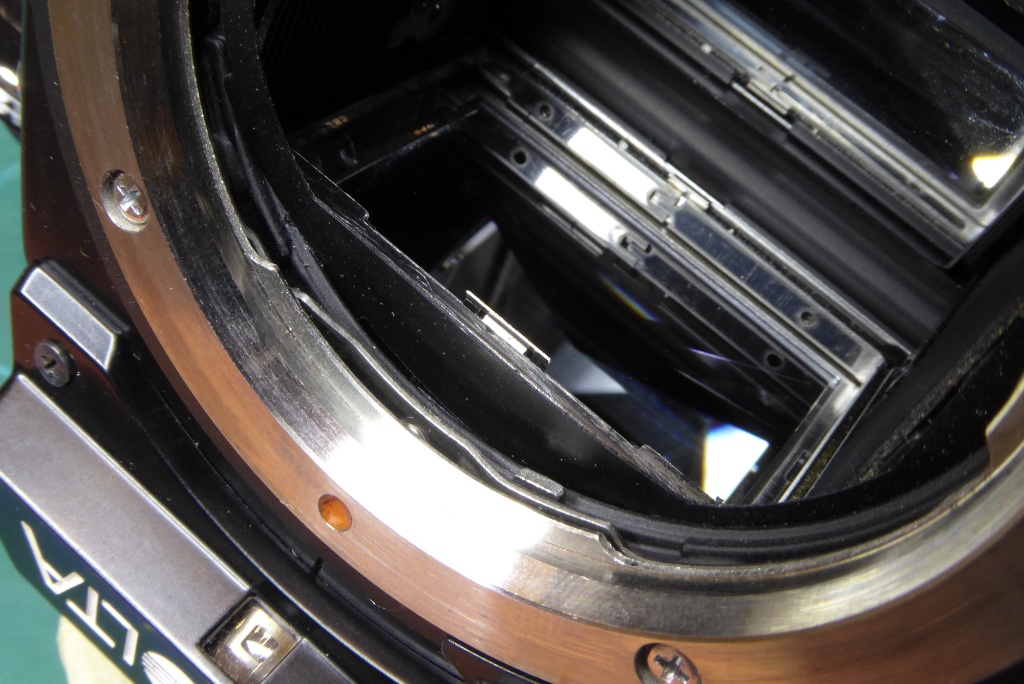
And now gently clean off the foam bumper and residue. This can take a long time with damp cotton buds and cocktail sticks. Be VERY careful not to get any muck on the prism or the focus screen. Periodically I use a mini vacuum to clean any muck out as I go. A household vacuum cleaner will do as well if you are careful. Here’s this X-700 cleaned up. You can now see the focus screen retaining clip at the centre at the front of the prism.
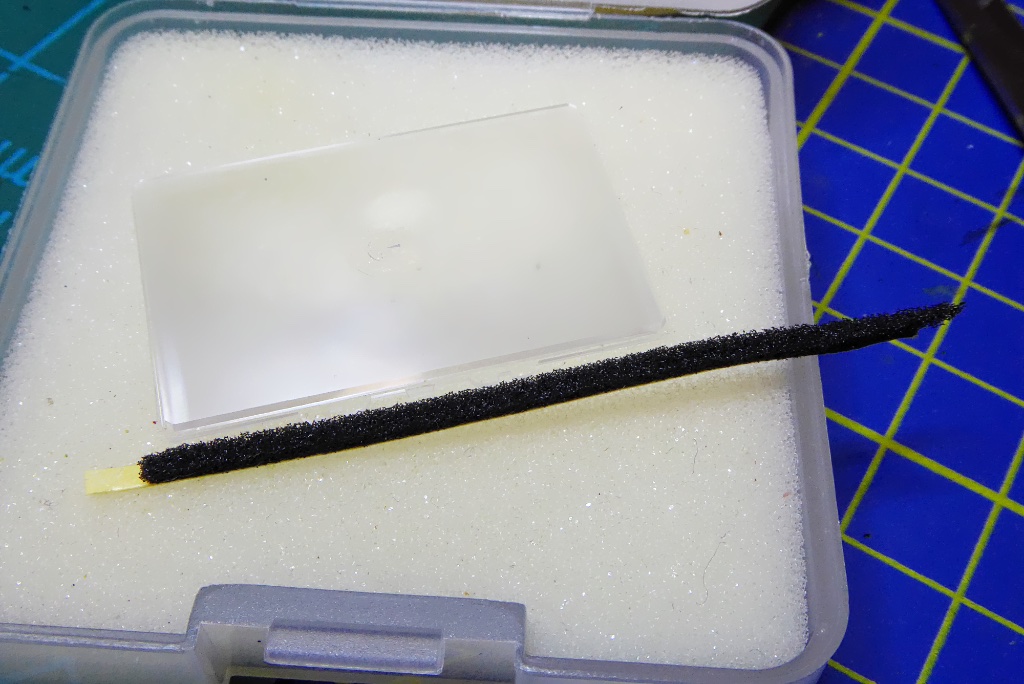
The X-700 like most Minolta X series uses a 1mm thick mirror bumper. Early ones had a thicker 1.5mm bumper. It’s normally around 2mm deep (front to back). Its length will be the same as the focus screen. Here’s a bit of foam cut to the right depth and being squared up against a focus screen for sizing the width.
Early X series used foam but thanks to the internal light baffle making life tough Minolta changed later ones to use felt which is unlikely to have any issues like decay or rot. With that said I have seen a few where the felt was just rotten and threadbare so I normally replace with 1mm or 1.5mm foam.
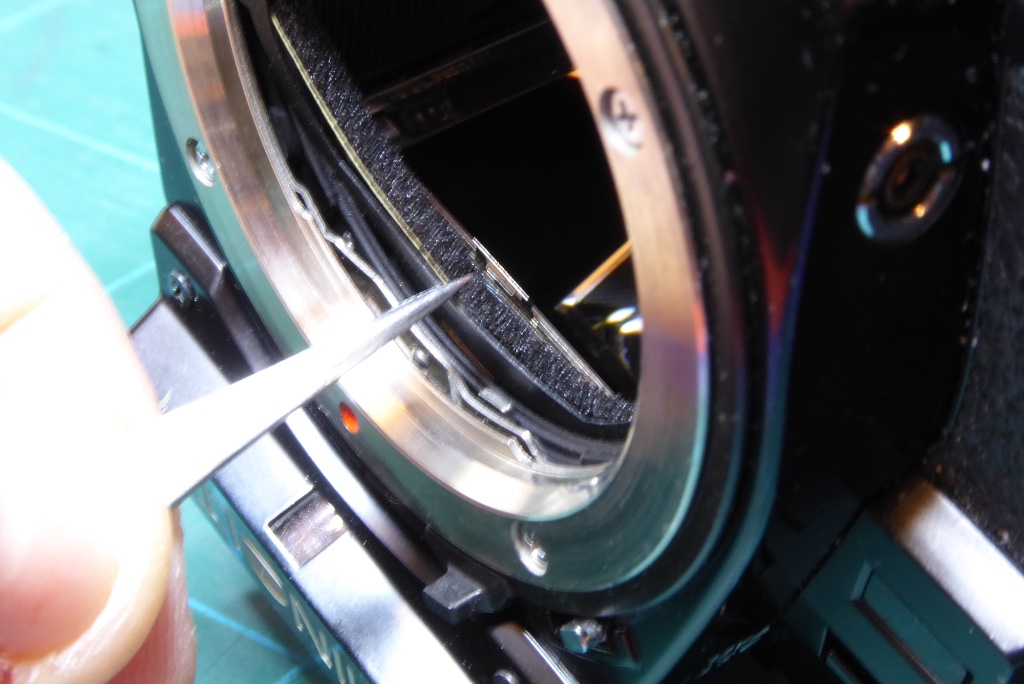
As with the light seals, remove the backing paper, give the bumper a nice lick of spit and get it nice and wet and then apply. As you wont easily be able to see the ends on many cameras I usually grab the bumper with some tweezers at its centre and use that as a positioning guide.
Here’s this one being applied.
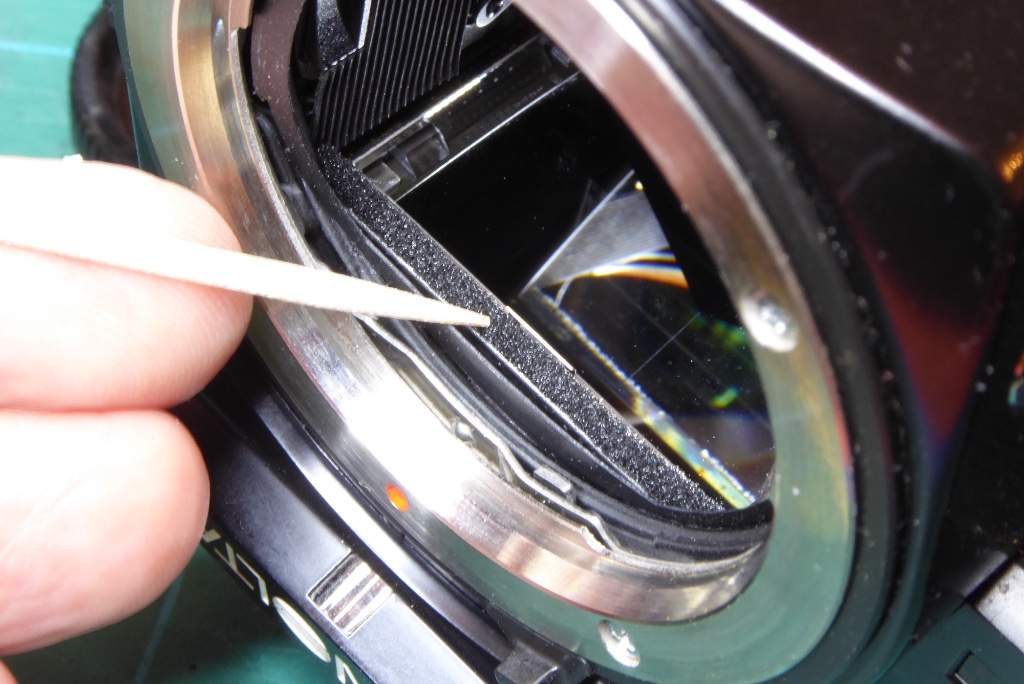
Once roughly in position use a cocktail stick to get a perfect position. Gently tamp down and leave the camera upside down to dry alone for 20 minutes.
Once you’re sure its settled ok it’s time to put the focus screen back in if it was removed.
Cleaning focus screen
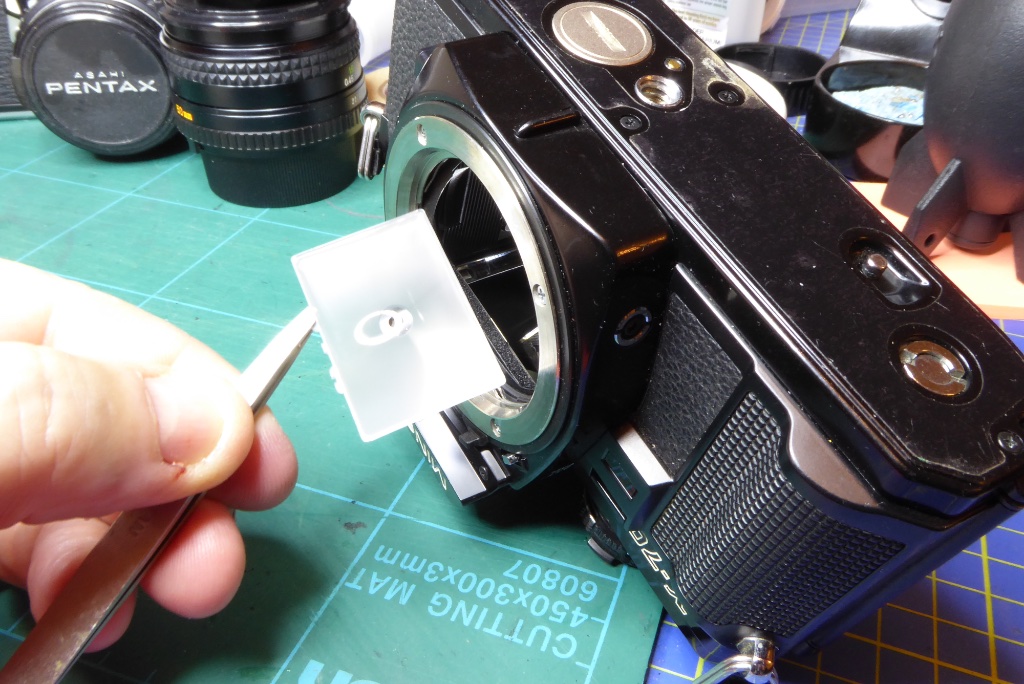
While not a dedicated part of a guide to replacing light seals, I recommend cleaning the focus screen if it was contaminated with dust from the old bumper by running it under cold water and then cold air blowing it dry to remove any water marks. That will generally remove loose debris. Heres the screen being readied for re-insertion.
The shiny side faces down towards the mirror the matt side faces towards the prism.
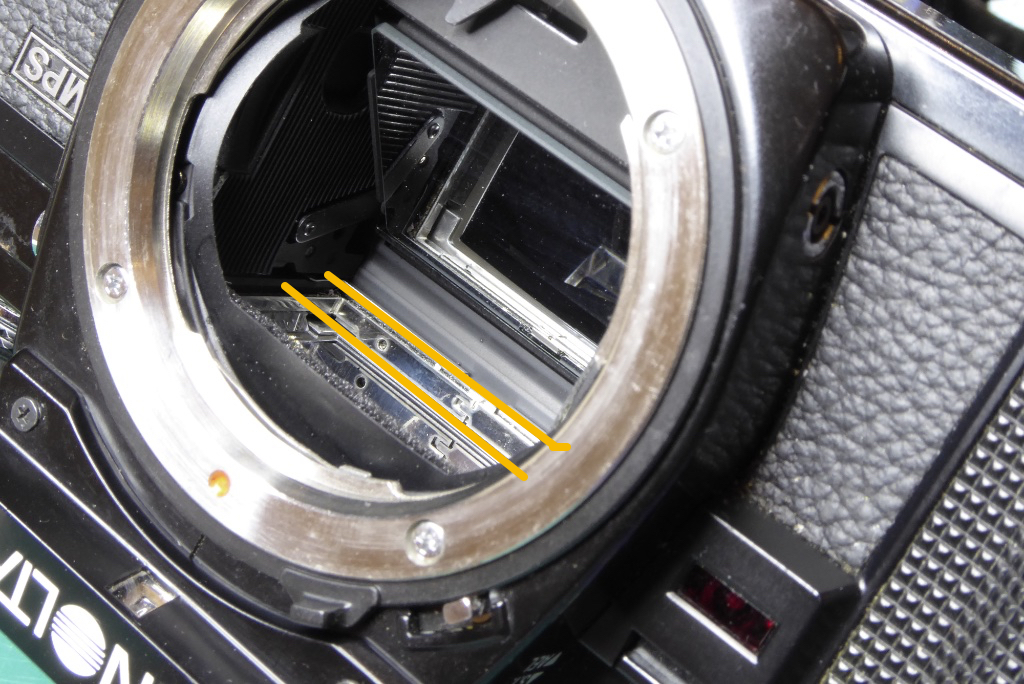
It’s hard to see in photos but on X series Minoltas the screen is held in place by a torsion bar spring at the rear of the camera. This forces the focus screen forward against the retaining clip and these are often hellish to get back in place. The trick is to get the focus screen rear edge into the guides highlighted in yellow and then press it backwards and down against the prism until it locks in place with the latch at the front.
This is the cause of many a scratched screen so be careful and if you are inclined to being hamfisted best to leave the screen in – just be careful with the chemicals while cleaning.
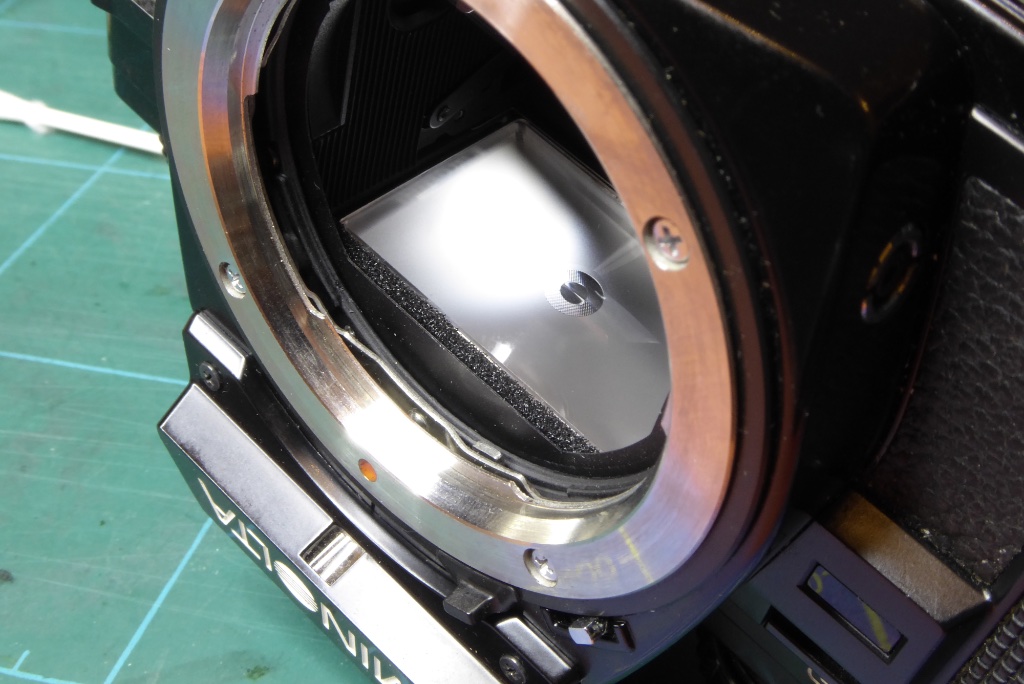
Here is the finished job. A nice new mirror bumper and a sparkling focus screen. I also normally clean down the prism and mirror while the screen is out just using breath and a very gently cleaning with a cotton bud.
Blow out and vacuum the camera to get rid of any possible debris that may have dropped while working on the bumper.
specific Guides to Replacing Light Seals in Common Cameras
The basics of fitting light seals are covered in the main guide. This section discusses a different guide to replacing light seals applied in some of the more common (New age of Film) cameras.
CANON AE-1
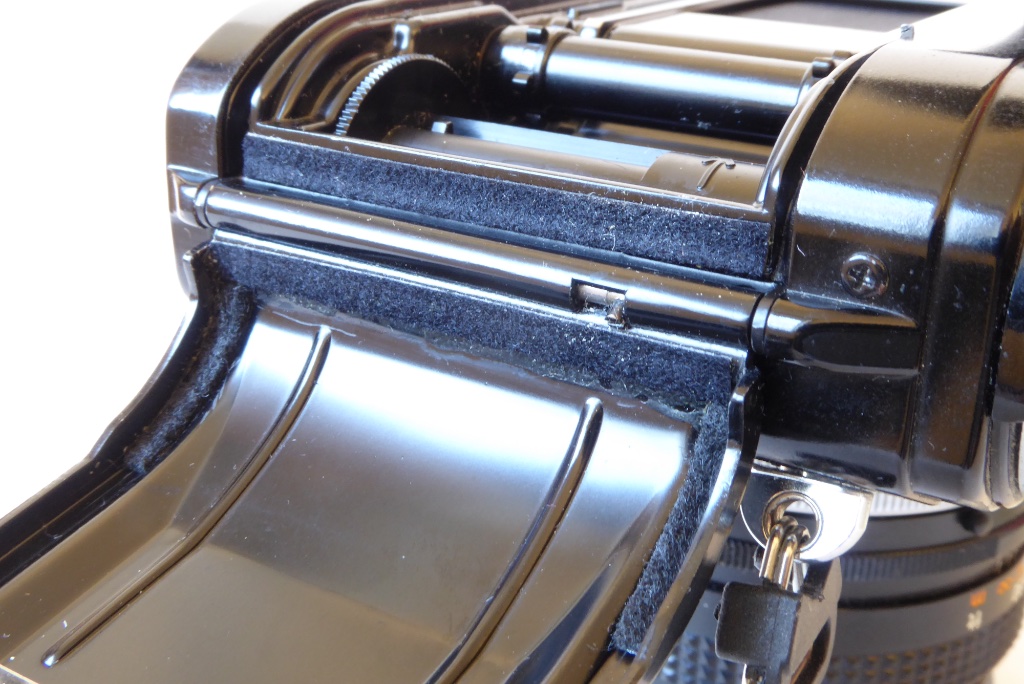
Guide to Replacing Light Seals in a Canon AE-1
The AE-1 uses felt rather than foam for its hinge seals. These are fitted as per the picture with a felt pad on the camera body. It also includes a matching felt pad on the door hinge. The door channels also have felt applied that runs around the curve of the door. This layout is nearly identical to the Canon FTb.
This is my own AE-1. It shows damage near the seal caused by the previous owners bodged fitting of light seals using contact adhesive. The body slot seals are most normally 1.5mm foam.
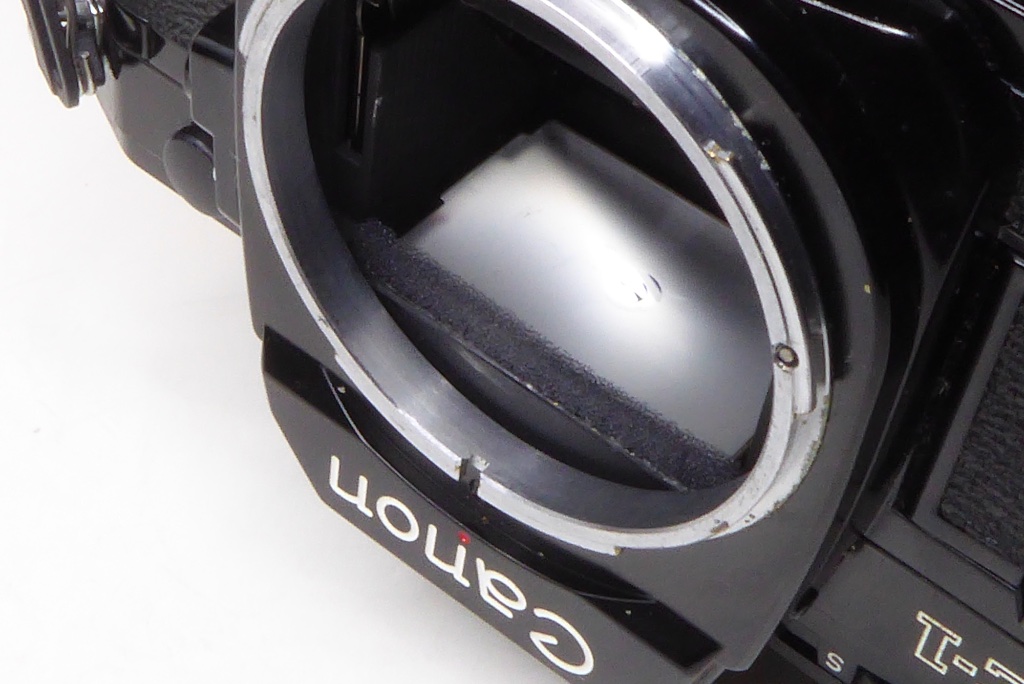
The AE-1 mirror bumper is conventional and uses 2mm thick foam. Again this is identical to an FTb.
FUJICA ST/AZ Series
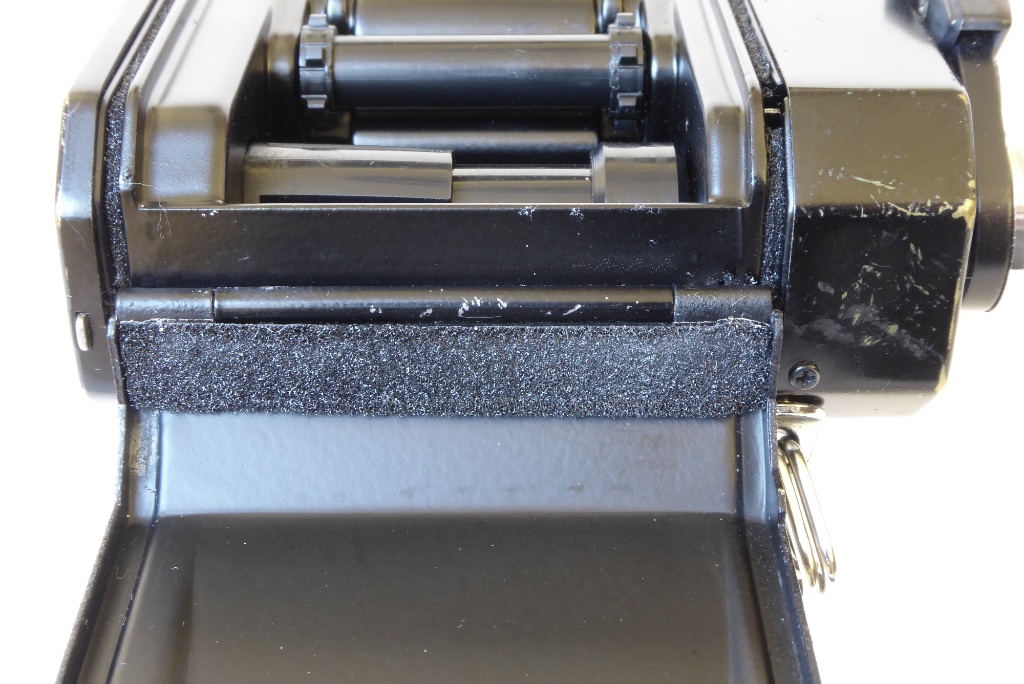
Guide to Replacing Light Seals in a Fujica/AZ Series
The ST-705, 605 and AZ-1 all have identical light seals. Slot seals on the body are 1 or 1.5mm thick foam.
The door has a slightly thicker 1.5mm foam block on the door at the hinge end and..
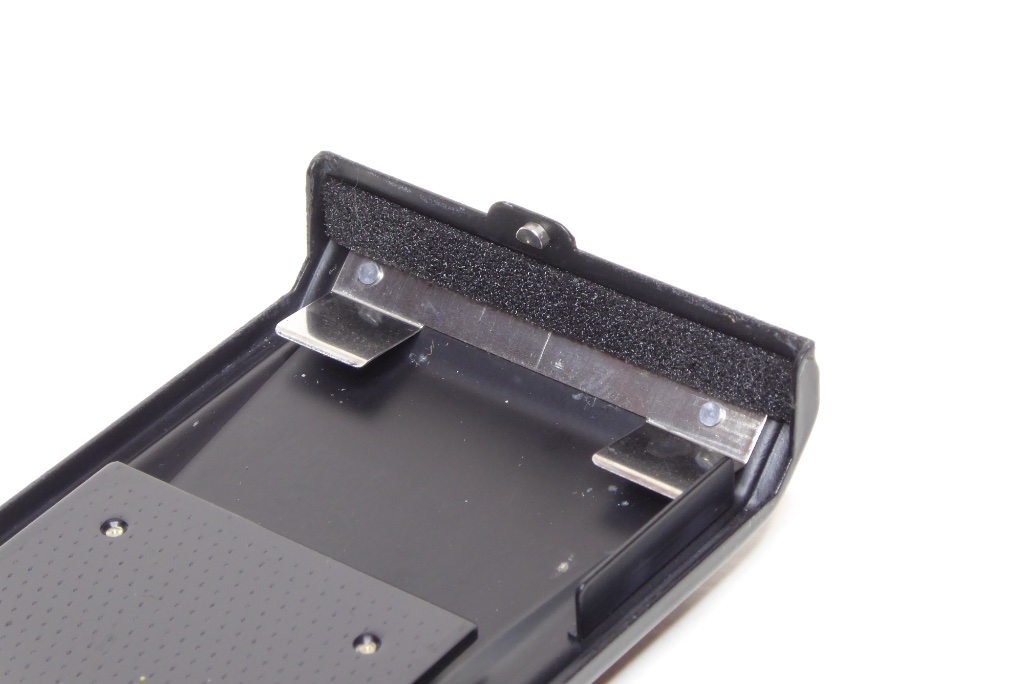
…a deep 2mm foam block insert at the latch end.
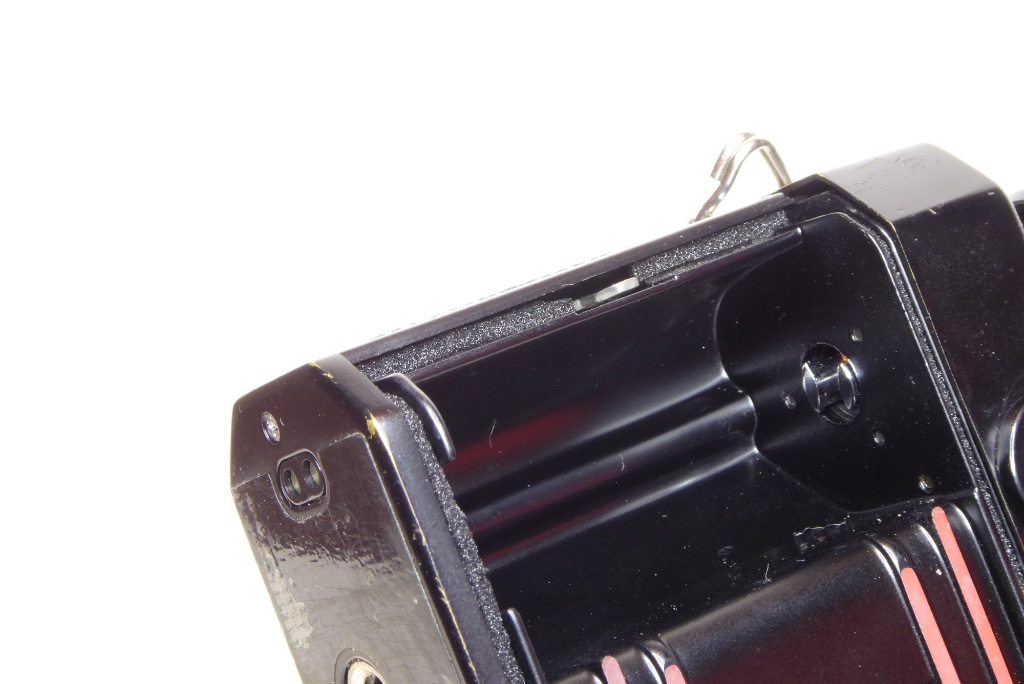
The body also has 1mm deep foam inserts in the slots either side of the body latch mechanism.
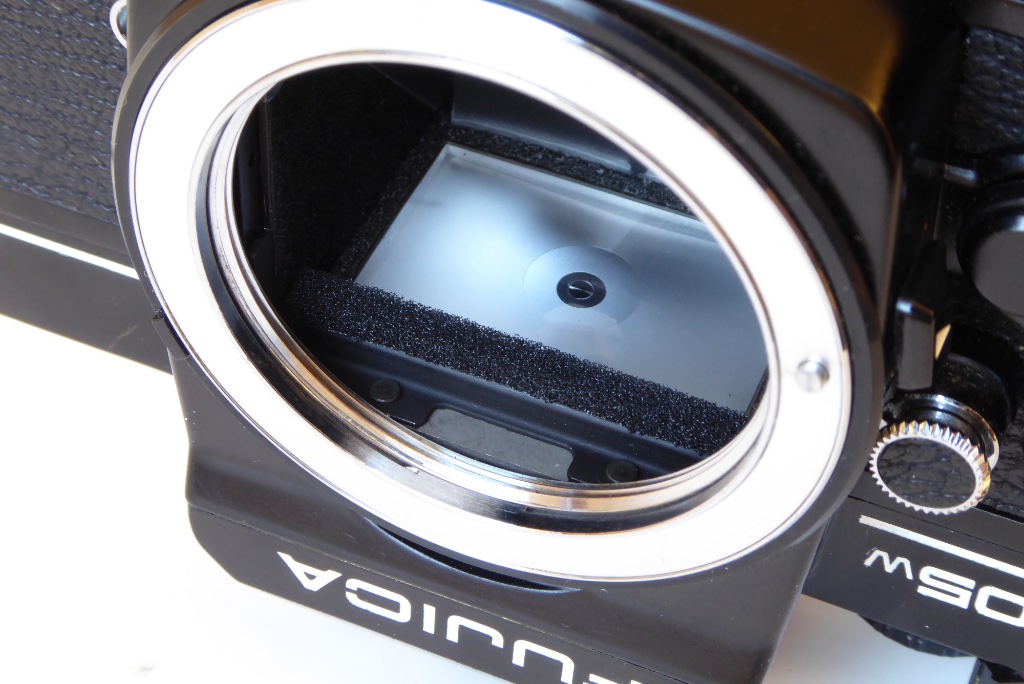
The mirror bumper is conventional and has a 2mm foam mirror bumper.
MINOLTA SR/SRT series
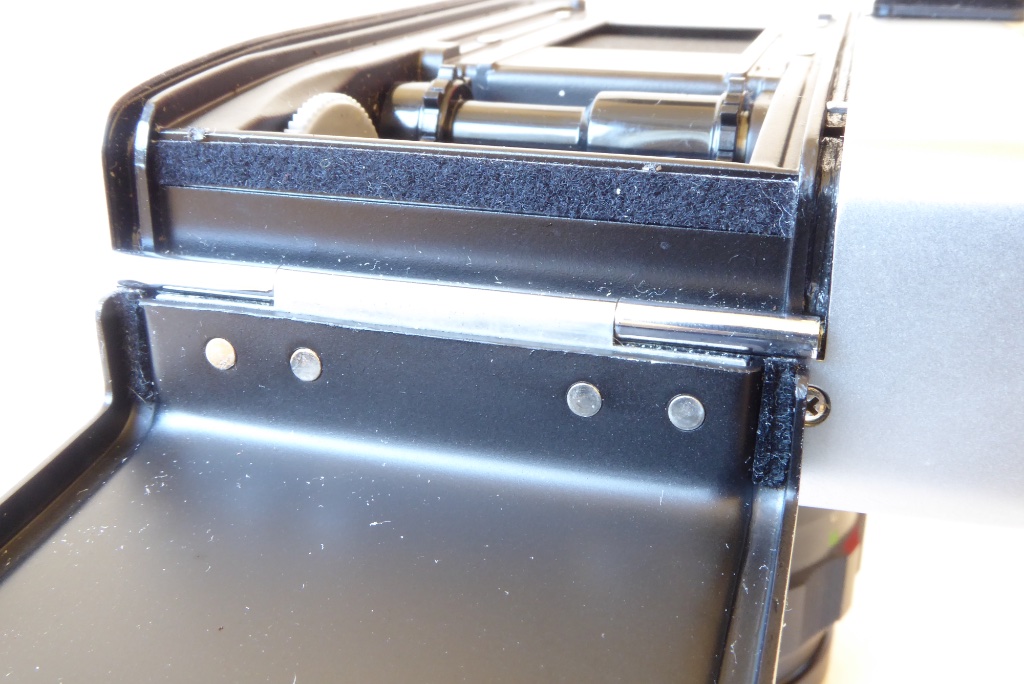
Guide to Replacing Light Seals in a Minolta SR/SRT Series
Slot seals on the body are a conventional 1.5mm foam. The hinge end of the body has a felt insert as shown. Note that the door channels at the hinge end also have small 1.5 foam inserts. On very early models these were made of felt.
Interestingly the SR7, the immediate predecessor to the SRT has no seals at all other than a felt strip on the camera body at the hinge end. I can be sure of this as I acquired a mint never used SR7 and its lack of seals was surprising. It does tend to indicate Minolta had a rethink and added the extra seals to the SRT and they must have had good reasons to do that.
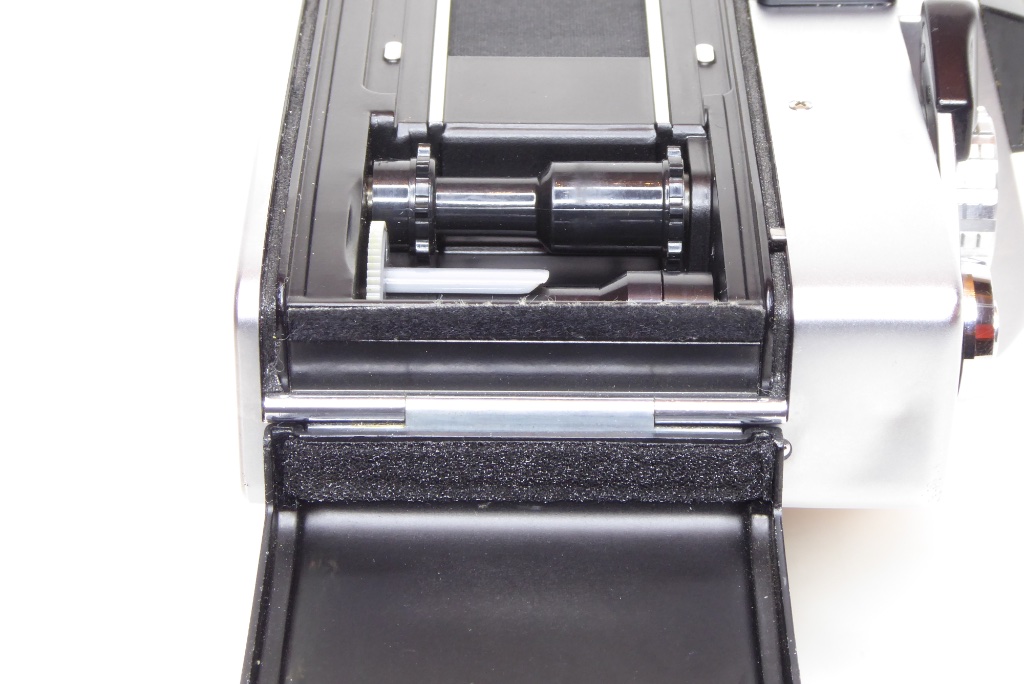
Later SRT models like the 303 also had a foam pad of 1.5mm thickness added to the door end hinge seal.
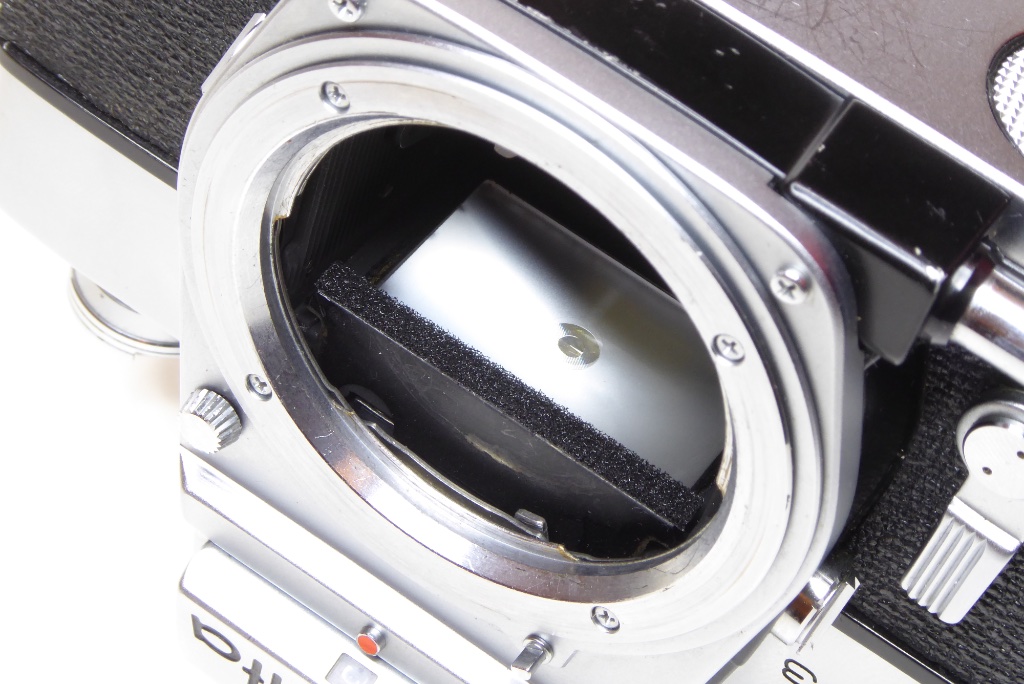
Mirror bumpers on most SRTs are often felt but some later models have 1mm foam on the mirror bumper. These are often awkward as the bumper is on the face of a spring loaded light trap/baffle. Be careful when you remove old foam or felt from these. There are two slots under the foam which are the grip points for a spring. If this becomes dislodged its very awkward to get it back into place.
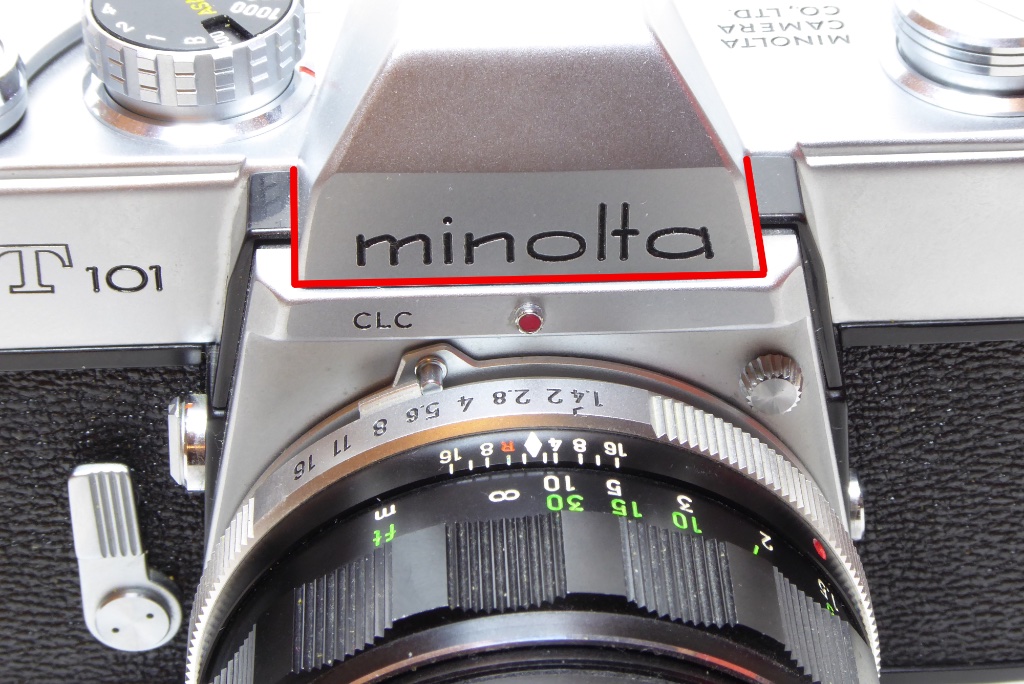
SRT101 and similar – additional seals
There are various versions of the Minolta SRT101. If the name plate of the camera looks like this one then there is a thin light seal that runs under the top cover around the front of the cover as indicated. You would need to get the top cover off to see this. This seal acts as a light seal and dust seal and also acts to hide the gap between the front of the prism bulge and the lens mount surround. These are almost always disintegrating in SRTs and a cause of debris on the top of the focus screen.
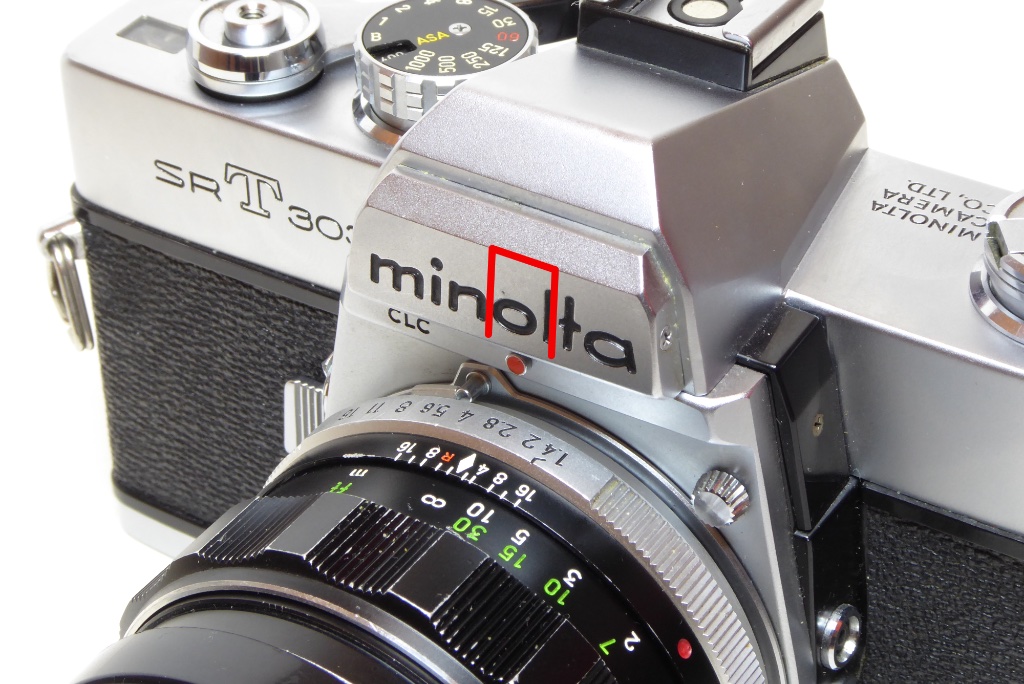
SRT303 and similar – additional seals
The later SRT303 and similar marks have a different name plate. On these there is a strip of foam that runs as indicated over and around the aperture indicator mirror. This can be accessed simply by undoing the screws either side of the name plate. This seal failing causes the same problem as the top plate seal on the SRT101 – namely debris being scattered onto the top of the focus screen.
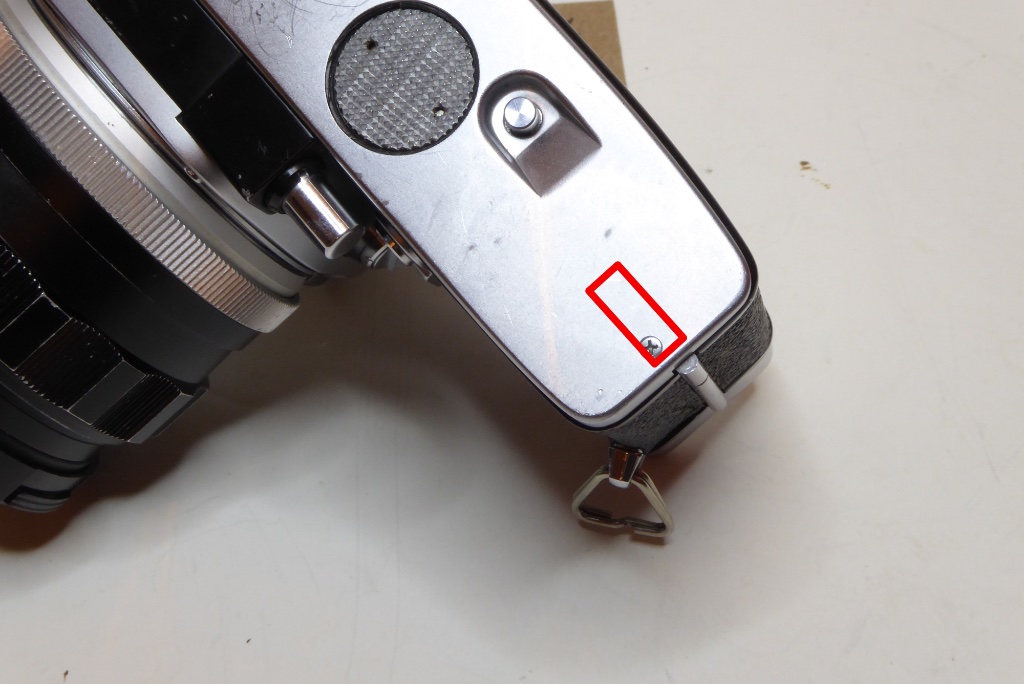
SRT – most versions – additional seal
In addition to the top cover seals many SRTs have a light seal in the position indicated under the base. These are often the cause of issues with meters as the seal can disintegrate and scatter debris and tar like material onto the variable resistors/trimmers in the base of the camera. The acidic breakdown of the foam here can also cause other electrical issues as the seal is directly next to the electrical junctions in the base of the camera.
MINOLTA XD
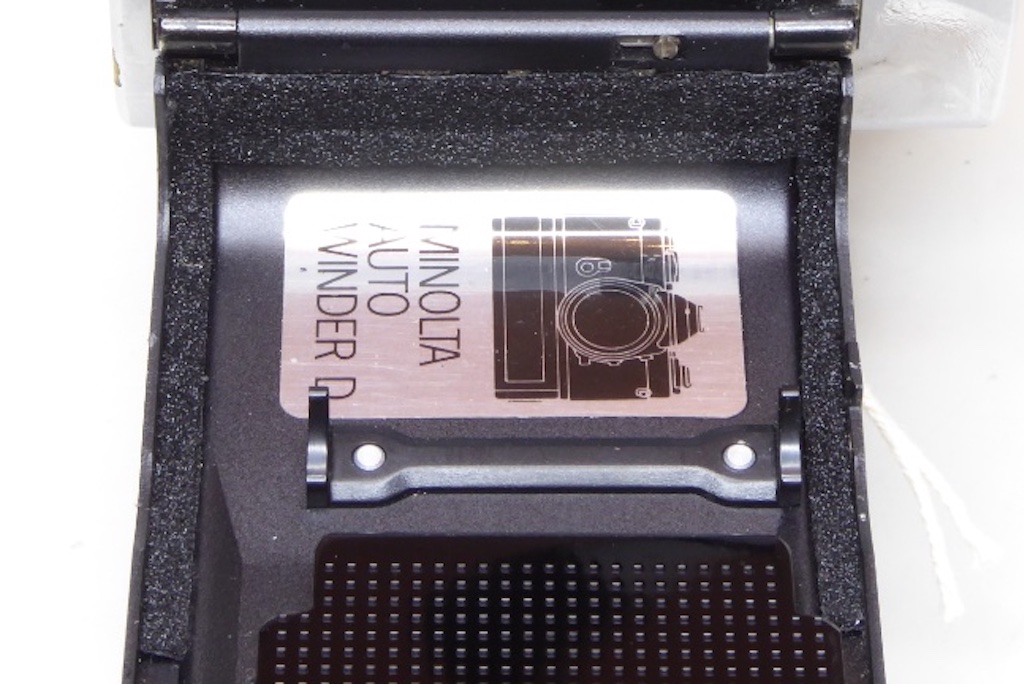
Guide to Replacing Light Seals in a Minolta XD
Camera body slot seals are the standard 1.5mm foam. The door hinge arrangement is as shown in the picture also using 1.5mm foam. The door channels have foam as shown which runs from the hinge to the edge of the film pressure plate, while the hinge seal fits BETWEEN the channel seals and does NOT run over the top of them like the X series.
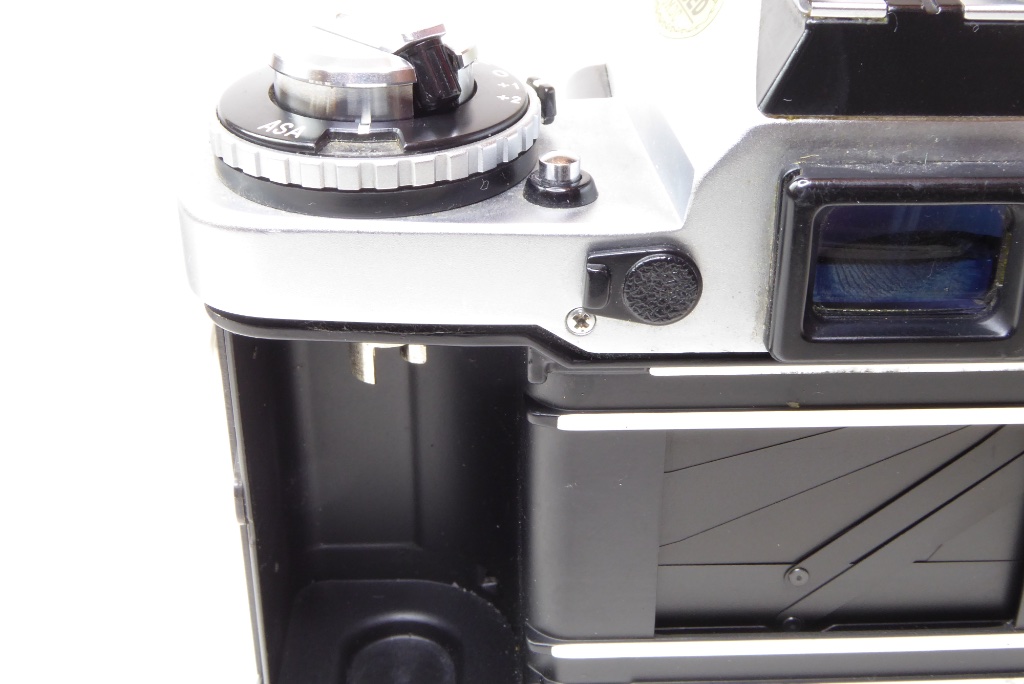
The XD body shape does present some awkwardness as the body slots have steps in them. This is common on some smaller bodies cameras and makes fitting the slot seals a little awkward. Its easy to pick up a twist in the seal as the seal runs round the angles so be careful when doing these.
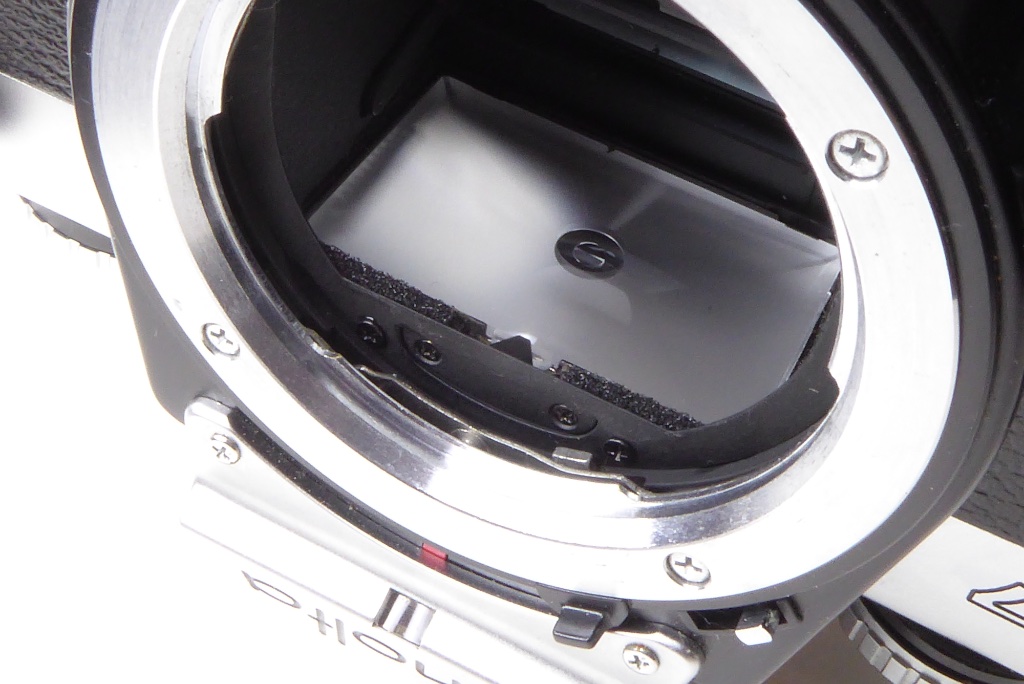
The XD mirror bumper is most often fitted in two halves of 1.5mm foam to allow the triangular focus screen retainer to be visible and removable. The triangular retainer needs to be free as part of the focus screen removal process. If you run mirror bumper foam over the triangular fitting the foam will be torn if you ever need to change focus screens. Some XD7s had a the foam strip running all the way across when they were built and at least two have seen have had felt applied in a single strip at the factory.
OLYMPUS OM-1
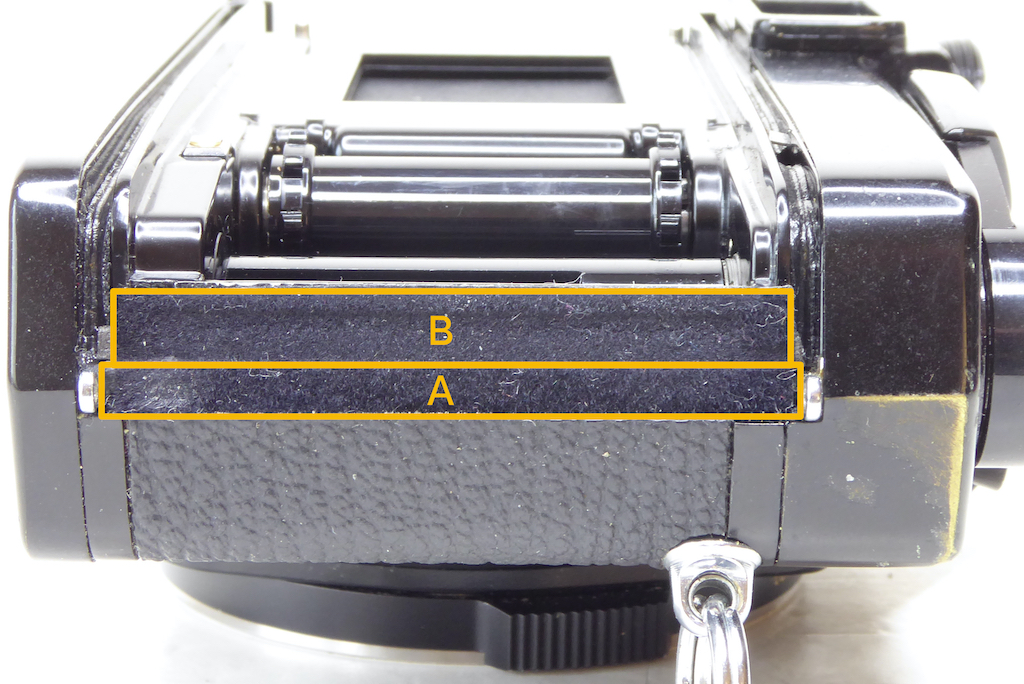
Guide to Replacing Light Seals in an Olympus OM-1
The slot seals are standard 1.5mm foam but the hinge seal needs special attention. The OM-1 is notorious for light leaks here. The hinge end light seal is comprised of three pieces.
The first piece (A) is 1.5 mm foam and it is set in place closest to the hinge (you will see if you remove the old seal there is a ‘step’ at the hinge end of the camera). This piece runs the full height of the hinge between the two hinge points. The second strip (B) is only 1mm thick and butts against the first strip and is slightly shorter stopping at the start of the body slots. The seals create a small .5mm step in the foam.
Once the two foam pieces are fully set and dried a felt strip cut to the size of the combined sizes of the two felt strips is applied over the top of the foam strips. The felt part should stop slightly short of the lip of the camera body. In the picture at the top edge of ‘B’ you can see the very edge of the camera body above the felt . This arrangement creates a nice light tight seal around the hinge.
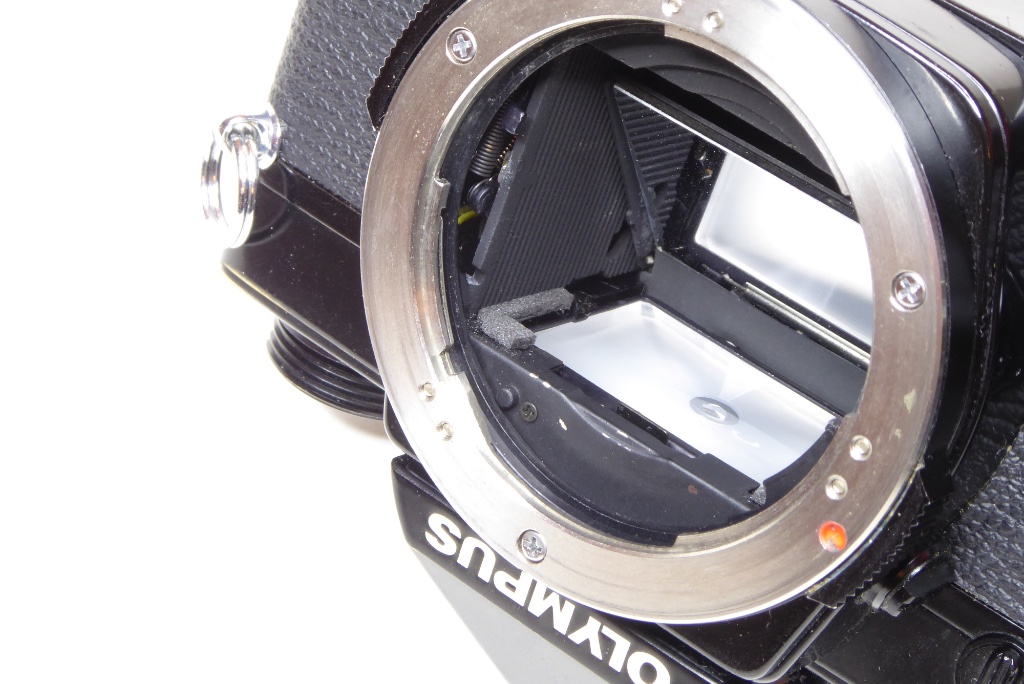
The mirror bumpers are also awkward with the OM-1, these are made from two blocks each side to create an ‘L’ shape and have to be fitted so that they do not foul the focus screen cradle when it’s released to change focus screens. Getting this right is fiddly work, so if your OM needs these allow plenty of time. The blocks are made from 1mm foam.
PENTAX KX/KM/K1000
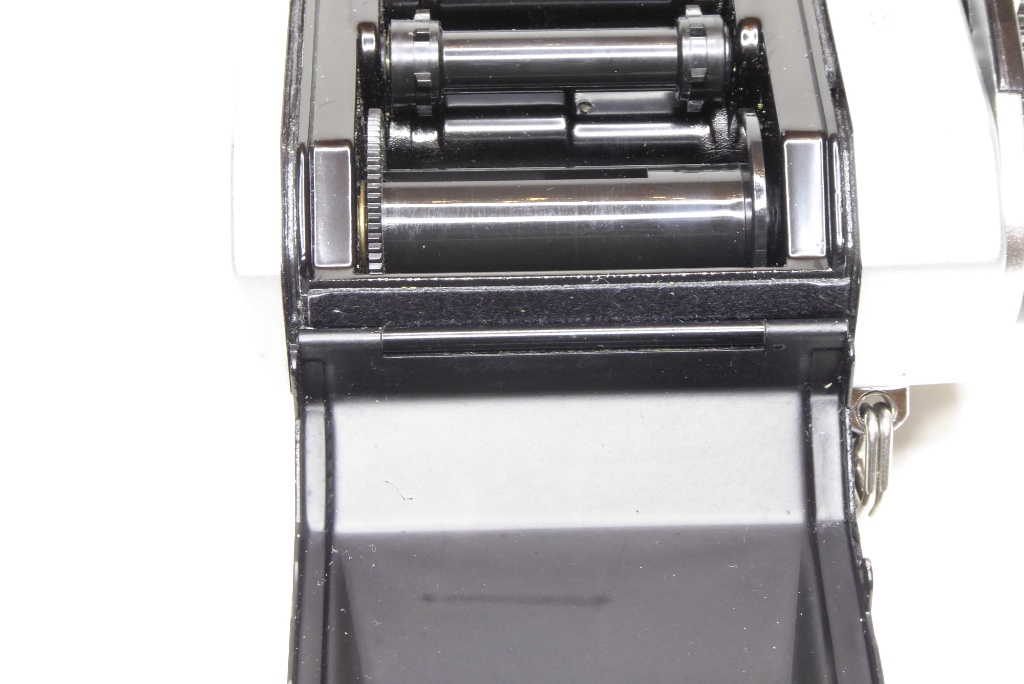
Guide to Replacing Light Seals in a Pentax KX/KM/K1000
The easiest of them all to do. The K series use standard 1 or 1.5mm foam in the camera door slots.
The hinge end seal is a fitted piece of felt as shown.
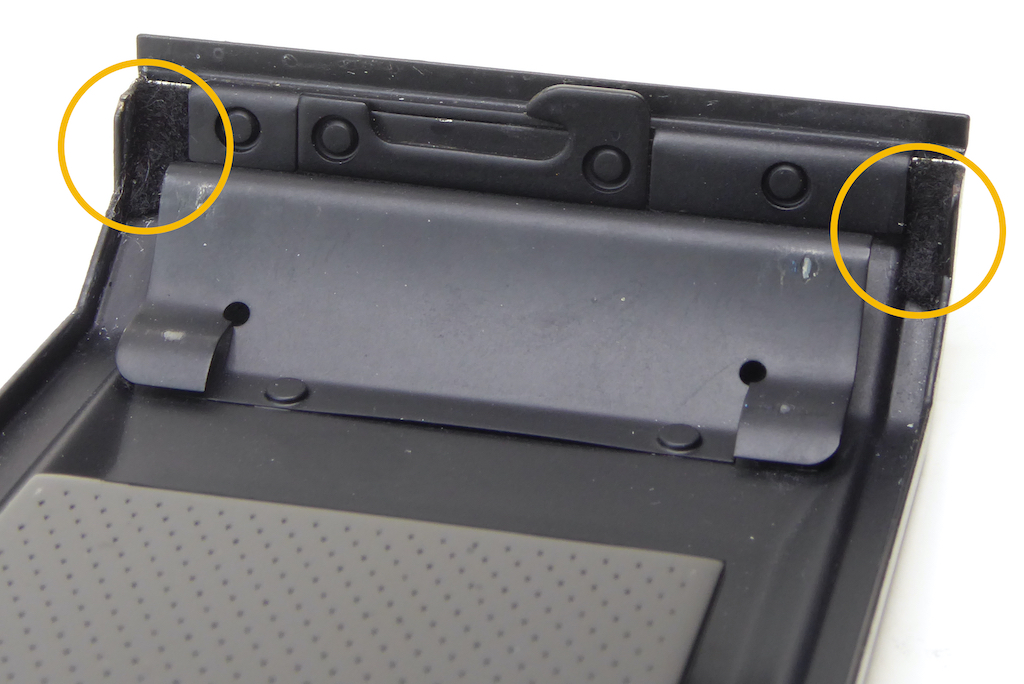
Watch out with Pentax for two small bits of felt that are normally installed at the very end of the door channels at the latch end. These almost never need replacing so if they look good then leave them alone.
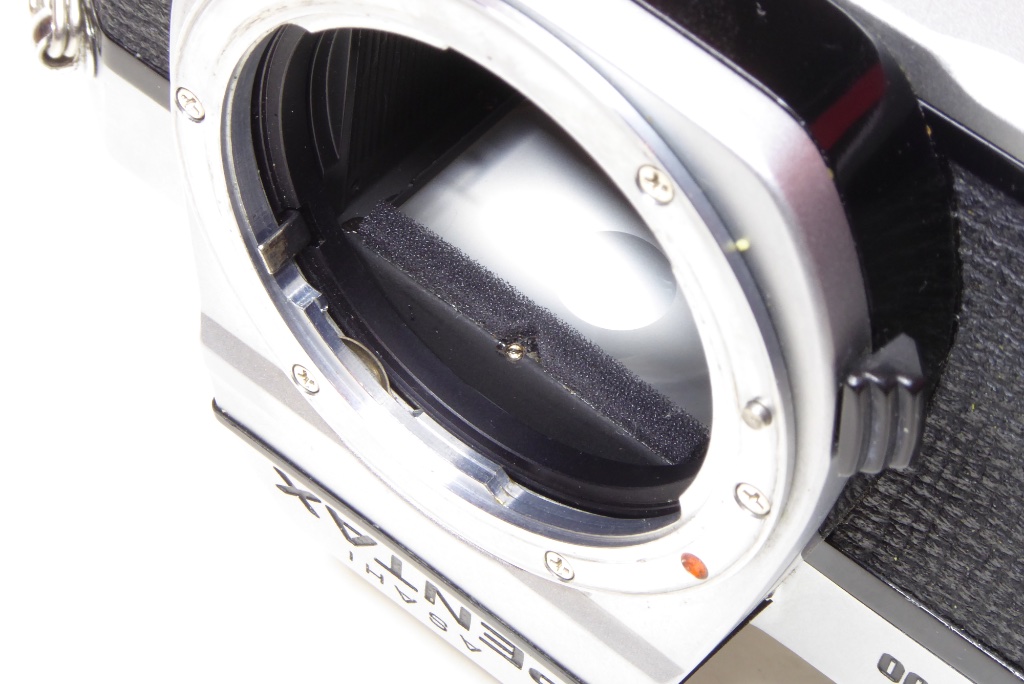
The Pentax mirror bumper is conventional. Most usually 2mm foam but note the small ‘V’ cut out which allows access to one of the adjustment screws. DO NOT MESS WITH THIS SCREW it controls the angle of the focus screen and should be left well alone.
CANON FTb
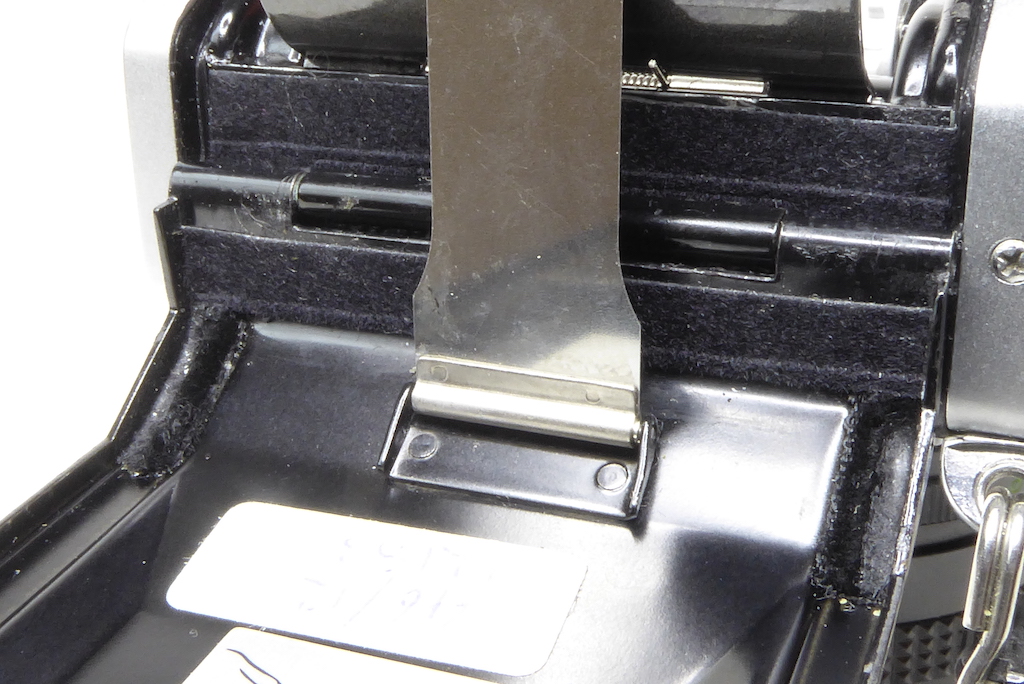
Guide to Replacing Light Seals in a Canon FTB
The Canon FTb is another awkward camera. The body slot seals are the standard 1.5mm thick foam but the hinge end is all made from felt. This is awkward to fit thanks to the Quick Loading (QL) mechanism being in the way. There is a felt body side hinge seal and a felt door side hinge seal. Two door channel seals in the door are also felt and run under the door side hinge seal. When you remove the old seals you will see there is an impression in the door which the channel seals should conform to. These run from just under the hinge seal to the flat back part of the door.
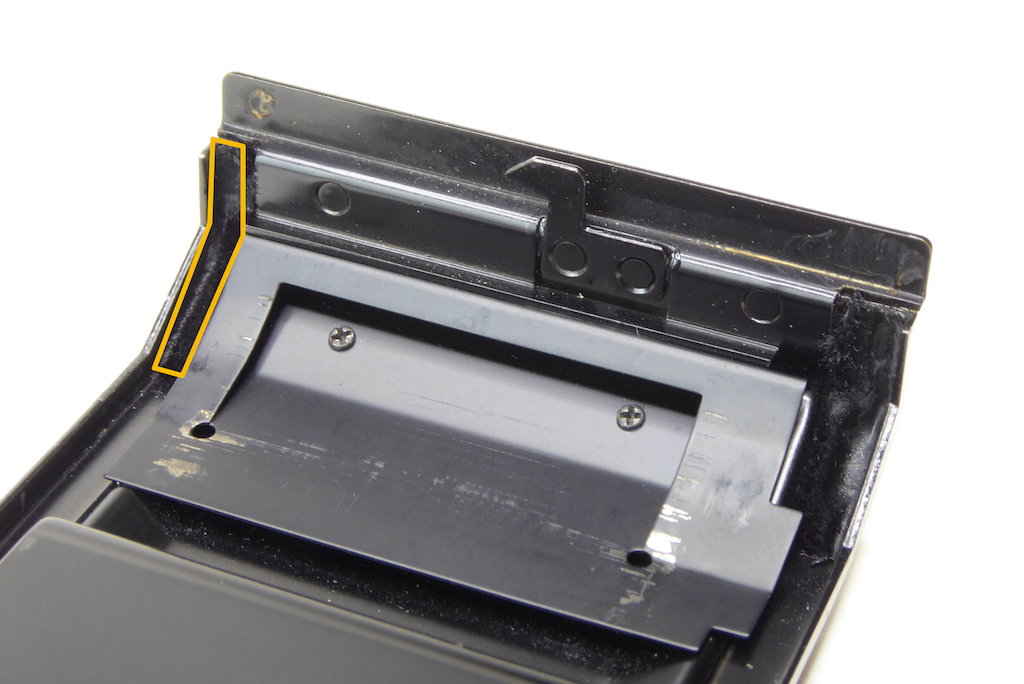
Similar to the Pentax K series the Canon FTb has small felt seals at the end of the channel at the latch end of the door. These are slightly longer than the Pentax K series arrangement and fit from the edge of the latch and run to the start of the flat back of the door. One of them is indicated in the picture.
MINOLTA X SERIES (300, 500, 700), XG & XG-M
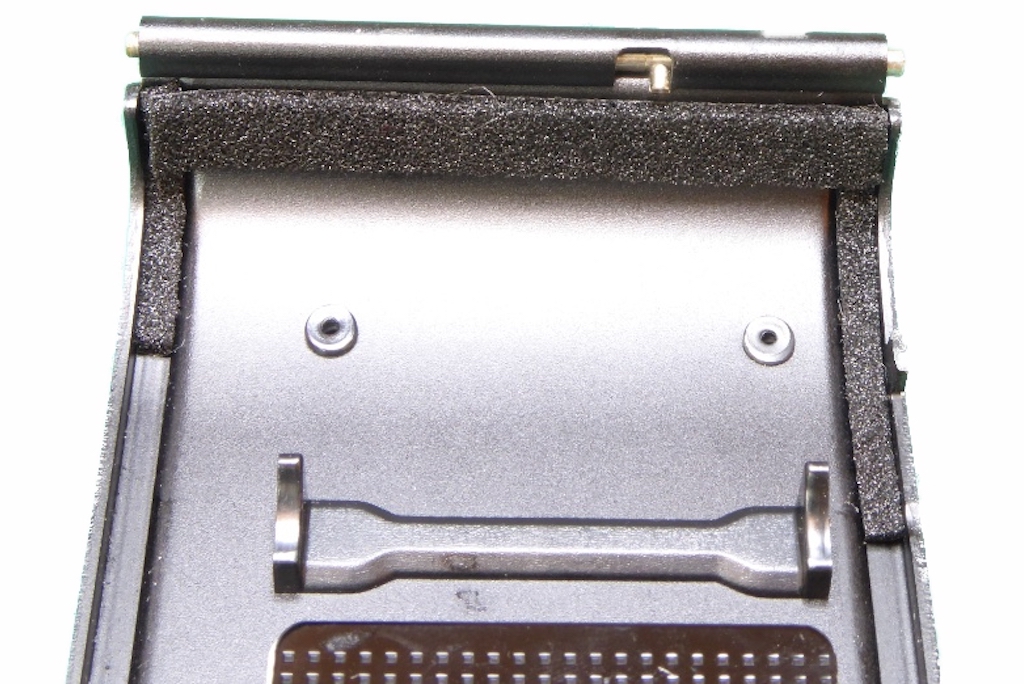
Guide to Replacing Light Seals in a Minolta X Series (300, 500, 700), XG & XG-M
Minolta constantly changed the light seals in the X series doors. Some of them have a short lower channel seal and longer upper channel seal, some have two short seals and some reportedly had no seals in the channels at all. Its generally best to replace like with like. If however you are dealing with a camera where its not possible to determine what was fitted my advice is go with the short lower channel seal and the long upper channel seal IF it’s an X-x00 series but go with two shorter seals if it’s from the XG series like the XG-M – based on cameras I have worked on this seems to be the most common arrangement. These seals are 1.5mm.
The only XG I have seen had only the vertical hinge side slot with no door channel seals. Mirror bumper as per all other Minolta X types.

XG and other X series also have a light seal under the sprung plate on the latch end of the door – the picture illustrates where this is located UNDER the sprung plate. This is typically 2mm foam and is applied to run from each end of the sprung plate. It’s around 5 mm wide and is butted up at between the sprung plate and the curve of the door.
This seal is almost always forgotten but is critical to stop crud from flaking into the camera.
Pentax MX
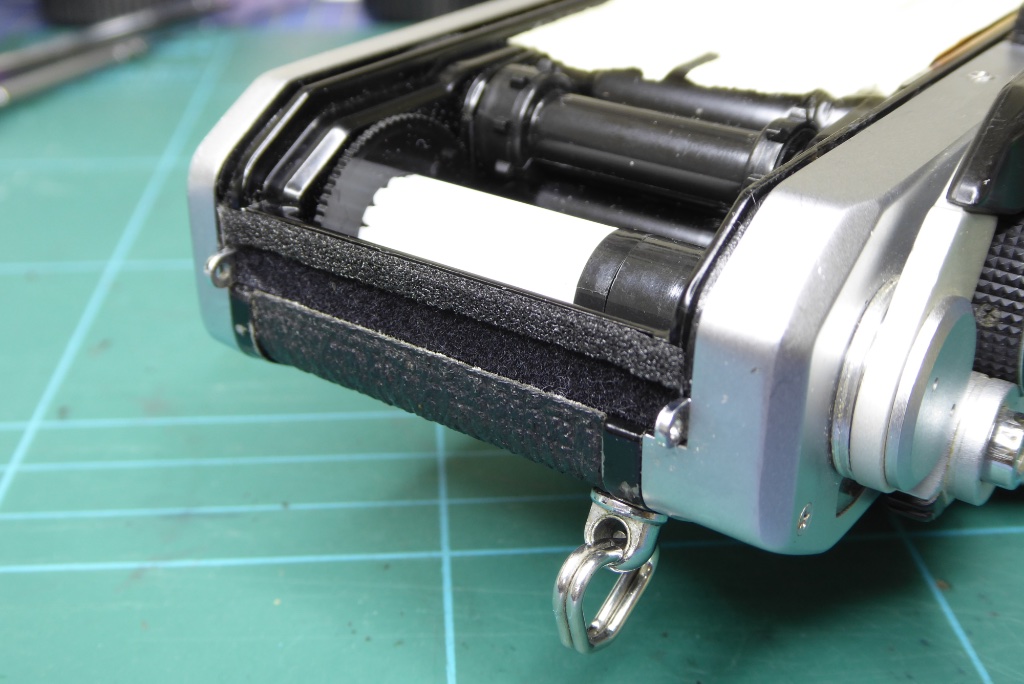
The Pentax MX is a tough one for replacing light seals. It’s quite a complex set of seals and mirror bumpers. The hinge end of the body has two seals in a stepped arrangement. The section that will be under the door hinge is made of felt and runs between the two hinge points. Butted next to it is a 1.5 strip of open-cell foam that runs from the lip of the camera to join with the felt and runs over the two slot seals in the body. The body slot seals are conventional 1.5mm open cell foam but are tricky to apply thanks to the bends in the slots and the fact the slots are slightly obscured by the top and bottom plates of the camera. Like most SLRs there is a small gap where the frame counter reset lever is located.
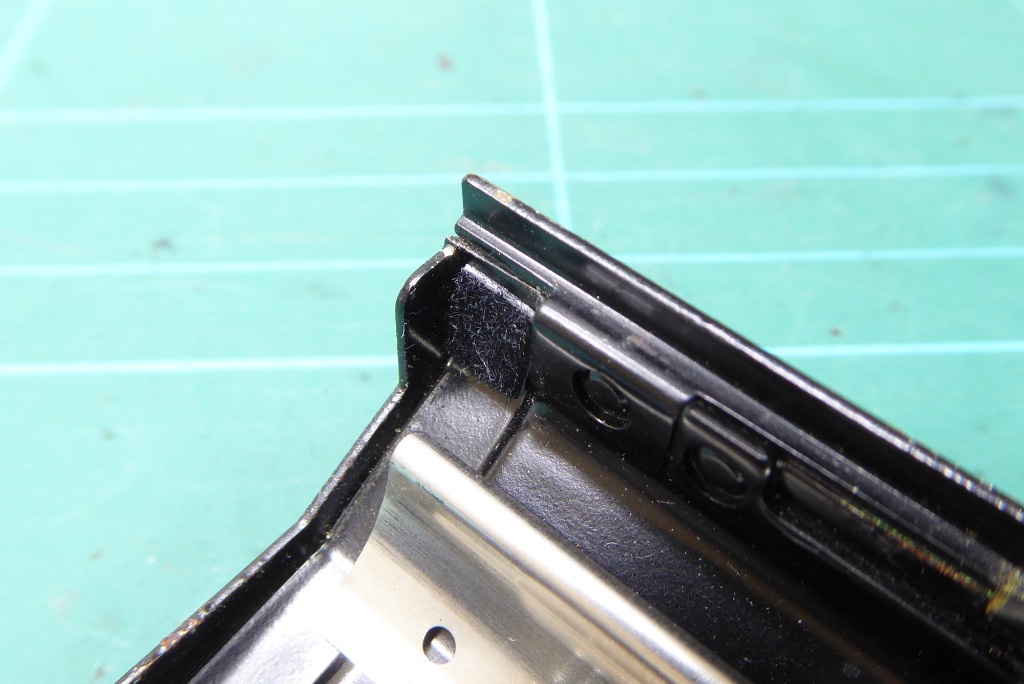
Like most Pentax SLRs the MX has two small felt seals at the catch end of the door. These are small and approximately 4mm square. Unless these have been damaged it is as well to leave these alone.
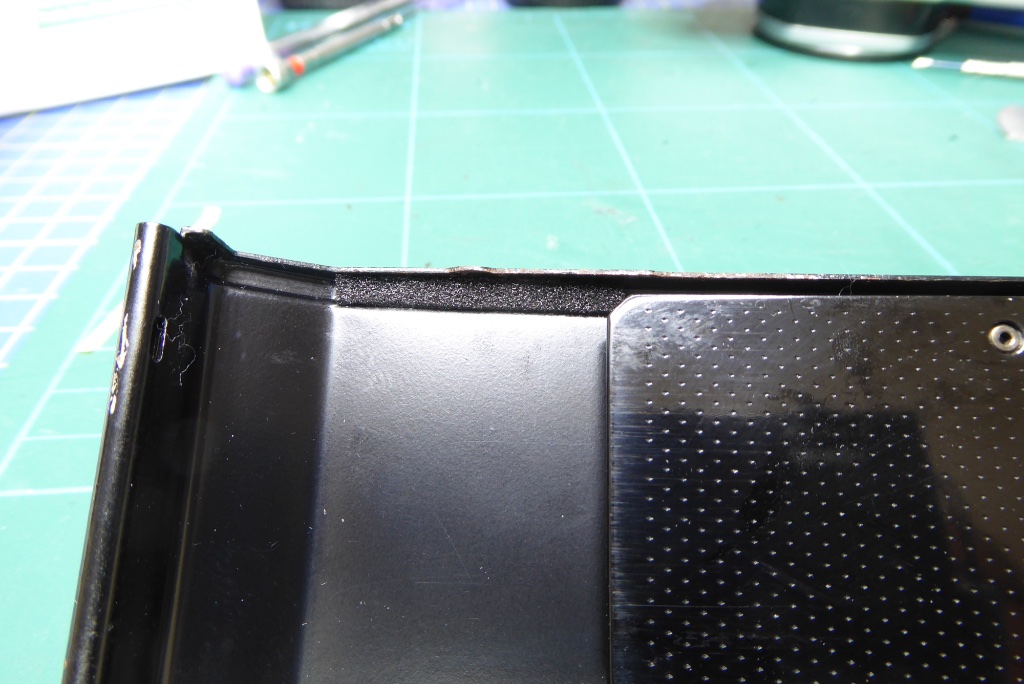
The door also has a strip of 1.5mm open-cell foam that runs along its top edge in the door channel which faces the frame counter reset lever in the body.
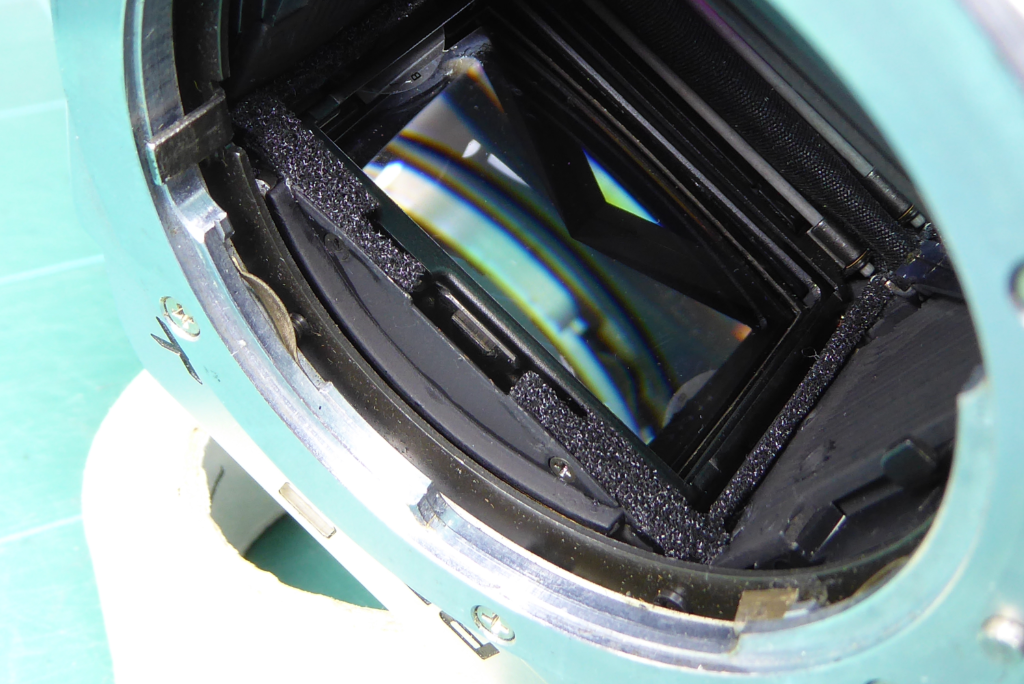
The mirror bumper in the MX is torturous and needs a huge amount of patience. The bumper is made of two very thin strips of 1.5mm foam that run front to back. These extend to the rear of the mirror cage and stop at the front edge where they join a separate bumper at the front. Exercise EXTREME care when removing the old ones as the shutter speed indicator extends into the space – this can easily be broken or melted by Isoprop Alcohol AND the cameras internals are open to this space so you need to be very careful not to let old seal foam get into these spaces. You have to remove the focus screen to do this and make sure after fitting that the side bumpers do not foul the focus screen holder when closing and opening it.
With the side bumpers installed you need to install two bumpers with cutouts as per the picture. These can be made of a single piece each if you are careful or can be assembled from two pieces.
Any questions relating to this guide to replacing lights seals or improvements? Please let us know in the comments below Mel
Further Reading

Mel is one of the driving forces behind High 5 Cameras and writes all our articles.
Starting serious photography back in 1972. Over the years she got to shoot film with most of the major brands in 35mm and large format as both a studio photographer and content provider for websites in the early life of the web. These days she is rediscovering photography and has become the GOTO person for knowledge on camera repair advice.


Excellent,in depth and mostly clever guide.
I have read almost every guide on the internet and saw most of youtube videos.
Just before i was wondering for some problems i found starting to replece seals to almost 100 cameras , of a friend collector, i saw your article.
The only thing i dont know is what type of glue exactly(brand and type for Greece) i can use, if i prefer to use non adhesive foam, just plain foam or may be cotton yarn…
In any case thank you!
Hi Dimitrios,
Firstly, many thanks for your kind words and the coffee you bought us. It will go towards the upkeep of the site and is much appreciated.
We have never used yarn in any of our repairs and always favour using what was originally provided by the manufacturer. The challenge with what glue to use is that if you ask 100 people what they use, you would get 100 different answers.
We know of people who do use yarn on site called learn camera repair which is a Facebook Group and I would ask your question there. It’s a great group to learn camera repair.
While we would never use yarn in our repairs it would be fascinating to learn what you find is the best adhesive in the end. Let us know and we will add it to the article and give you a mention.
Kind Regards
Mel
Hi thanks for the guide! Is there a specific felt you would recommend for use in replacing the Olympus OM-1 light seals?
Hi and thanks for visiting the site…
We normally use Japan Hobby foam for the foam parts of the light seals as this is closest to the original foam that was used when these cameras were produced.
Felt is a tricky one. We have bought felt from a range of sources and been unhappy with the overall quality. Normally we use a very high grade optical equipment felt but the supplier of this is now longer in business and we have yet to find a really suitable replacement.
However for the light seal felt on the Olympus OM1,2 and 4 bodies we find telescope light flocking material by protostar to be a good substitute. It’s normally sold in large quantities for the interior of telescope tubes but it is possible to obtain smaller sheets from places like eBay.
The key to the felt is it has to be black, non reflective and non-shedding. You don’t want particles floating around in the film chamber. Protostar flocking felt is designed with all of those things in mind.
Kind Regards
Mel & Claire
PS if you found our advise and article useful please consider buying us a coffee. It helps support the costs of running the site. Click the Button Below.
Thanks for the information! I’ll see what I can find for a reasonable price. Does the felt piece just lay on top of the foam pieces for the OM-1? I assume some sort of adhesive is used for that as well.
Hi, Yes the felt is fitted to the shape of the two underlying pieces of foam and stuck on top. You need a felt thats got a self stick backing rather than using a glue which could cause problems with the underlying foam. The foam strips are different lengths to accommodate the hinge pieces of the camera so you end up with a felt rectangle with some small cuts outs at each end.
This is not how the camera was originally supplied BUT OM cameras are notorious for light leaks around the hinge area. This will completely resolve fix any potential issues and is not harmful to the camera. Some people will just put a thick block of foam but this puts pressure on the cameras hinges and latches and can cause worse problems. This is a solution which will last a long time, looks good and is kind to the camera.
Protostar flocking is ideal because the glue it uses doesn’t harm the foam and is also VERY sticky so make sure its damped down a lot when you position it. After 20 minutes the moisture will dry out and the glue will grip on very tight.
Thanks for the coffees – it all goes to help fund the site running costs.
what type of felt would you use for the FTb, also what size in mm. Can you just use the foam seals.
We think you are referring to the door side hinge for this. We usually use a good photographic quality felt. Our stock is quite limited on tis but if we were buying again we would use japan Hobby Tools flocking material. You basically need a good quality felt thats reasonably dark and fluffy with a a non-shedding fibre.
Great guide, especially the practical tips. I am working on a Pentax MX, I removed the focusing screen and replaced it with a rectangle of hard cardboard to protect the pentaprism and the timing indicator. It seems to be working.
The MX is quite lovely – we had to make a hard decision and sell the one we had and frankly we have been regretting it ever since. Sighs – when you refurb and sell unfortunately you cant keep everything.